Making menu settings, Ee “making, A remove the top panel – Teac DR-10C User Manual
Page 17: B disconnect the connector, C attach the top panel, D set the switch according to the manufacturer, E apply the switch setting label (ak-dr10cr only), F model setting
TASCAM DR-10C
17
$.'5&5
IRU621<5$06$
$.'5&+
IRU6+85(
D
E
F
F
G
H
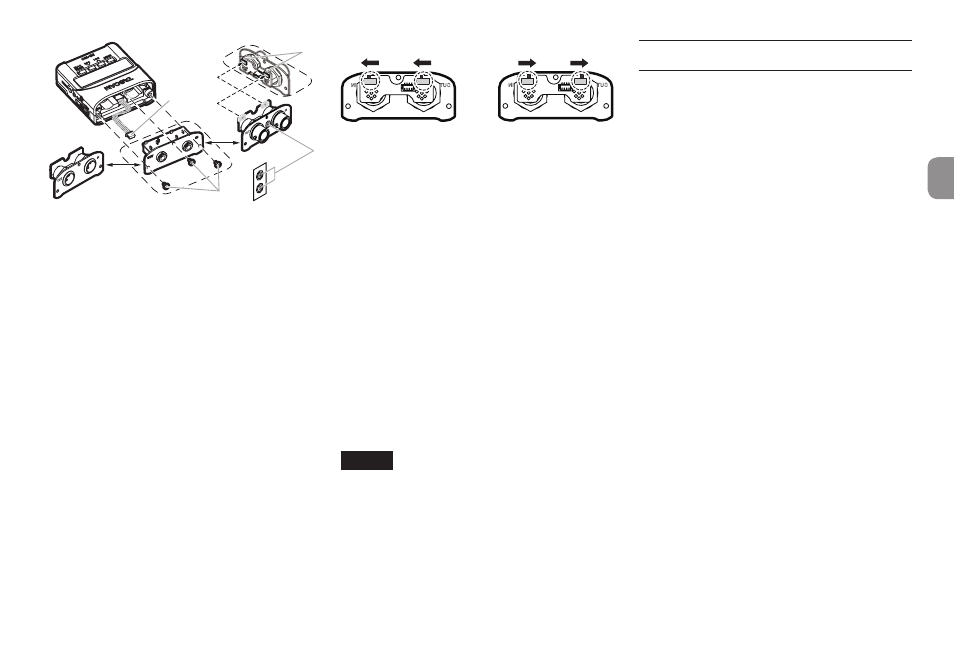
a Remove the top panel
Use a flat-bladed screwdriver to remove the 3
attachment screws. After removing the screws,
pull the top panel out slowly.
b Disconnect the connector
The top panel and the rest of the unit are
connected by a connector. Hold the top panel
with one hand and the rest of the unit with the
other hand and use a finger to disconnect the
protruding end of the connector.
c Attach the top panel
Confirm that the orientation of the connector
is correct and insert it fully into the connector
receptacle on the replacement top panel. (If
something seems wrong when inserting the
connector, check its orientation.)
d Set the switch according to the
manufacturer
If replacing the top panel with the AK-DR10CR, set
the switch on the circuit board on the back of the
top panel as follows according to the manufac-
turer of the mic being used.
for SONY
for RAMSA
Next, use the screws removed in step a to secure
the replacement top panel.
Be careful not to tighten the screws too much.
Confirm that the screws are not loose or
protruding after connection.
e Apply the switch setting label
(AK-DR10CR only)
After completing top panel replacement, attach
the included label to the front of the top panel
to show for which manufacturer the switch is set.
(SONY: S, RAMSA: R)
f Model setting
Set the
MODEL SELECT
item on the Menu
Screen as follows.
i AK-DR10CH:
SHURE
i AK-DR10CR:
RAMSA
for RAMSA
SONY
for SONY
NOTE
Be careful not to lose the screws when they are
removed.
If you should accidentally lose a screw, a
spare screw that can be used is included in the
shipping box.
Making menu settings
Follow these procedures to change various unit
settings.
1. When the Home Screen is open, press the
MENU button to open the Menu Screen.
2. Use the . [j] and / [k] buttons to
select the menu item to set and press the
7’9
[ENTER] button to show the setting
item.
3. Use the . [j] and / [k] buttons to
change the setting.
4. Press the 7’9 [ENTER] button to confirm
the setting and return to the Menu Screen.
5. Repeat steps 2 to 4 as necessary to set each
item.
6. When finished, press the MENU button to
return to the Home Screen.