Displaying the inputs, Calibration – Greenheck Kitchen Fan Control Center (475730) User Manual
Page 13
13
Kitchen Fan Control Center
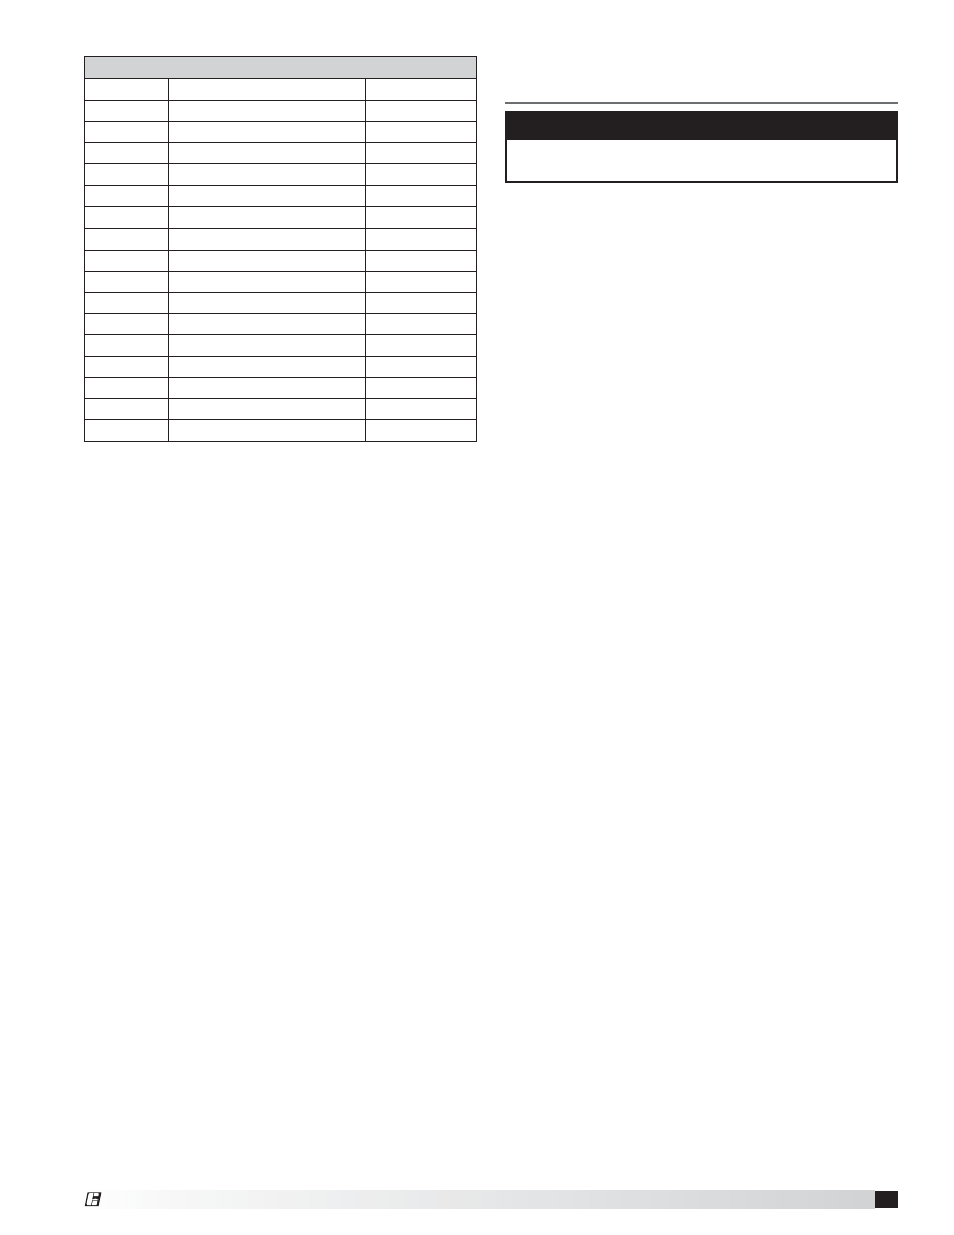
Factory Selected Parameters
Parameter
Description
Factory Setting
St1
Set Point 1
95
St2
Set Point 2
95
cO
Operating Mode
1
P1
Set Point Differential
5.0
P2
Set Point Differential
5.0
P3
Dead Zone Differential
0
c6
Delay between two outputs
0
c9
Minimum relay on time
5
c10
Probe alarm output status 1
1
d10
Probe alarm output status 2
1
c11
Output Rotation
4
c13
Probe Type
3
P14
Probe 1 Calibration
0
P15
Probe 2 Calibration
0
c18
Unit of Measure
1
c19*
Function of probe 2
0 or 7
*Parameter c19 is factory set at 0. If controller is connected to two
sensors, then the parameter is factory set at 7.
Displaying the Inputs
1. Press
T. The current input will be displayed,
alternating with the value:
b1 : probe 1
b2 : probe 2
di1 : digital input 1
di2 : digital input 2
St1 : set point 1
St2 : set point 2
2. Press
S or T to select the input to be displayed.
3. Press
Set for three seconds to confirm.
Thermostat Style Temperature
Interlock Configuration
NOTE
This section only applicable if the KFCC is configured
with thermostat style temperature interlock.
Calibration
Thermostat(s) will be preset by factory to 95°F and will
have slow make and break contact. It will make contact
on a temperature rise and break contact on temperature
fall. The temperature set point may have to be adjusted
slightly depending of both ambient and cooking
conditions. The adjustment knob is located on the back
of the thermostat. Use a small blade screwdriver to
make the adjustments.
1. Turn counterclockwise to increase the temperature
set point, turn clockwise to decrease the temperature
set point.
2. Quarter revolution in either direction corresponds
to a 22.5°F adjustment. Be sure to make small
adjustments, about 1/16 of a turn (≈6°F) or less at one
time.
3. Do not exceed more than one-half revolution in either
direction.
4. Check system operation before making additional
adjustments.
®