Safety precautions, Control reference guide, Maintenance – Denon DVD-1600 User Manual
Page 6: Placement, Voltage, Ac mains lead protection, Foreign matter, Service, 1no p q ? 4 c @ m a b 3 2 il
6
ENGLISH
Control reference guide
Page
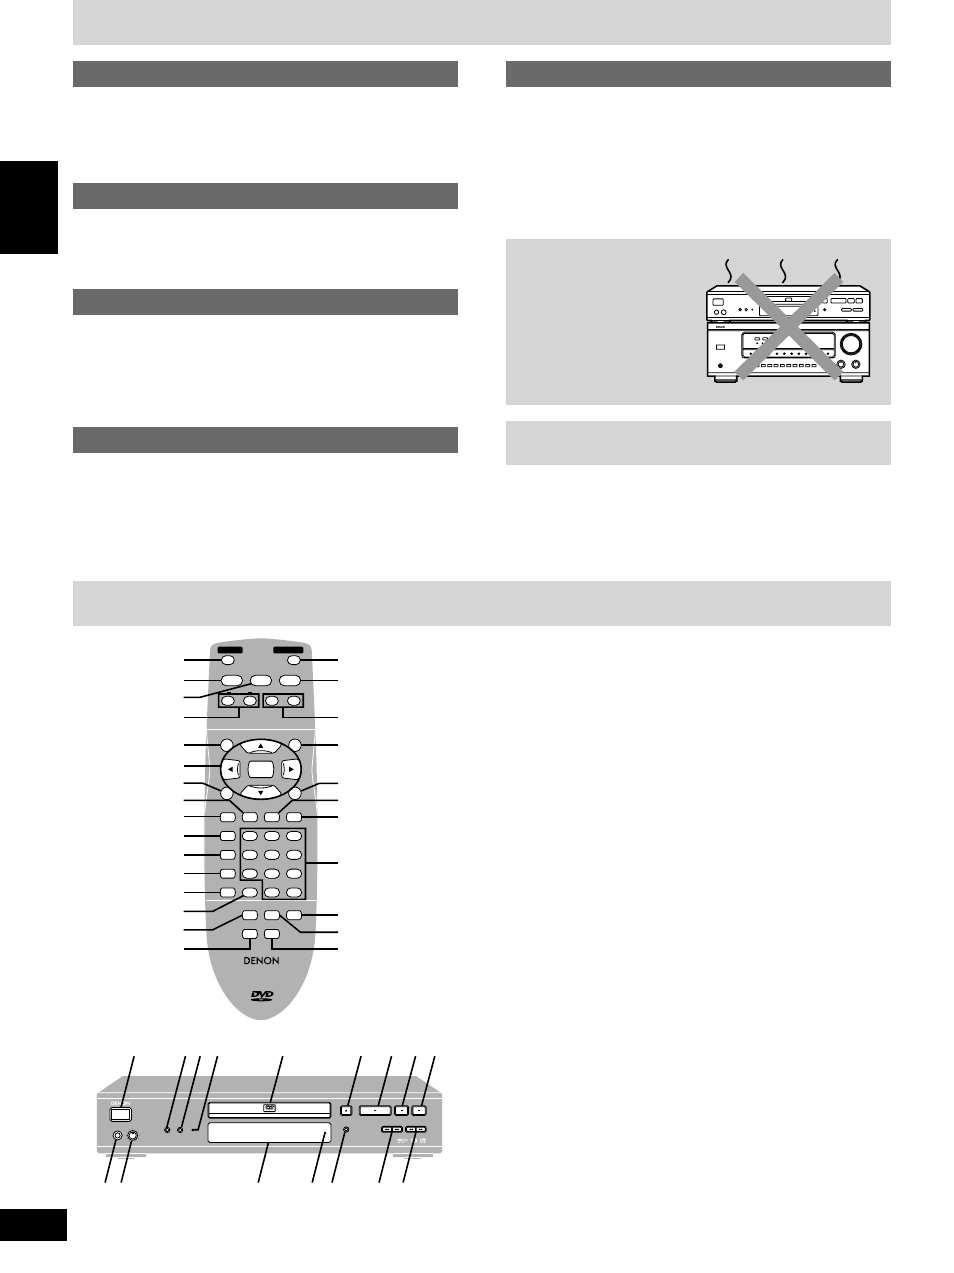
1
On/standby switch (POWER) ................................................. 5
Press to switch the unit from on to standby mode or vice versa. In
standby mode, the unit is still consuming a small amount of power.
2
Stop button (
∫
STOP) ............................................................ 8
3
Still/Pause button (
;
STILL/PAUSE) .................................... 8
4
Skip buttons (
:
,
9
SKIP) .............................................. 9
5
Top menu button (TOP MENU) .............................................. 8
6
Cursor buttons (
3
,
4
,
2
,
1
)/Enter button (ENTER) .......... 5
7
Display button (DISPLAY) ..................................................... 14
8
Subtitle button (SUBTITLE) .................................................. 13
9
Play mode button (PLAY MODE) .......................................... 11
:
Repeat mode button (REPEAT MODE) ................................ 12
;
A-B repeat button (A-B REPEAT) ......................................... 12
<
Cinema button (CINEMA) ...................................................... 10
=
Setup button (SET UP) ...................................................... 5, 19
>
Clear button (CLEAR) ............................................................. 9
?
Group button (GROUP) .......................................................... 9
@
Headphone V.S.S. button (HP-V.S.S.) .................................. 10
A
Open/Close button (OPEN/CLOSE) ...................................... 8
B
Play button (
1
PLAY) ............................................................ 8
C
Slow/Search buttons (
6
,
5
SLOW/SEARCH) ............... 9
D
Menu button (MENU) .............................................................. 8
E
Return button (RETURN) ....................................................... 5
F
Audio button (AUDIO) ........................................................... 13
G
Angle button (ANGLE) .......................................................... 13
H
Numbered buttons (1 – 9, 0,
S
10) .......................................... 8
I
Audio only button (AUDIO ONLY) ........................................ 10
J
Page button (PAGE) .............................................................. 10
K
Speaker V.S.S. button (SP-V.S.S.) ........................................ 10
L
Audio only indicator
M
Disc tray .................................................................................. 8
N
Headphone jack ..................................................................... 10
O
Headphone level control (PHONES LEVEL) ........................ 10
P
FL Display
Q
Standby indicator (STANDBY)
When the unit is connected to the AC mains supply, this indicator
lights up in standby mode and goes out when the unit is turned on.
Placement
Set the unit up on an even surface away from direct sunlight, high
temperatures, high humidity, and excessive vibration. These condi-
tions can damage the cabinet and other components, thereby short-
ening the unit’s service life.
Do not place heavy items on the unit.
Voltage
Do not use high voltage power sources. This can overload the unit
and cause a fire.
Do not use a DC power source. Check the source carefully when
setting the unit up on a ship or other place where DC is used.
AC mains lead protection
Ensure the AC mains lead is connected correctly and not dam-
aged. Poor connection and lead damage can cause fire or electric
shock. Do not pull, bend, or place heavy items on the lead.
Grasp the plug firmly when unplugging the lead. Pulling the AC
mains lead can cause electric shock.
Do not handle the plug with wet hands. This can cause electric shock.
Foreign matter
Do not let metal objects fall inside the unit. This can cause electric
shock or malfunction.
Do not let liquids get into the unit. This can cause electric shock or
malfunction. If this occurs, immediately disconnect the unit from the
power supply and contact your dealer.
Do not spray insecticides onto or into the unit. They contain flam-
mable gases which can ignite if sprayed into the unit.
Service
Do not attempt to repair this unit by yourself. If sound is interrupt-
ed, indicators fail to light, smoke appears, or any other problem that
is not covered in these instructions occurs, disconnect the AC mains
lead and contact your dealer or an authorized service center. Electric
shock or damage to the unit can occur if the unit is repaired, disas-
sembled or reconstructed by unqualified persons.
Extend operating life by disconnecting the unit from the power
source if it is not to be used for a long time.
Maintenance
To clean this unit, wipe with a soft, dry cloth.
≥
Never use alcohol, paint thinner or benzine to clean this unit.
≥
Before using chemically treated cloth, read the instructions that
came with the cloth carefully.
Do not place the unit on
amplifiers or equipment
that may become hot.
The heat can damage the
unit.
Buttons such as
2
function the same as the controls on the remote
control.
ENTER
POWER
STOP STILL / PAUSE
PLAY
OPEN/CLOSE
SKIP
TOP MENU
MENU
DISPLAY
RETURN
GROUP
PAGE AUDIO ONLY
HP-V.S.S. SP-V.S.S.
6
:
9
5
∫
;
SLOW / SEARCH
PLAY MODE SUBTITLE AUDIO
ANGLE
1
2
3
A-B REPEAT
4
5
6
7
8
9
SET UP CLEAR
0
S
10
CINEMA
REPEAT MODE
1
REMOTE CONTROL UNIT
RC-551
AUDIO/VIDEO
1
A
B
D
G
H
I
J
K
E
F
C
4
@
2
5
6
9
:
;
<
=
7
>
?
8
3
PCM AUDIO TECHNOLOGY / DVD AUDIO / VIDEO PLAYER
DVD-1600
STANDBY
GROUP
OPEN/CLOSE
PLAY
SKIP
SLOW / SEARCH
STILL / PAUSE
STOP
PHONES
PHONES LEVEL
HP V.S.S.
192kHz / 24bit DVD Audio
AUDIO ONLY
MIN
MAX
AUDIO/VIDEO
ON / STANDBY
REMOTE SENSOR
1
NO
P
Q ?
4 C
@
M
A B 3 2
IL
Safety precautions