Woodhaven 7660: Large Half-Blind Router Table Dovetail Jig w/Bit User Manual
Page 4
4
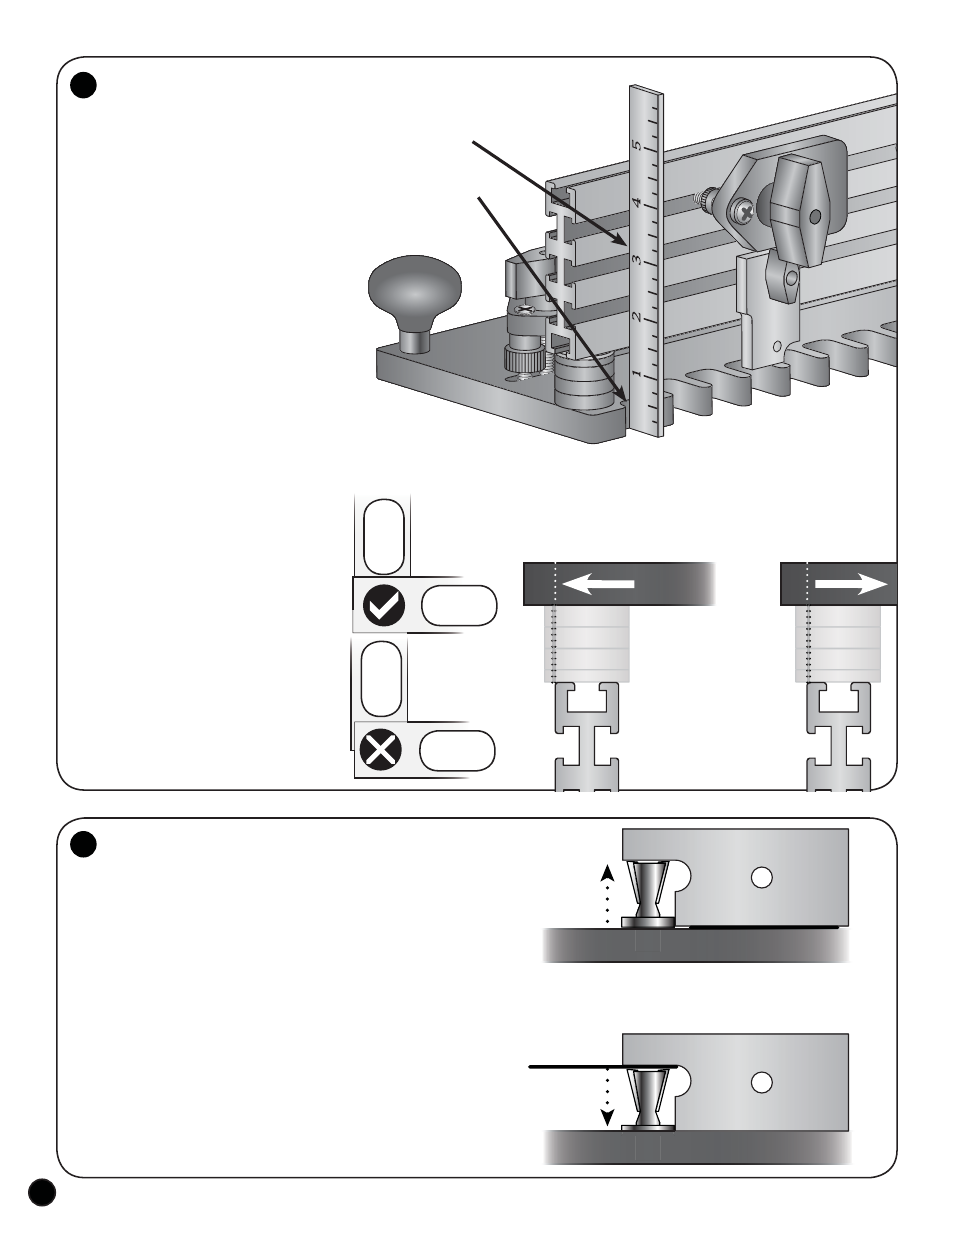
Move Template back to
increase the amount the
drawer front/back will
stick out past the side.
Move Template forward
to decrease the amount
the drawer front/back will
stick out past the side.
Face of Ultra
Track pre-set
fl ush to edge
of Setup Notch
near each end
of Template
Joint Fit - Front to Side:
The end of the drawer front/back
should be flush to the drawer side, or stick
out past it no more than l/64" (.015"), so the end
of the drawer front/back can be easily sanded/
routed flush to the drawer side after assembly.
There are two setup notches in the Template, the
edges of which are pre-set flush with the Ultra
Track to provide an overhang of about .005".
After making a test cut, the overhang amount
may need to be adjusted by moving the Template.
Clamp the Ultra Track in a vise (slide
Clamps off Ultra Track if necessary) and,
using a 7/16” socket wrench, slightly loosen
the two bolts holding the Template to the Ultra
Track. Make small & equal adjustments at
each end of the Template. An adjustment of
just .004" in the Template position doubles
to .008" on the actual drawer front/back
overhang. Use a feeler gauge or scraps of copy
paper (about .004" thick) to help measure
the adjustment in the Template position.
To Decrease the Drawer Front/Back
Overhang: Rest the edge of a 6" ruler on the
Ultra Track, with part of the blade resting on
the setup notch of the Template. Place one or
two pieces of copy paper (.004 -.008") between
the edge of the ruler and the Ultra Track, then
move the Template forward until the edge
of the blade rests evenly on both the Ultra
Track and edge of the setup notch again.
To Increase the Drawer Front/Back
Overhang: Rest the edge of a 6" ruler on the
Ultra Track, with part of the blade resting on
the setup notch of the Template. Place one or
two narrow pieces of copy paper (.004 -.008")
between the blade edge and the edge of the setup
notch, then move the Template back until the
edge of the blade rests evenly on both the Ultra
Track and the edge of the setup notch again.
Joint Fit - Tightness:
The PINS/TAILS (cut in the drawer side) should
slide into the SOCKETS (cut in the drawer front/back)
with hand pressure, or a light tapping at most. The bit height
was initially set in Step 2 of the instructions but, after test
cutting, you may need to readjust the bit height slightly.
Use one or two pieces of paper (.004 to .008"
thick) to help gauge the amount of adjustment.
To tighten the joint, adjust the bit higher than 25/32"
by placing the pieces of paper under the edge of the 7650B
Bit Gauge as it rests on the router plate.
To loosen the joint, adjust the bit lower than 25/32" by
placing the pieces of paper between the edge of the 7650B
that the end of the bit indexes against and the end of the bit.
©Copyright WOODHAVEN INC. 7/11/14
(800) 344-6657 or WWW.WOODHAVEN.COM
7
8
Paper beneath
Bit Gauge
Paper above
Router Bit
TIGHTEN JOINT:
RAISE BIT
LOOSEN JOINT:
LOWER BIT
Side should
not stick out
past the front
Front should
stick out
past the side
1/64” or less
Drawer
Front
Drawer
Front
Dr
aw
er
Side
Dr
aw
er
Side
7650B
7650B