Caution, C. battery removal and replacement, Warning – Troy-Bilt 12069-7HP User Manual
Page 59: A warning
Attention! The text in this document has been recognized automatically. To view the original document, you can use the "Original mode".
1. Remove the battery from the
tiller (see “Battery Removal” in
structions on this page) and place
on a stable, level surface.
2. Clean the battery if needed. If
the battery is very cold, let it warm
up to between 60-to-80°F.
3. Remove filler caps. Keep them
off when filling and charging.
4. Carefully check the electrolyte
level. If low, add distilled or dem
ineralized water (do not add bat
tery acid) to bring the solution
level in each cell up to the correct
height. Avoid overfilling.
5. Charge the battery (with caps
removed) until all cells are gassing
freely. (To check for gassing, wear
protective goggles and inspect
each cell with a flashlight for bub
bling of the electrolyte solution.)
Use one of the following methods
to charge the battery:
a) Recommended Method: charge
the battery at a rate of l-to-2
amperes until cells are gassing
freely. Do not exceed 24 hours
charging time.
b) First Alternative Method: charge
battery at 4-to-6 amperes until
cells gas freely. Do not exceed
8 hours charging time.
c) Second Alternative Method:
charge the battery at a rate of 6-
to-12 amperes until cells gas
freely. Do not exceed 4 hours
charging time.
^ CAUTION
Do not charge the battery at a
rate higher than 12 amperes.
A charge rate greater than
this generates excessive heat
and gassing, and wiil perma
nently damage the battery.
6. When battery is fully charged,
turn charging equipment off and
disconnect the cables. Check elec
trolyte level in all cells. Add dis
tilled or demineralized water if
necessary to adjust level to the cor
rect height. Then reconnect the
charger cables to the battery and
charge the battery for one more
hour.
7. Replace the filler caps and wash
off any spilled electrolyte with a
baking soda and water solution.
8. Store the battery in a cool, dry
location. Avoid freezing tempera
tures. Batteries lose voltage when
in storage, more so in hot weather
than in cold. Ideal storage temper
ature is 50‘’F.
C. Battery Removal
and Replacement
WARNING
To help avoid personal injury,
stop the engine, wait for all
moving parts to come to a
complete stop, remove the
electric start key, disconnect
the spark plug wire and move
wire away from spark plug,
and let the engine and muf
fler cool before removing or
replacing the battery.
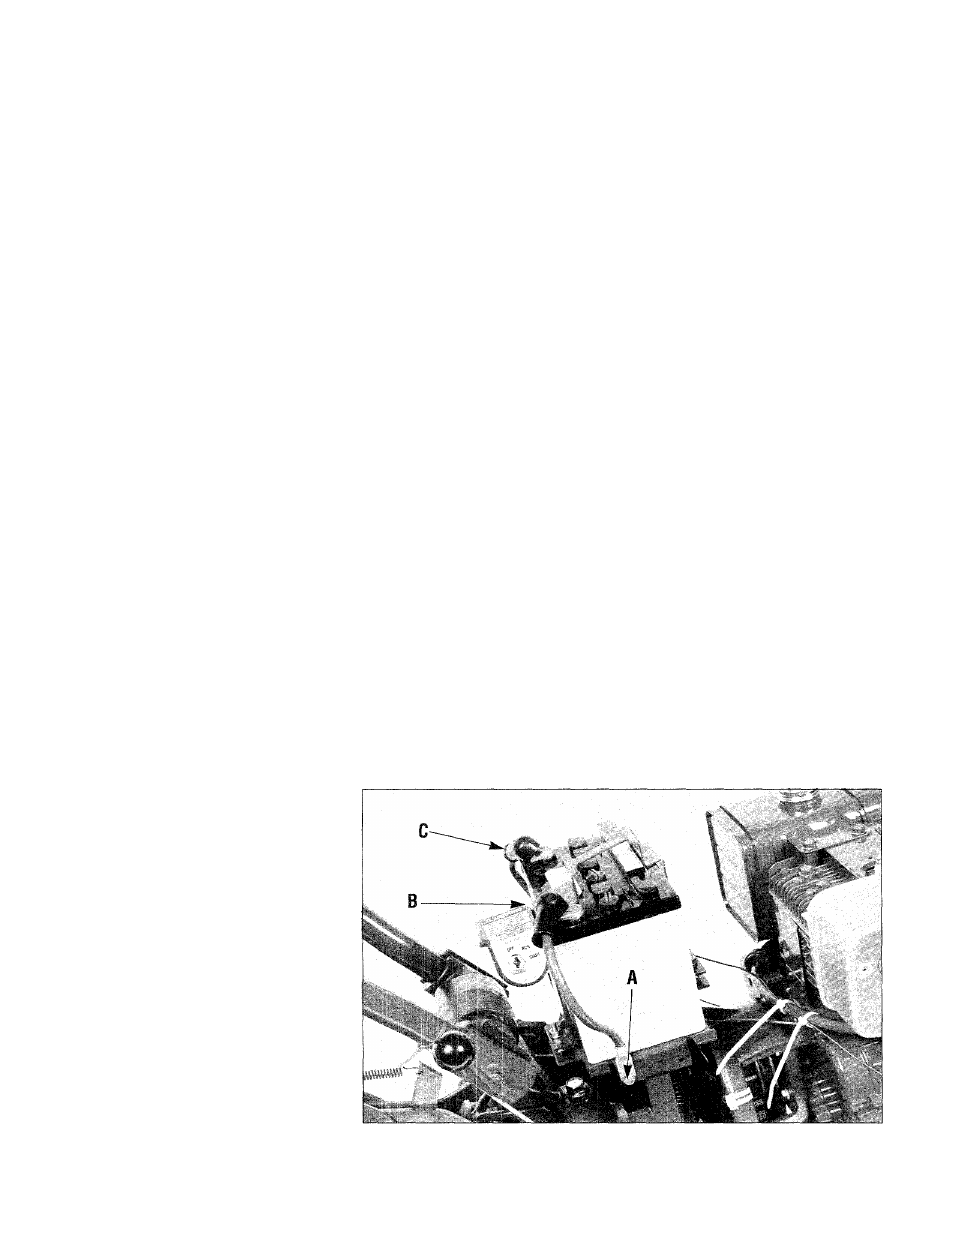
1. Disconnect the negative (-)
cable from the grounding screw on
the right side of the battery bracket
(A, Photo 5-44) and bend the cable
away from all metal parts.
2. Disconnect the negative cable
from the negative (-) battery post
(B, Photo 5-44), and remove cable.
3. Disconnect positive (-t) cable
from positive battery post (C,
Photo 5-44) and bend it safely
away from metal parts. Cover
cable terminal with rubber boot.
4. Remove the battery holddown
clamp and remove the battery.
5. Reverse the previous steps to
replace the battery. The battery
posts must face the rear of the
tiller. (The positive post must be
on the left side as you face forward
from the handlebars.)
6. Insert the vent tube (on positive
side of battery) into the vent tube
shield. Be sure it is not crimped,
pinched or folded along its length.
A
WARNING
When removing the battery,
always disconnect the nega
tive (-) cable first followed by
the positive (+) cable. Re
verse this procedure when re
installing the battery.
Photo 5-44: Follow battery removal and replacement instructions carefully.
59