Maintenance accessories – Poulan 195 User Manual
Page 14
Attention! The text in this document has been recognized automatically. To view the original document, you can use the "Original mode".
A WARNING
AU three catches must be fastened and the lock
tab latched onto the Lock Ring. If installed in
correctly, the Lock Ring can fly off and become a
dangerous missile._______________
h.
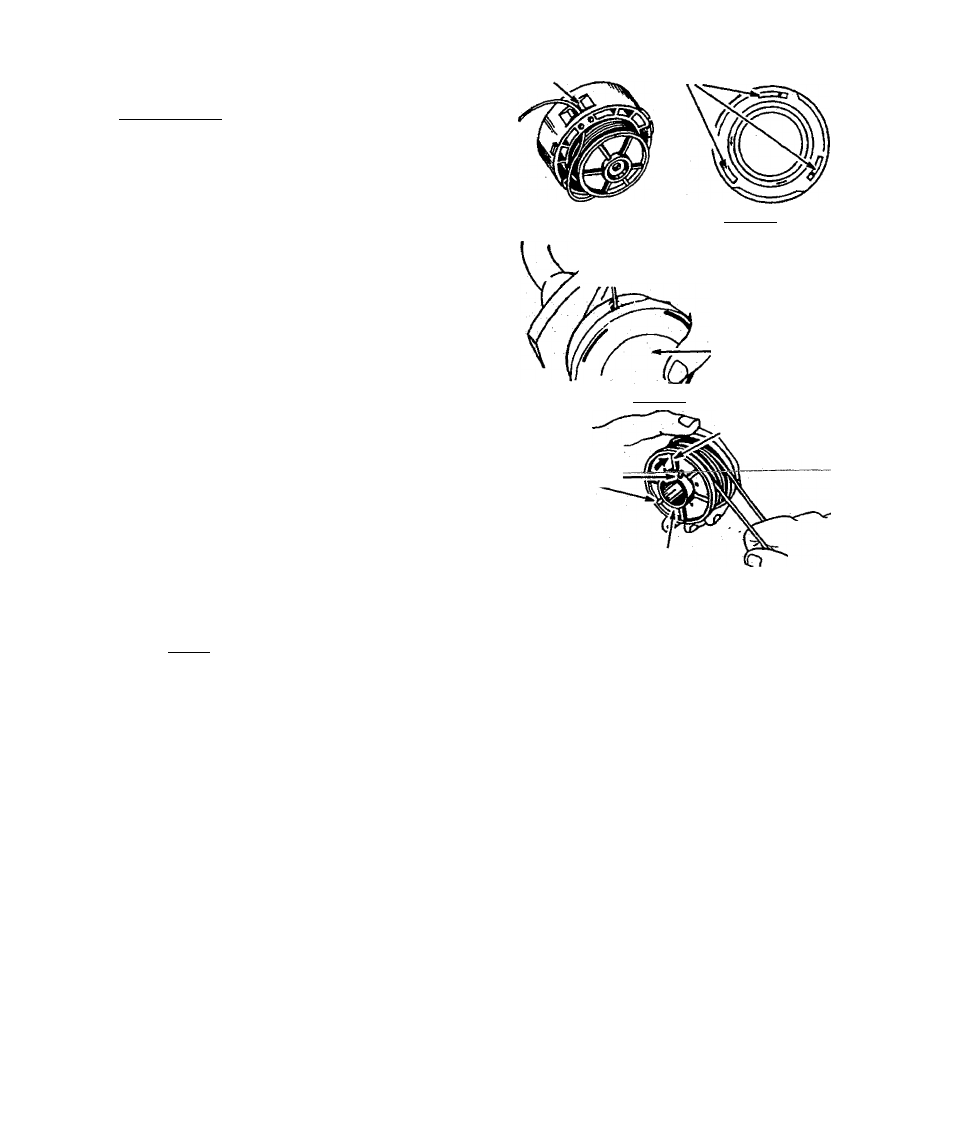
Check to make sure all three catches (Fig
ure 16 ) and the lock tab (Figure 17 ) are prop
erly fastened. Figure 18. Then test the Lock
ring by trying to turn it cormterdockwise.
Pull on line to change the spool from the locked
position to the operating position. Figme l9,
i. Obtain correct line length (4”) by pressing tap
button and pulling line again, figure 19 .
2. installing Line on Spool
a. To replace the Line on existing Spool:
1. ) Follow “Installing Spool w/Ime,” steps
“a.—d,” and remove any line remaining on
the spool,
2. ) Use two 20 foot lengths of POULAN PRO
,080” line.
3. ) Insert 1/16” to 1/8” of the end of each line
through two of the holes in the inner rim of
the ^ool. Figure 20 , Allow no more than
1/8” line to extend beyond the rim to avoid
interference with tapping action.
4. ) With your finger between thè lines, wrap
the lines onto the spool firmly and evenly in
a clockwise direction as shown by the arrow
on the spool. Figure 20 ,
"The^ne must be wrappedRfmljrand
evenly for proper line feed.
5.) Follow “Installing Spool w/Line,” steps
“e.—i.”
b. If line breaks off or backs up in the trim
mer head, follow “Installing Spool w/Iine,”
steps “a,—d.” Puli dack in line until line is
^tightly wound onto spool, leaving 4—6 inches
of extended line. Continue with steps
line Exit
Hole
Catches in
Locked Position
Figure 17
Figure 18
Approximately 2 Inches of Line Can Be
Pulled From the Trimmer Head Each,
Time the Tap Button is Pressed.
Tap Button
Figure 19
. 1/8” of line
"ThrougETHoîës
Wrap Line On
Spool As Shown
By Arrow
Inner Rim
Figure 20
3. Trouble Shooting the Triinmer Head and Line
NOTE: For best results, POULAN/WEED EATER recommends the use of POULAN PRO brand line.
Does not advance, or breaks while cut
ting:
—
Improperly wound onto spool,
—
line size incorrect.
—
Too little line outside head.
—
Improperly routed in head.
Welds onto spool:
—
line size incorrect,
--Incorrect spool,
—
Crowding line against material being cut.
—
Cutting at higher ^eeds than necessary.
—
friferior line.
Pulls back into head:
—
Too little line outside of head.
Kelesuses continuously:
—
Improperly routed in head,
—
line size incoriect.
Usage is excessive:
—
Improperly routed in head,
—
line size incorrect.
— Inferior Hne,
MAINTENANCE ACCESSORIES
TAP-N-GO DUAL EXIT HEAD ...952-711617
l^ON GUTTING LINE (.080 dia.)
SPOOL W/LINE ..._______ _________ 952-711518
^ ..................... . .................* * * * *
200Ft, .................... ........................ 952-711511
400 Ft,
952-711512
- 1 4 -