D,une replacement, Installing spool w/line – Poulan 195 User Manual
Page 13
Attention! The text in this document has been recognized automatically. To view the original document, you can use the "Original mode".
The line will easily remove grass and weeds
from around walls, fences, trees and flower
beds, but it also can cut the tender bark of
trees or shrubs and scar fences. To help avoid
damage especially to delicate vegetation or trees
with tender bark, shorten line to 4—5 inches and
use at less than fiill throttle^
jFor mowing or sweeping, rise throttle for
a good clean job.
Above Tip of the Line
' Ground"
A
WABNING
Use minimum speed and do not crowd the line
when cutting around hard objects (rock, ^avel,
fence posts, etc), which can damage the trimmer
head,
become
entangled
in
the
line,
or
be
thrown causing a serious hazard*_____________
A
wahning
Always wear eye protection. Never lean over the
trimmer head. Rocks or debris can ricochet or
be thrown into eyes and face and cause blind-
ness or other serious injury.
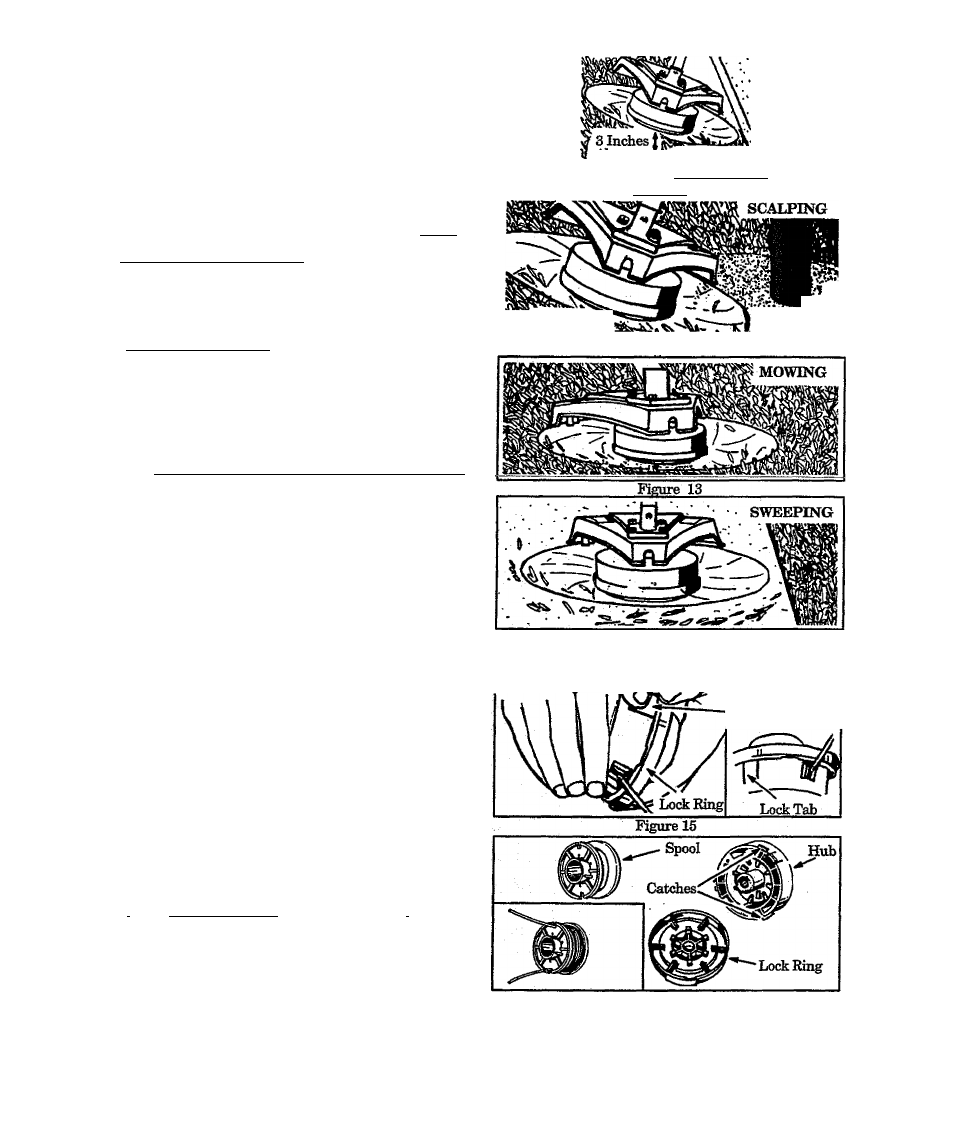
1. TRIMMING — Figure 11. Hold bottom of the
trimmer head about 3 inches above ground and at
an an^e. Allow only thé tip of the Une to make
contact. Do not force trimmer line into work area.
2.
SCALPING — Figure 12, The scalping tech
nique removes unwanted vegetation. Hold the
bottom of the trimmer head about 3 inches above
the ground and at an angle. Allow the tip of the
line to strike ground aroimd trees, iwsts, monu
ments, etc. This technique increases line wear,
3. MOWING— Figure 13 . Your trimmer is ideal
Figure 11
Does the Cutting
3 Indies
Above Ground T
Fmure 12
4.
for mowing in places conventional lawn movresrs
cannot ream. In the mowing position, keep ihe
line parallel to the ground. Avoid pressing the
head into the ground as this can scalp the ground
and damage the tool.
SWEEPING — Figure 14. The fanning action
of the rotating line can be used for a quick and eaay
deanuj). Ke^ the line parallel to and above sur
faces being swept and move tool from side to sidel
Figure 14
D,UNE REPLACEMENT
• For proper line feed:
— Use only genuine POULAN PRO pre-
wound ^ools and .080** diameter line.
Use of other types of spo^ or lines can result
in excessive breakage, line welding and im
proper line feed.
—
Pre—wound spools offer the most conven
ient method for replacing line as wdl as
optimum performance.
• Always clean dirt and debris firom spool and
hub when performing any type maintenaaace.
1. Installing Spool w/Line
Press lock tab and turn lock ring. Figure 15.
Remove lock ring and spool. Figure 16.
Clean dirt and debris h^m all parts.
Inspect all trimmer head parts for damage. Re-
.____ place damage parts. ________________.
A
warning
THinmer
head
parts that are
chipped, cracked,
bro^]^ or damaged in an^ other way can fly
apa)!^ and cause serious iiyufy. Do not use. Be-
place damaged parts before using the tooL
To Remove, Turri Lock lüng Coimterclockwise.
To Replace, Turn Lock Ripg Qockwise^^^
-Lock Tab
a.
b.
c.
d.
e.
Install new ^ool by routing one of the two
lines throu^ each line exit hide. Figure 17.
Place spool in hub. Make sure trimmer line is
not cau^t between rim of spool and hub.
Figure 16
£ Al^ the lock ring over the three catches on
the hub. Push the lock ring down on the huh
and turn as shown in Figure 15,
- 1 3 -