Blade drive belt tension (all models) – Troy-Bilt 1900678 User Manual
Page 29
Attention! The text in this document has been recognized automatically. To view the original document, you can use the "Original mode".
on the blade drive idler pulley, using two 9/16" wren
ches. Then slip the blade drive belt up and over the
idler pulley belt guide. Finally, slip the blade drive belt
down and off the blade drive rear puiley (lower pulley).
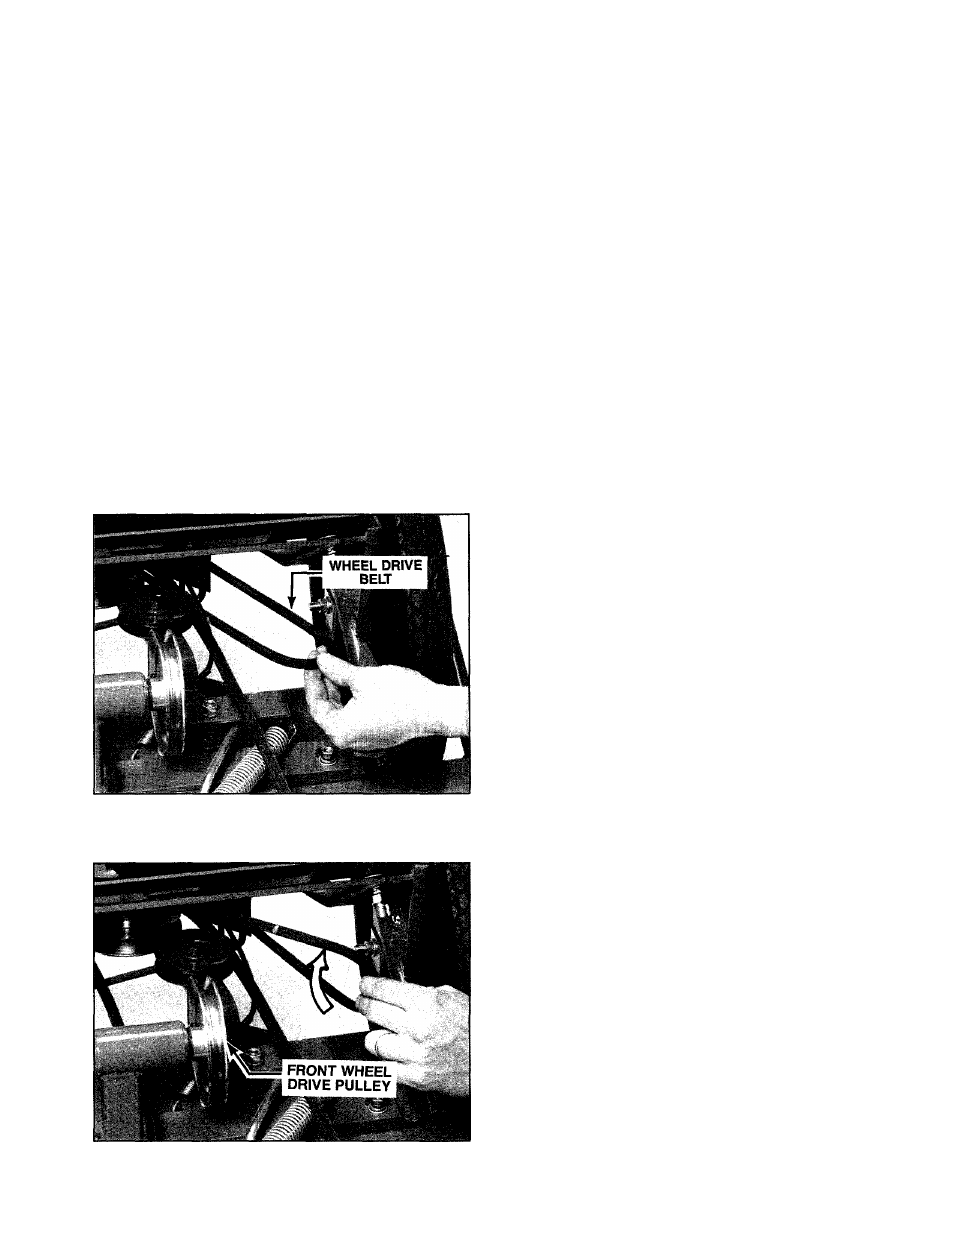
F. Slip the wheel drive belt down and off the wheel
drive rear pulley (upper pulley). Temporarily leave the
belt in between the upper and lower pulleys.
G. Remove the other end of the wheel drive belt from
the wheel drive front pulley.
H. Return to the rear of the mower and slip the wheel
drive belt down and off the blade drive rear pulley
(lower pulley). The belt can now be removed through
the opening between the lower pulley and the pulley
belt guard.
I. Install the new wheel drive belt up through the
opening between the rear belt guard and the blade
drive rear pulley (lower pulley). Slip one end of the belt
up and over the lower pulley, but do not seat it in the
upper pulley at this time.
J. At the front of the mower, hold the wheel drive belt
so it is flat, as shown in Photo 5-15. Then twist the belt
V
4
turn in a clockwise direction, as shown in Photo
5-16. Without changing the twist in the belt, seat the
belt on the wheel drive front pulley.
Photo 5-15: Hold wheel drive belt in flat position (trac
tion drive mounting bracket removed for photo clarity
only).
K. At the rear of the mower, seat the other end of the
wheel drive belt on the wheel drive rear pulley (upper
pulley).
L. Replace the blade drive belt on the blade drive rear
pulley (lower pulley), making sure that the belt fits in
side the belt guard that surrounds the rear and sides of
the pulley.
M.
Next replace the blade drive belt on the blade
drive idler pulley, making sure that the belt fits inside
the idler pulley belt guide. Securely tighten the screw
and nut on the idler pulley.
N. Check that the blade drive belt is inside the belt
guide located next to the blade drive front pulley.
O. Adjust the tension on the new wheel drive belt by
following Steps E through I of the previous “Wheel
Drive Belt Tension” instructions.
BLADE DRIVE BELT TENSION
(All Models)
Check the blade drive belt tension after each 10
hours of operation. Due to normal stretch and wear on
the belt, periodic adjustments may be required. While
checking the tension, look for obvious signs of wear
such as cracks, cuts or fraying. If the belt is in poor
condition, order a replacement from the Garden Way
Parts Department. This is a special belt made for your
mower and is not available locally.
a
CAUTION: To avoid personal injury, stop the
engine, disconnect the spark plug wire, keep
the wire away from the spark plug, and allow the
engine and muffler to cool before inspecting or
adjusting the drive belt.
Photo
5-16:
Twist belt
V
a
turn clockwise.
TOOLS NEEDED: 7/16" and two Vz" Wrenches, Flat
Blade Screwdriver, Ruler.
A. You will need a second person to assist you in per
forming Steps C and D.
B. Remove the belt/pulley safety cover by removing
the three hex nuts and two self-tapping screws.
C. Tension on the blade drive belt is checked by
measuring the length of the blade drive tension spring
that is located on the end of the blade drive cable. See
Photo 5-17. To measure the spring, have your assistant
squeeze the blade control handle against the handle
bar grip and then engage the blade control by pushing
the control all the way forward until a distinct “click” is
heard. While the blade control is in this engaged posi
tion, measure the length of the stretched spring.
D. The beit tension is correct if the stretched spring
measures between
1
V
4
" to 1 3/8". If the spring
measures longer than 1 3/8" the belt needs to be
loosened. If the spring measures shorter than
1
V
4
" the
belt needs to be tightened. Have your assistant release
the blade control handle when you have finished mea
suring the spring.
27