Electric start assembly steps, Step 1: activate and charge the battery – Troy-Bilt 1900678 User Manual
Page 12
Attention! The text in this document has been recognized automatically. To view the original document, you can use the "Original mode".
ELECTRIC START
ASSEMBLY STEPS:
IMPORTANT
Your new battery must be activated with eiectroiyte and
fuiiy charged before placing it in service.
The optional electric start system includes a 12-volt
side-vented battery, a key switch ignition system, a
solenoid, a starter motor (attached to the engine), and
the cables and wires that connect the electrical
system.
A
built-in
recharging
circuit
automatically
recharges the battery during mower operation.
The following steps explain how to activate and
charge the battery, and how to assemble the electric
start system. For your safety, please follow each step
carefully and observe all of the accompanying Safety
Warnings and Cautions.
A.
DANGER — POISON -
■ CAUSES SEVERE BURNS!
• Electrolyte is a sulfuric acid solution.
• Avoid contact with skin, eyes or clothing.
• To prevent accidents and avoid personal injury,
wear protective clothing, rubber gloves, and
shield eyes with safety goggles.
•
Neutralize acid spills with baking soda and
water solution. Neutralize empty container with
baking soda and rinse with watei.
ANTIDOTE:
External — Flush with water. Eyes
— Flush with water for 15 minutes ana get prompt
medical attention.
ANTIDOTE:
Interna! — Drink large quantities of
water or milk. Follow with milk of magnesia, beat
en eggs, or vegetable oil. Call physician immedi-
KEEP OUT OF REACH OF CHILDREN.
B
DANGER — BATTERIES PRODUCE
EXPLOSIVE GASES!
• Keep sparks, fiame. cigarettes away.
• Ventilate area when charging or using battery
in enclosed space.
• Make sure venting path of battery is alv/ays
open once battery is filled with acid.
B.
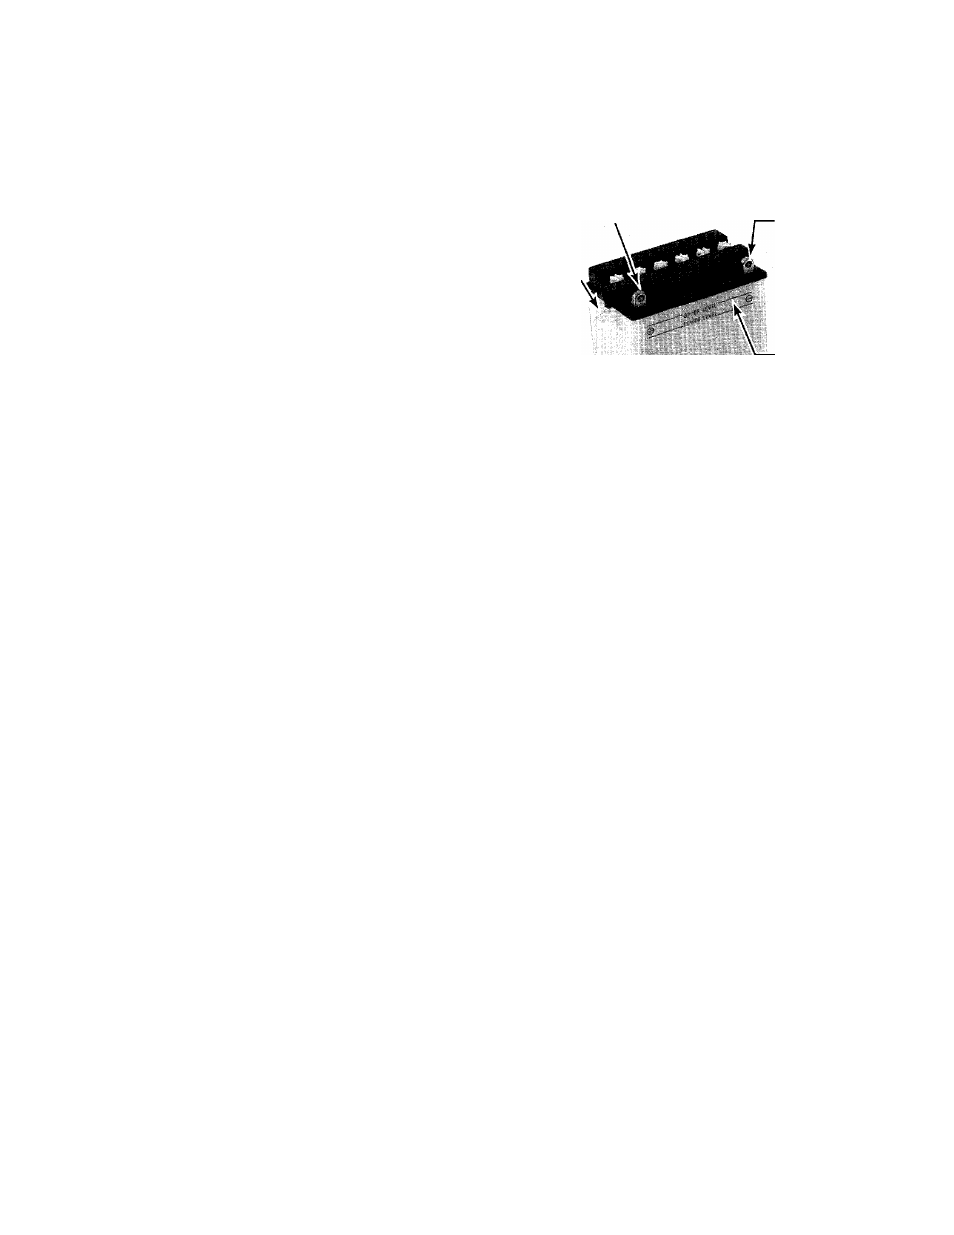
There may be a sealed plastic tube covering the
vent fitting on the positive (-i-) side of the battery. Be
sure to remove and discard this tube before activating
the battery. See Photo 2-16.
C.
Piace battery on level surface and remove all filler
caps. Leave caps off during filling and charging
procedures.
POSITIVE
(+)POST
VENT.
NEGATIVE
(-)POST
UPPER
LEVEL
LINE
Photo 2-16:
Add electrolyte to UPPER LEVEL line.
n
WARNING:
Remove metal jev,ielry before
working near the battery or any pari of the
electrical system. Failure to do so can cause a
short circuit that could result in electrical burns,
an elect'ical shock, or an explosion of battery
D.
Carefully fill the cells with battery grade electrolyte
(1.265 Specific Gravity sulfuric acid) until it reaches
the UPPER LEVEL LINE that is marked on the outside
of the battery case. See Photo 2-16. The temperature of
the battery and the electrolyte should be between 60°F
to 80°F for best results. No water or other liquid should
be added to the battery during this initial activation.
E.
Allow the battery to stand for 30 minutes. Then
check each cell and, if necessary, add more electro
lyte until it reaches the UPPER LEVEL LINE. DO NOT
overfill with electrolyte as this may cause electrolyte to
flood over during battery charging.
STEP 1: Activate and Charge the Battery
A.
The battery is shipped to you “dry”, and it cannot
be used until it has been activated with electrolyte (bat
tery grade sulfuric acid) and given a proper start-up
charge. Activating a battery with electrolyte is danger
ous work (the acid can eat through clothing and burn
skin) and we therefore strongly recommend that you
take the battery to a reliable service station, battery
store, or farm/outdoor power equipment center where
a trained battery technician can complete the job safe
ly. PLEASE DO NOT ATTEMPT TO ACTIVATE THE
BATTERY YOURSELF UNLESS YOU ARE FULLY EX
PERIENCED IN BATTERY SERVICE WORK!
A
DANGER
Batteries generate explosive gases Keep sparks
and flames away from battery at all times.
Ventilate area when charging or using battery
in enclosed space.
We recommend that the battery not be left on
charge while unattended (the charging time
need not be continuous).
Carefully
follow
charging
instructions
and
Safety Rules provided by the manufacturer of
the charging equipment being used.
10