Step 6: attach vent tube to battery, Step 7: install battery and hold-down clamp, Step 8: attach positive (-f) battery cabie – Troy-Bilt 1900678 User Manual
Page 15: Step 8: attach positive, Battery cabie
Attention! The text in this document has been recognized automatically. To view the original document, you can use the "Original mode".
STEP 6: Attach Vent Tube to Battery
A.
Parts Needed; (1) Vent Tube (shipped in battery
carton).
B.
Attach the long, clear plastic vent tube over the
vent fitting on the positive ( + ) side of the battery. See
Photo 2-24.
Photo 2-24:
Attach vent tube to battery.
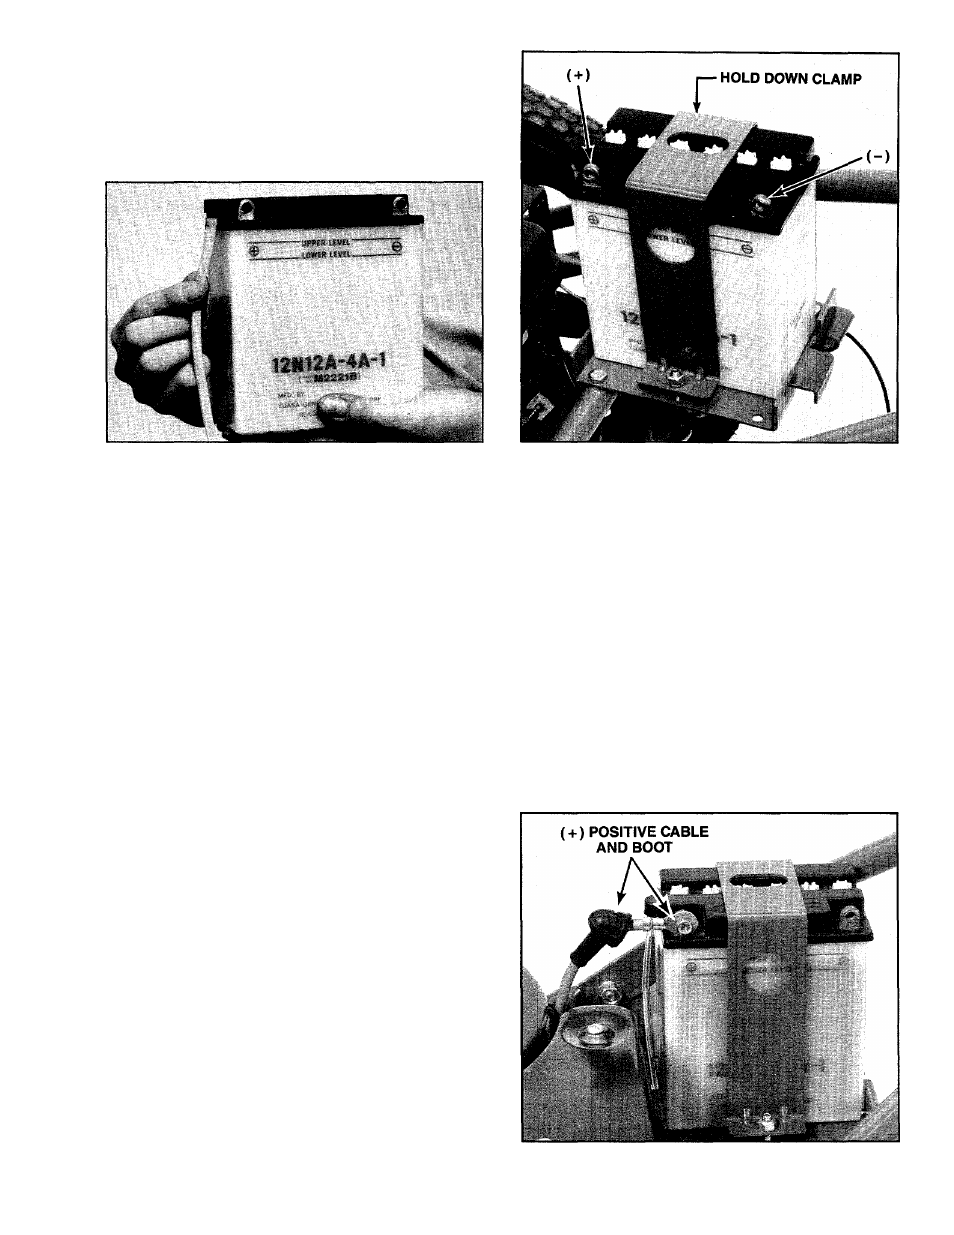
Photo 2-25:
Install battery and hold-down clamp.
STEP 7: Install Battery and Hold-Down Clamp
A.
Parts Needed: (1) Hold-Down Clamp, (2) 1/4"-20 x 1"
long Hex Hd. Screws, (2) 1/4"-20 Locknuts.
B.
Place the battery on the mounting bracket exactly
as shown in Photo 2-25. Make sure that the positive (-t-)
post on the battery is facing the engine.
C. Run the plastic vent tube straight down the side of
the battery so that the end is pointing toward the ground.
D.
Position the hold-down clamp over the battery ex
actly as shown in Photo 2-25, making sure that the large
hole in one side of the clamp is on the left side of the
battery.
E. Fasten the two sides of the clamp to the bracket by
inserting the two 1" long screws up through the mount
ing holes. Add 1/4" locknuts and tighten securely using
two 7/16" wrenches. The clamp should be tight enough
to prevent the battery from moving, but do not overtigh
ten the screws, which would bend the tabs on the clamp.
ik
WARNING
•
Do not touch the positive (+) battery post and
any other surrounding metal with tools, jewelry,
or other metal objects. Doing so can cause a
short circuit that could result in electrical burns,
an electrical shock, or an explosion of battery
•
Install the battery exactly as shown in Photo
2-25. If the battery is installed in reverse, the
battery and other electrical system parts will
be damaged.
•
Make certain that the vent tube is not crimped,
pinched, or folded anywhere along its length.
Improper venting could result in a battery ex
plosion.
STEP 8: Attach Positive (-
f
) Battery Cabie
A.
Parts Needed: (1) 1/4"-20 x 1/2" long Battery Bolt,
(1) 1/4"-20 Hex Nut (shipped in battery carton). Note;
Battery bolts and nuts are metric sizes. The sizes given
above are in U.S. size equivalents.
B.
The positive ( + ) battery cabie is a thick red cable,
approximately 14" long. One end is already attached
to the upper stud on the solenoid. There is a rubber in
sulating boot located on the cable.
C.
Place the battery nut on the inside of the battery
positive (-i-) post and the cable terminal on the outside
of the post. Install the battery bolt securely using a Phil
lips head screwdriver. See Photo 2-26.
D. Slide the rubber boot over the battery post, making
sure that it covers the post completely. If necessary,
use a screwdriver with a wide, flat tip to help seat the
boot between the battery nut and the battery case.
Photo 2-26:
Attach positive (-i-) battery cable.
13