Pumpout procedures, refrig 114 units (see fig. 3) – Carrier 17CB User Manual
Page 5
Attention! The text in this document has been recognized automatically. To view the original document, you can use the "Original mode".
r ^
2.
Charge approximately 25 lb of the proper
refrigerant thru the cooler charging valve.
3. Pressurize machine to test pressure (Table 1)
using dry air or nitrogen, or purge or pumpout
unit. Do not exceed test pressure.
4. Test all joints, valves, fittings etc. with a halide
or electronic leak detector.
Check Leakage Rate
1. Install a mercury manometer (absolute pressure
type) on a tee at the cooler charging valve.
2. Pull 25 in. of vacuum on the machine.
3. Let machine stand with this vacuum for at least
8 hours.
4. If leakage rate is less than 0.1 in. Hg in 24 hours
(0.033 in. Hg in 8 hours), machine is suffi
ciently tight. Perform Machine Dehydration.
5. If leakage rate exceeds 0.1 in. Hg per 24 hours,
repeat Check for Small Leaks, repair leaks and
repeat this Leakage Rate Check.
6.
Remove or valve off manometer before re
peating any pressure test.
Machine Dehydration
Before dehydration, drain shipping oil and flush oil
reservoir. Shipping oil vaporizes under vacuum and
can greatly inhibit dehydration.
CAUTION: Do not attempt to start oil pump
or purge motor even for a rotation check, nor
apply test voltage of any kind while machine is
under
dehydration
vacuum.
Motor
insulation
breakdown and serious damage may result,
1. Connect dehydration pump to cooler charging
valve.
2. Ensure that all valves on purge assembly are
closed.
3. Install mercury thermometer (absolute pressure
type) at charging valve tee.
4. Operate pump until manometer reads 29.80 in.
Hg vacuum (0.1 psia). Continue to operate
pump for 2 more hours.
5. Close cooler charging valve; stop pump; record
manometer reading.
6. Wait 2 hours and read manometer again. If
vacuum has not decreased, dehydration is com
plete. If vacuum has decreased, repeat steps 4, 5
and 6.
7. If vacuum fails to hold after several dehydra
tion attempts, check for machine leak by
repeating the refrigerant pressure test.
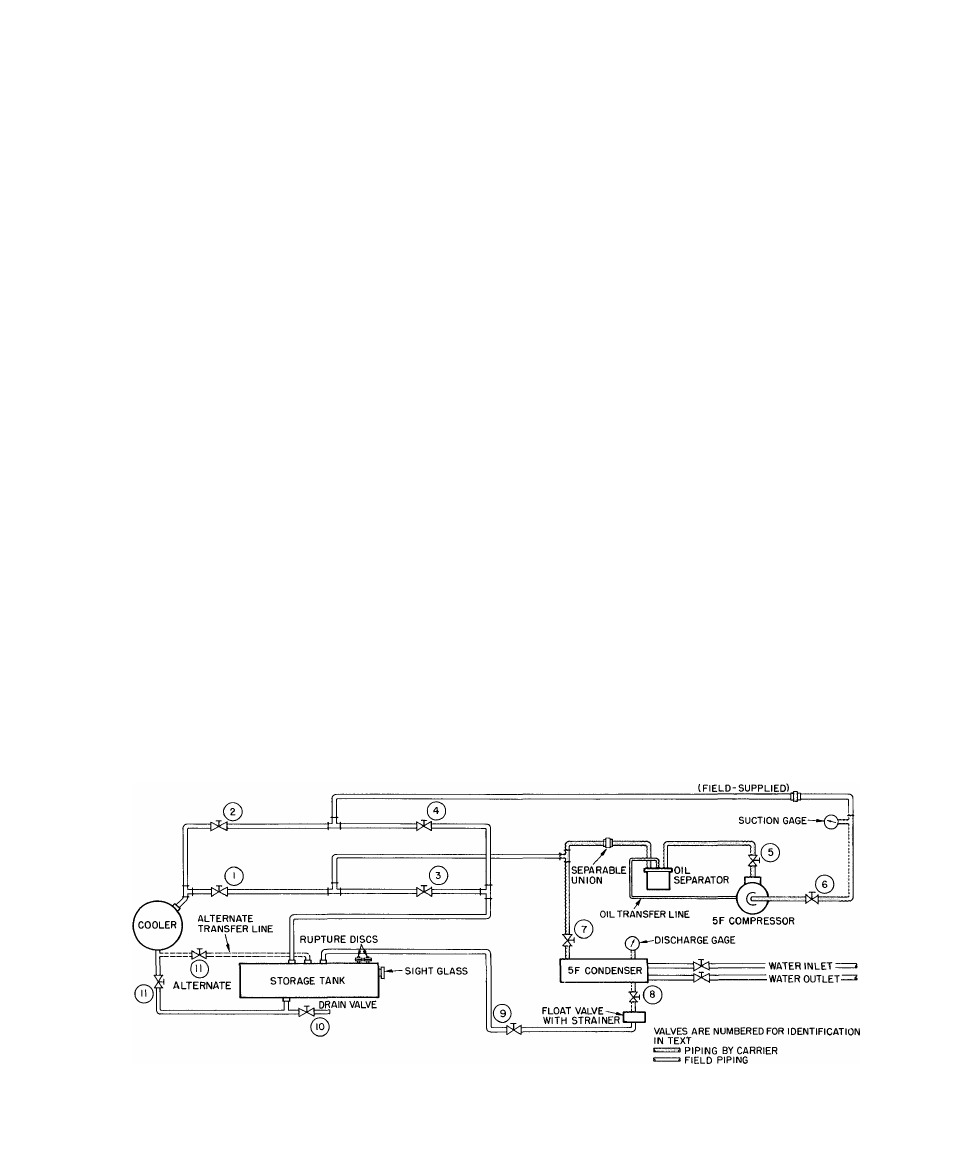
Pumpout Procedures, Refrig 114 Units (See Fig. 3)
MACHINE EVACUATION (No refrigerant in
system)
1. Set purge valves per operation 5 on purge valve
operation plate.
2.
Jumper low-pressure cutout on pumpout
compressor.
3. Close valves 1 , 3 , 7 and 10.
4. Open valves 2, 4, 5, 6, 8, 9 and 11.
5. Disconnect separable union between pumpout
condenser and oil separator.
6.
Run pumpout compressor until desired
machine vacuum is reached.
7. Close valve 5 and reassemble union.
8. Stop compressor.
9. Remove jumper.
PRESSURIZING THE MACHINE (No refrigerant
in system)
1. Set purge valves per operation 4 on purge valve
operation plate.
Close valves 2, 4 and 10.
Open valves 1 , 3 , 5 , 6, 7 , 8, 9 and 1 1 .
Disconnect separable union in pumpout com
pressor suction line.
Operate pumpout compressor until desired
pressure is reached. Do not exceed test pressure
listed in Table 1.
Shut off pumpout compressor.
Reassemble union.
Return purge valves to Normal-Auto condition
when pressurizing is completed.
2
.
3.
4.
5.
6
.
7.
8
.
SEPARABLE UNION
Fig. 3 — Pumpout System Schematic (R-114 Units)
5