Fig. 24 — fan belt adjustment, Lubrication — shut off power protect, Shut off unit power – Carrier 50BK User Manual
Page 17
Attention! The text in this document has been recognized automatically. To view the original document, you can use the "Original mode".
Step 3 — Matched Set of Belts — Always use
matched set of belts.
NEVER mix new and used
belts andjor mix belts from different manufacturers.
Step 4 — Belt Installation:
a.
Move pulleys together to facilitate belt installa
tion.
NEVER pry or roll belt on to pulleys as this
may cause serious damage to belts.
b.
Work belts around pulleys by hand. All belts
should be slack on same side of drive.
Mixing
slack and tight sides together may result in
.serious damage to belts when drive is tensioned.
THIS
OR THIS
NEVER THIS
Fig. 24 — Fan Belt Adjustment
c.
Move pulleys apart until belts are snug. Make
preliminary check of sheave and shaft alignment.
Operate drive at no load for several minutes to
seat belts and then check belt tension.
Excessively
high or low tensions adversely affect the life and
operation of V-belts.
d.
Check sheave and shaft alignment after belt
tension is applied.
PULLEY ALIGNMENT —
Shut off unit power
Make sure motor and fan shafts are parallel.
Align
shafts
by
loosening
motor
on
mounting
bracket if required. Then loosen fan pulley set
screws, slide pulley along fan shaft and align with
straightedge as shown in Fig. 25.
PULLEYS
/
\ SETSCREWS
MOVABLE F
langes
A
/ ■
STRAIGHT EDGE MUS
t
/
SE PARALLEL
WITH BELT
/
A
l
/
: SETSCREWS--
nXED FLANGES
SINGLE-GROOVE T-WO-GRC'O'VE
MOTOR a FAN SHAFTS
' ^ MUST BE PARALLEL
Fig. 25 — Indoor Air Fan Pulley
Adjustment and Alignment
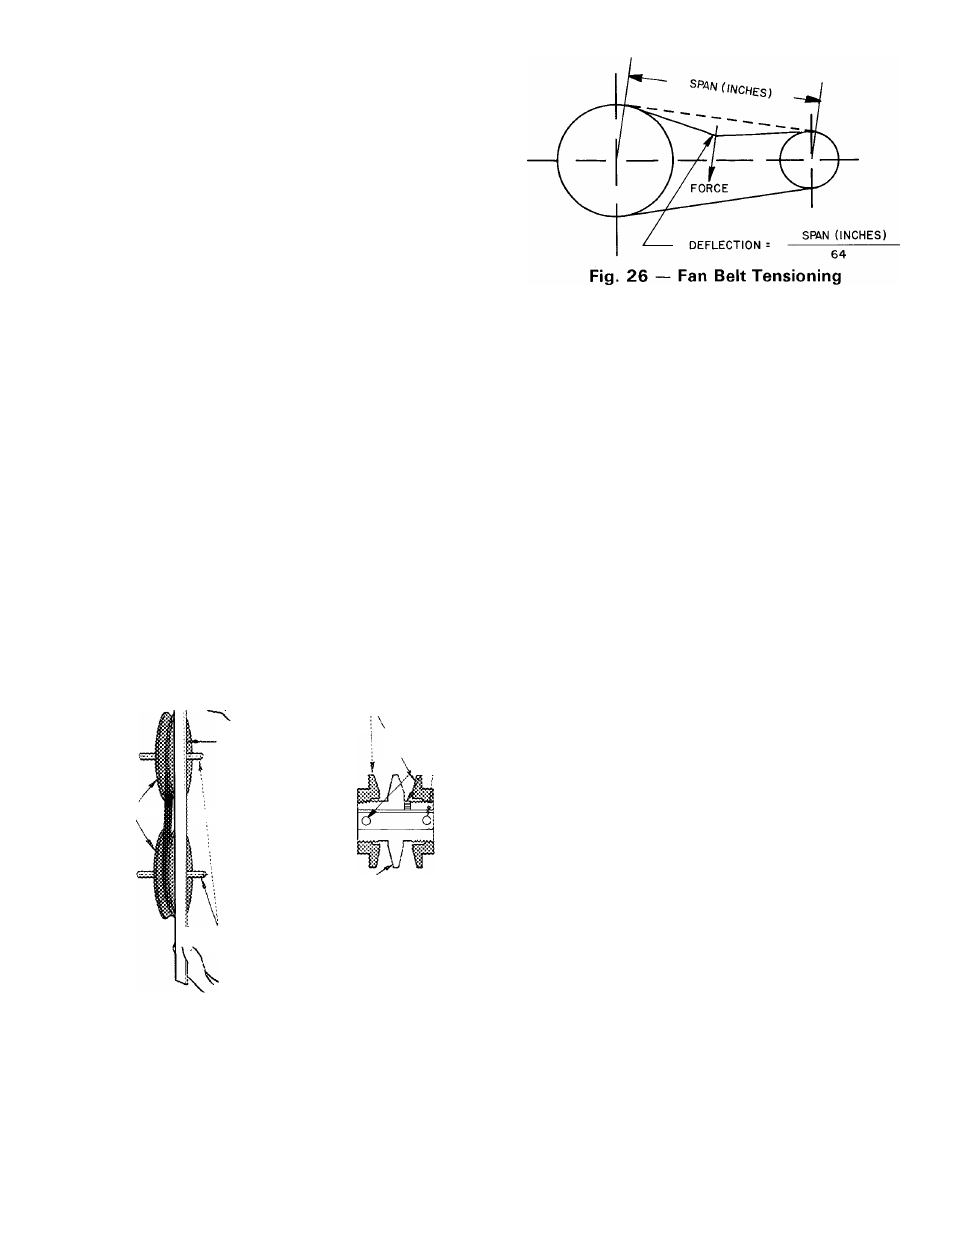
TENSIONING (See Fig. 26) — Use the following
steps when adjusting belt tension:
Step 1 — Measure belt span in inches.
Step 2 — Use spring scale at center of span to deflect
belt 1/64 inch for every inch of span length. Record
scale reading.
Example: For span of 10 inches — deflection will be
10
5 . .
tt
or inch.
64
32
Step 3 — Spring scale reading should be in range of
12 to 18 pounds. Maximum tension for a new belt
is 18 pounds.
Step 4 — Adjust tension to maximum after 15
minutes. Check belt tension after 2 to 4 hours of
operation.
Step 5 — After 24 to 48 hours of operation, check
drive to see if normal tension is obtained.
Exces
sively high or low tension will adversely affect life
and operation of V-belt.
Lubrication —
Shut off power
Protect
coil from damage.
Fan motor bearings are factory lubricated and
will need no lubrication for the first 5 years of
operation (3 years with continuous service or ex
cessively dirty conditions).
Inspect bearings and relubricate or replace as
required.
Follow
manufacturer’s
instructions
for
lubrication of special field-supplied motors.
Fan shaft bearings on 50BJ,BK016 and 024 units
are lubricated for the life of the bearings. Bearings
for 50BJ,BK028 thru 064 units have grease fittings.
On 50BJ,BK044-064 units the fan shaft universal
joint requires the same lubrication as the bearings.
Lubricate annually with a good grade of mixed base
grease or lithium base grease with rust inhibitor.
Add grease until air bubbles form under the seal.
Do not overgrease.
Return-Air Filters — Inspect filters twice monthly
and replaee as often as required by operating condi
tions. Filter type and size is given in Table 1.
If field-supplied, cleanable filters are used, flush
them with hot water or steam, or soak them in a
mild solution of soap or detergent and water. Refer
to filter manufacturer’s instructions as applicable.
Never operate the unit without return-air filters
in place.
Condensate Drains — Clean drain line and unit
drain pan at start of each cooling season. Check
flow by pouring water into drain. Be sure trap is
filled to maintain air seal (Fig. 18).
16