French – H-B Instrument 540 User Manual
Page 2
6.
Memory Function: Split times, lap times, and total elapsed times are automatically entered into the memory –
the fastest, slowest, and average lap can all be recalled. To recall, press [RECALL] – the times will be recalled
successively by continually pushing [RECALL]. At any time to see the fastest or slowest lap, press [LAP/SPLIT •
RESET]. At any time to see the average lap, press [START/STOP]. To stop the recall of the stored data press
[MODE]. You can view the time stored in memory even while the stopwatch is counting.
A.
If you measure over 99 times or 10 hours of the split time and the total time, the average function will
not appear
B.
If you measure over 10 hours of the split time and total time, the fastest/slowest time will not appear
7.
Countdown Timer Mode: The maximum countdown time is 9 hours, 59 minutes and 59 seconds. To enter into
timer mode, press [MODE] until you see the TR in the upper left hand corner. The top line will show the setting
time: hour, minute, second. The second line will show the running time: hour, minute, second. The bottom line will
show the repeat counter. The hour digits will be set first. Press [LAP/SPLIT • RESET] to select the digits to be
adjusted. Press [START/STOP] to set the flashing digits – the digits will move more quickly if [START/STOP] is
pressed for more then 2 seconds. After all the adjustments are made, press [MODE]. Press [START/STOP] to start
the timer. To reload the timer run value, press [LAP/SPLIT • RESET].
8.
Pacer Mode: Press [MODE] until you see PACE at the top of the display – this will enter you into PACER mode. The
top line shows the time of the pacer. The middle line shows the count of the pacer. The bottom line shows the
pacer value from 10-320. Pressing [START/STOP] will start the pacer. Pressing [LAP/SPLIT • RESET] will allow you
to set the pacer value from 10 to 320.
MAINTENANCE
1.
When all the digits on the stopwatch begin to flash, replace the battery.
2.
Be careful not to drop your stopwatch or hit it against hard surfaces as this may cause damage.
3.
Your stopwatch will not be affected by magnetism.
4.
Your stopwatch works with stable accuracy between a temperature range of 5/35° (41/95°F).
5.
Temperature over 60°C (140°F) may cause battery leakage or shorten the battery life. If the watch is left in direct
sunlight for an extended period of time, the display may become black, but this condition will be corrected when the
stopwatch returns to a normal temperature.
6.
Do not leave your stop watch in a very low temperature below –10°C (14°F) for a long time since the cold may
cause a slight time loss, the change of digits to slow, and/or the display light to dim – these conditions will all be
corrected once the stopwatch returns to a normal temperature.
7.
Be careful not to expose your stopwatch to solvents (such as alcohol and gasoline), mercury, cosmetic spray,
detergents, adhesives or paints. Otherwise the case, bracelet, etc. may become discolored, deteriorated, or
damaged.
8.
The IC used in your stopwatch will be affected by static electricity, which may disturb the display. Keep your watch
away from close contact with objects such as TV screens, which emit strong static electricity.
9.
To prevent possible rust on the case and bracelet caused by dust and perspiration, wipe them periodically with a soft
dry cloth.
FRENCH
DESCRIPTION : Chronomètre digital à écran à 3 lignes
FONCTIONNALITÉS
Chronométrage du temps intermédiaire et du temps au tour
Compte à rebours
Temps réel avec année, mois, jour, heure, minute et secondes
Fonctions du rythmeur
30 mémoires enregistrables avec Temps intermédiaire/au tour supérieur, Temps
intermédiaire/au tour inférieur et Temps intermédiaire/au tour moyen
Résistant à l’eau
Réglage de la minuterie jusqu’à 9 heures, 59 minutes, 59 secondes en 1/100
secondes
La valeur du rythmeur est réglable de 10 à 320 secondes
Chronomètre jusqu’à 100 temps intermédiaires/au tour
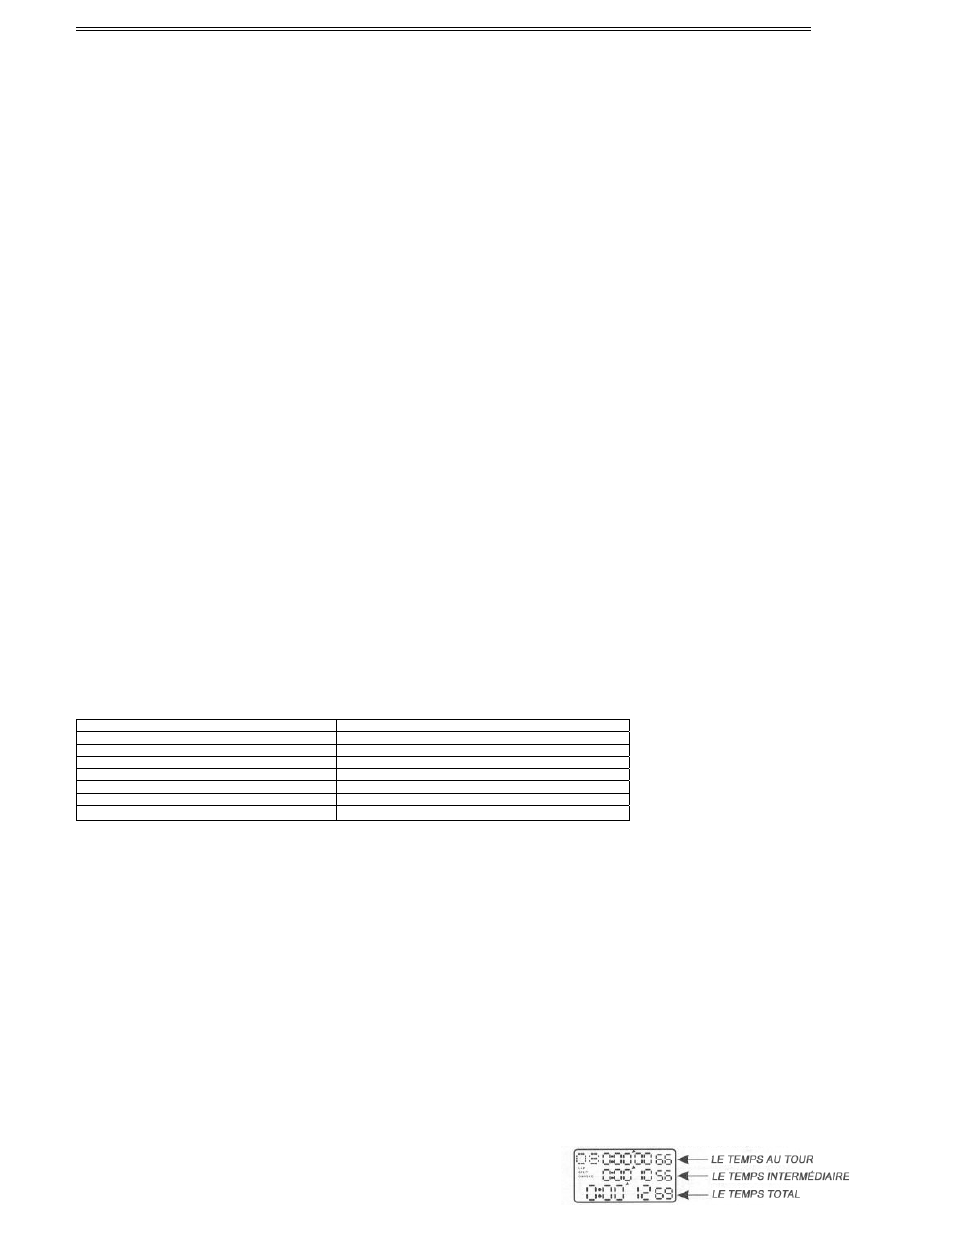
Le temps total écoulé, le temps intermédiaire et le temps au tour peuvent s’afficher et être
chronométrés simultanément
SPÉCIFICATIONS
Intervalle de chronométrage maximum 9 heures, 59 minutes, 59 secondes
Résolution de l’affichage
1/100 de seconde
Plage de temps intermédiaire/au tour
Jusqu’à 100 temps intermédiaire/au tour
Mémoires
JUSQU’à 30 mémoires
Valeurs du rythmeur
Réglable de 10 à 320 comptages par minute
Pile
Pile au lithium CR2032 ou équivalent
Taille de l’écran
31(L) x 24(H) mm
Taille du produit
60(L) x 80(H) x 20(P) mm (cordon exclu)
UTILISATION
1.
Réglage de l’heure / du calendrier : Appuyez sur [MODE] jusqu’à ce que l’heure / le calendrier s’affiche. Pour
régler l’heure / le calendrier, appuyez sur [LAP/SPLIT • RESET] – l’année se met à clignoter – pour régler l’année,
appuyez sur [START/STOP] jusqu’à l’année souhaitée, puis appuyez sur [LAP/SPLIT • RESET] pour afficher le mois.
Pour régler le mois, appuyez sur [START/STOP] jusqu’au mois souhaité, puis appuyez sur [LAP/SPLIT • RESET] pour
sélectionner le jour. Pour régler le jour, appuyez sur [START/STOP] jusqu’au jour souhaité, puis appuyez sur
[LAP/SPLIT • RESET] pour choisir entre le format 12h ou 24h – appuyez sur [START/STOP] pour passer du format
12h au format 24h. Pour régler l’heure, appuyez sur [LAP/SPLIT • RESET] et l’heure clignotera. Pour régler l’heure,
appuyez sur [START/STOP] jusqu’à l’heure souhaitée. Appuyez sur [LAP/SPLIT • RESET] pour passer au premier
chiffre des minutes. Appuyez sur [START/STOP] jusqu’à ce que le premier chiffre souhaité s’affiche. Appuyez sur
[LAP/SPLIT • RESET] pour passer au deuxième chiffre des minutes. Appuyez sur [START/STOP] jusqu’à ce que le
deuxième chiffre souhaité s’affiche. Appuyez sur [LAP/SPLIT • RESET] pour sélectionner les secondes. Appuyez sur
[START/STOP] jusqu’à ce que les secondes souhaitées s’affichent. À l’issue des changements, appuyez sur [MODE].
A.
Notez que la date se règle automatiquement et tient compte des années bissextiles en février.
B.
Pour faire défiler les chiffres plus rapidement, appuyez sans relâche sur la touche [START/STOP] pendant
plus de 2 secondes.
C.
Les années sont paramétrables jusqu’en 2049.
2.
Réglage de l’alarme quotidienne : Appuyez sur [MODE] jusqu’à ce que l’alarme quotidienne s’affiche (AL en
haut à gauche). Pour régler l’alarme quotidienne, appuyez sur [LAP/SPLIT • RESET] pour sélectionner l’heure.
Appuyez sur [START/STOP] pour changer l’heure. Une fois l’heure souhaitée réglée, appuyez sur [LAP/SPLIT •
RESET] pour sélectionner le premier chiffre des minutes. Appuyez sur [START/STOP] pour changer le premier
chiffre, Une fois le chiffre souhaité réglé, appuyez sur [LAP/SPLIT • RESET] pour passer au deuxième chiffre des
minutes. Appuyez sur [START/STOP] pour changer le deuxième chiffre. Une fois les minutes réglées, appuyez sur
[LAP/SPLIT • RESET]. Appuyez sur [MODE] pour valider l’heure. Pour activer ou désactiver l’alarme, appuyez sur
[RECALL]. ON ou « -- » s’affiche – ON signifiant que l’alarme est réglée et « -- » signifiant que l’alarme ne retentira
pas.
A.
Notez que lorsque l’alarme est activée, l’alarme retentira pendant 15 secondes
B.
Pour faire défiler les chiffres plus rapidement, appuyez
sans relâche sur la touche [START/STOP] pendant plus de
2 secondes.