Accoppiamento meccanico, Mechanical coupling – Winco ECP3-2LN/2 (Replaces ECO3) User Manual
Page 18
ECP3 Manual - April 2011 revision 01
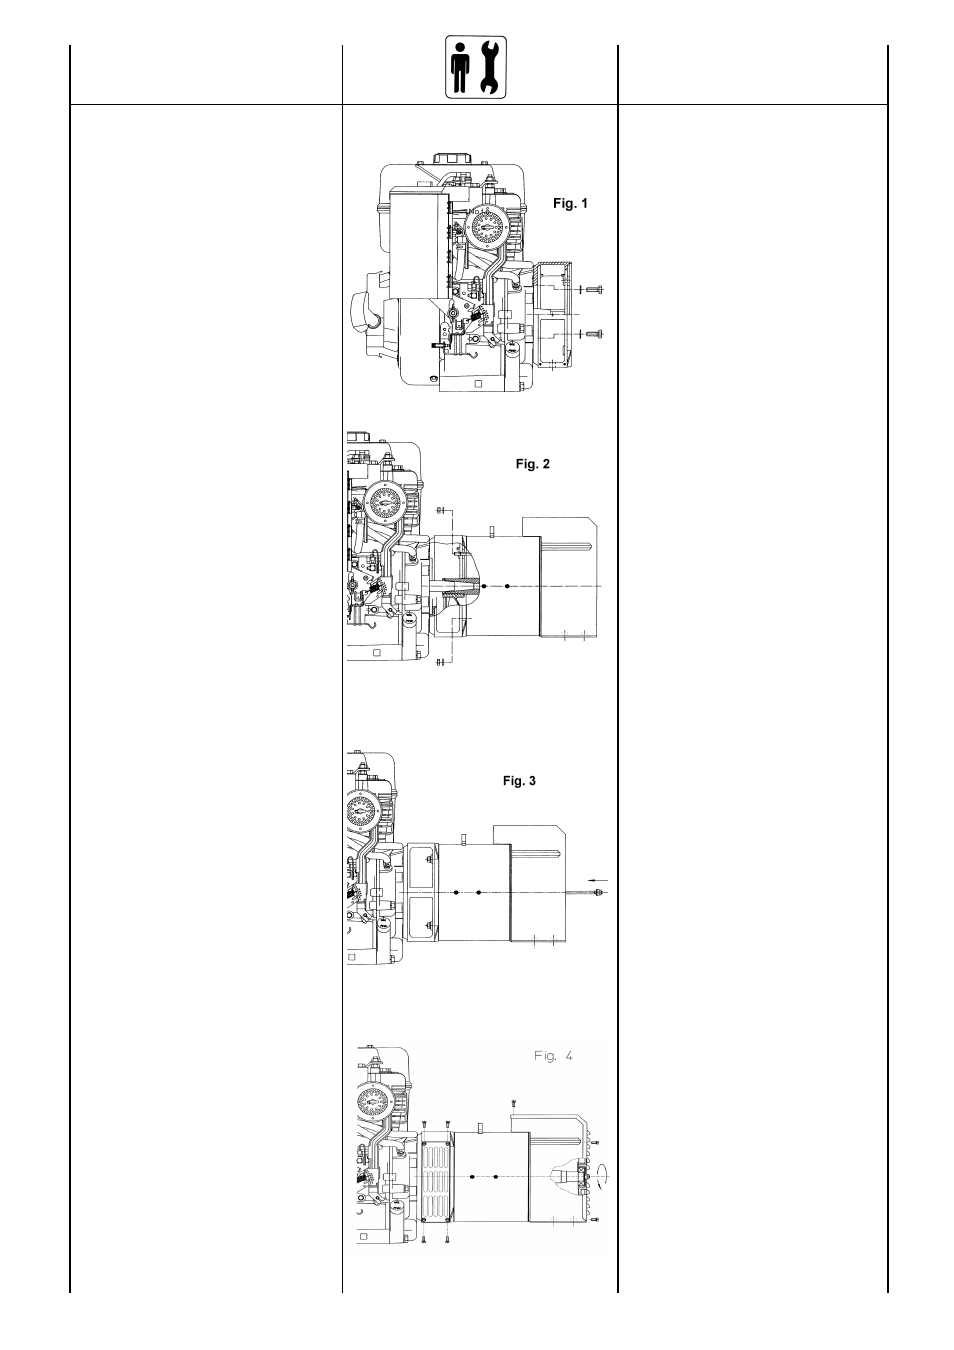
Nel caso di accoppiamento di un gene-
ratore serie ECP3 avente forma costrut-
tiva B3/B9 seguire le seguenti istru-
zioni:
-) montare il coperchio anteriore sul
motore fissandolo con le apposite viti e
applicando una coppia di serraggio di
48±7% Nm se si impiegano viti M10 o
21±7% Nm nel caso di viti M8 (figura 1)
-) bloccare l’alternatore sul coperchio
fissando i quattro dadi M8 sui tiranti,
applicando una coppia di serraggio pari
a 16 ±7% Nm (figura 2)
-) inserire il tirante centrale nella sua
sede ed avvitare il dado (figura 3)
-) bloccare il tirante centrale applicando
una coppia di serraggio pari a 21±7%
Nm se si impiegano tiranti M8, mentre,
se si impiegano tiranti M14, applicare
una coppia di serraggio pari a 120±7%
Nm; rimontare le retine di protezione
laterali e la griglia di chiusura posteriore
applicando sulle viti M5 una coppia di
serraggio pari a 3,5±7% Nm (figura 4).
ACCOPPIAMENTO
MECCANICO
18
MECHANICAL
COUPLING
When coupling with an ECP3 series
generator having a B3/B9 form, follow
the instructions below:
-) mount the front cover on the motor,
fixing it with the appropriate screws and
applying a tightening torque of 48±7%
Nm if using M10 screws or 21±7% Nm
for M8 screws (figure 1)
-) lock the alternator into the cover by
fixing the four M8 nuts onto the bolts,
applying a tightening torque of 16±7%
Nm (figure 2)
-) insert the central bolt into its housing
and screw the nut (figure 3)
-) block the central stay rod, applying a
tightening torque of 21±7% Nm if you
are using stay rods of M8, while if you
are using M14 stay rods, apply a
tightening torque of 120±7% Nm;
reassemble the lateral protective nets
and the rear closing grid by applying a
tightening torque of 3,5±7% Nm to the
M5 screws (figure 4)