Twin City Fans With CE Mark - ES-2-06 User Manual
Page 4
4.
Twin.City.Fan.Engineering.Supplement.2-06
bore. hubs),. or. for. bushing. bore. hubs,. progres-
sively. tighten. the. bushing. bolts. per. Table. 3..
Record.the.measured.torque.value.
.
c..Insert. shaft. through. opening. in. drive. side.. (If.
splithoused.unit,.lower.into.position.)
.
d..Install.bearings.onto.shaft..Do.not.tighten.bear-
ing.setscrews.at.this.time..The.bearing.housing.
should. be. perpendicular. and. the. bearing. base.
parallel.to.the.axis.of.the.shaft.to.prevent.loads.
caused.by.misalignment.
.
e..Mount. assembly,. bolt. bearings. to. drive. stand..
Shaft. must. be. parallel. with. side. of. bearing.
pedestal.
.8.. Arrangement.3.(Split-housed).units.(See.Figure.4):
.
a..Parts. on. DWDI. units. are. assembled. in. the. fol-
lowing.order.as.viewed.from.opposite.drive.side:.
Bearing.bar.assembly.and.opposite.bearing,.fun-
nel,.(housing.side),.wheel,.(housing.side),.funnel,.
drive. side. bearing. bar. assembly,. drive. bearing.
and. sheaves.. Mount. bearing. bar. assembly. to.
housing..Center.wheel.in.funnels.
.
b..Parts. on. SWSI. units. are. assembled. in. the.
following. order. as. viewed. from. opposite. drive.
side:.Bearing.bar.assembly.and.opposite.bearing,.
funnel,. (housing. side),. wheel,. (housing. side),.
drive. side. bearing. bar. assembly,. drive. bearing.
and. sheaves.. Mount. bearing. bar. assembly. to.
housing.
.
c..Assemble.parts.in.above.order.on.shaft.
.
d..Move.assembly.into.position..Lightly.bolt.bearings.
into.place.
.
e..Shaft.should.be.parallel.with.discharge.of.hous-
ing.. Move. bearings. to. accommodate.. Follow.
bearing.alignment.instructions.per.step.5.in.fac-
tory.assembled.units.section.above.
.
f.. Level. shaft;. shim. bearings. if. required.. Tighten.
bearing.setscrews.
.9.. Install.motor.on.base..Carefully.align.shafts.for.drive.
installation.
11..Check.that.bearings.are.fully.lubricated.and.check.
the. oil. level. in. the. static. oil. lube. systems. (if.
supplied).
12..Install. any. accessories. shipped. loose. from. the.
factory.
Fan Installation - Disassembled Units
General instructions for industrial centrifugal fans – For Axial
fans (including mounting arrangements for inline centrifugal
fans), follow assembled fans instructions above and use
Appendix B for assembly details.
. A.unit.is.considered.“disassembled”.if.any.component.
required.for.proper.operation.is.shipped.or.supplied.sepa-
rately.or.in.pieces..Reference.earlier.instructions.concern-
ing. proper. handling. of. fan. components.. Assembly. shall.
only.be.performed.by.trained.personnel.familiar.with.the.
assembly.of.this.type.of.equipment.
.1.. Move.the.lower.half.of.the.housing.to.its.mounting.
location.(split.housing).
.2.. Remove.skids,.crates,.and.packing.materials.carefully.
.3.. If.vibration.isolation.is.to.be.used,.place.the.vibra-
tion.isolation.base.on.mounting.bolts..Line.up.holes.
in.fan.base.with.bolts.
.4.. Place.the.lower.housing.on.the.mounting.structure..
Carefully.level.the.lower.housing.on.the.foundation.
and.shim.as.necessary.using.stainless.steel.shims.
on.both.sides.of.each.anchor.bolt.
.5.. If.the.bearing.pedestal(s).are.separated.they.should.
be.installed.next.
.
a..Move.bearing.pedestal(s).to.mounting.location.
.
b..Put.vibration.base,.if.any,.in.place..Set.pedestal(s).
on.bolt(s).
.
c..Do. not. distort. bearing. pedestal. by. forcing. it. to.
align. with. a. non-level. foundation.. Shim. beneath.
the.pedestal.as.necessary.
.
d..Check. the. bearing. centerline. height.. Adjust. the.
height. to. match. centerline. height. of. the. hous-
ing..High.temperature.units.may.require.a.lower.
housing. centerline. when. cold. so. that. it. will. be.
centered.when.hot.
.
e..Bring. the. bearing. pedestal. into. square. with. the.
housing. using. careful. measurements. or. a. large.
square.
.
f.. Bolt.the.pedestal.into.position.
.6.. If.the.wheel.and.shaft.were.shipped.unassembled,.
you.must.now.install.the.shaft.in.the.wheel.
.
a..First.use.solvent.to.clean.the.protective.coating.
off.the.shaft..Check.all.surfaces.for.corrosion.or.
nicks.and.clean.if.necessary.with.fine.emery.cloth.
or. a. stone.. After. thoroughly. cleaning. the. shaft.
with.solvent,.do.not.touch.it.with.bare.hands.as.
perspiration.can.cause.rust.or.pitting.over.time.
.
b..Remove.keys.from.the.shaft.
.
c..Clean.the.inside.of.the.wheel.bore.with.solvent..
Make.sure.the.setscrews.will.not.interfere.when.
inserting.the.shaft.into.the.wheel.bore.
.7.. Arrangement. 1,. 9. or. 10:. Drive. Component.
Assembly:
.
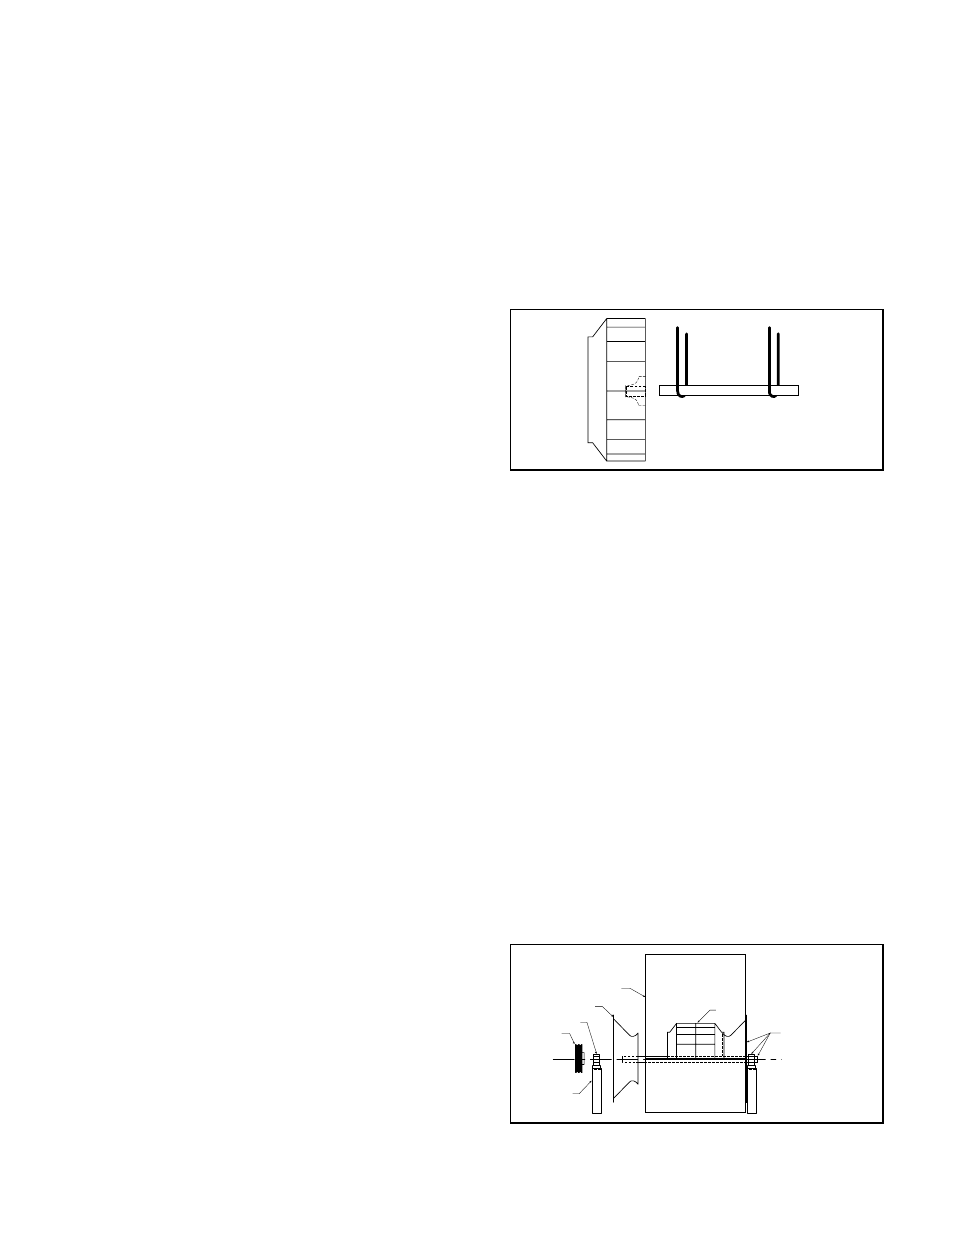
a..Insert.shaft.into.wheel.from.back.side.of.wheel.
(Fig.3).
.
b..When.shaft.is.flush.with.wheel.hub,.put.key.into.
keyway.and.tighten.wheel.setscrews.(for.straight.
Figure 3. Drive Component Assembly
Shaft
Centerline
Bearing
Pedestal
Sheave
Bearing
Inlet Funnel
Housing Side
Wheel
Assembled Bearing,
Shaft, Funnel, and
Housing. Frame
Angles Not Shown.
Figure 4. Split-housed Drive Component Assembly