Top Flite Antares User Manual
Page 12
NOTE HOW UPPER SPAR IS USED AS A WEDGE
TO SUPPORT BOTTOM FRONT SHEETING
WITH WING F R A M E W O R K PINNED TO A FLAT
WORK AREA, PRESS SPAR BACK UNTIL THE
SHEETING MATCHES RIB CONTOUR
mate center of the 1/4"dia pencil mark you just made
on W-2A Using this rib as your guide, drill similar 1/8"
dia holes through all of the remaining ribs that hold
the aileron cable tube—W 3A through W 15
9. Starting with tip rib W 20 and working inboard, glue
all wing ribs in place * Use a triangle or a small block
with right angles to ensure that these ribs are in place
at 90° to the bottom sheeting *NOTE W-2A is
installed at the same angle as the inboard end of
W-21, this provides the root dihedral angle required.
Do not install W-2B or W-3B at this time.
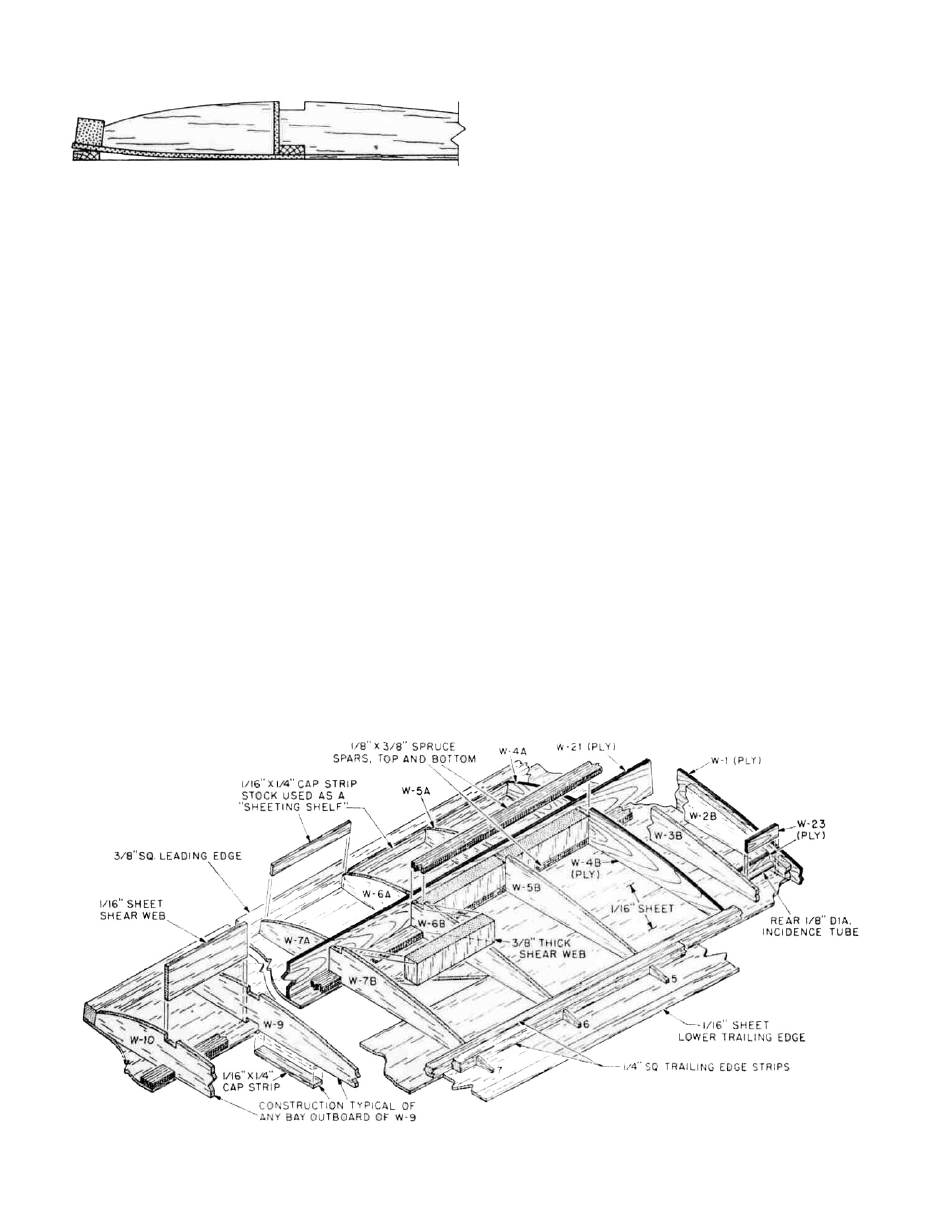
10. Locate and glue the 3/8" sq leading edge in place
11 Cut, glue and fit the 1/16" x 1/4" "sheeting shelves" that
fit between each rib, flush with their top edges and
against the inside of the 3/8 sq leading edge These
are made from the 1/16" x 1/4" x 36 stock provided
12. Locate, remove and glue in place all of the aileron and
flap "riblets" on the bottom sheeting, againstthe rear
edge of the 1/4"sq stock in place Note that there are
two #12's provided for each wing panel and that they
are glued in place on each side of the aileron flap cut
made earlier, use a piece of card stock to space them
13. Remove the top spars from underneath the leading
edges of the wing panels and temporarily install
them into the top rib slots Align their inboard ends
flush with the top inboard end of W-21 Using the
spars as spacers, glue the rear ply W 22's in place to
the bottom sheeting and the rear face of the bottom
spar—do not glue to the top spdr Note that W 22 is
meant to fit from the inboard edge of the bottom
wing sheeting out to rib W 4B Remove the top spar
and re-install it beneath the leading edge of the wing
panel
14 Locate the bag containing the 3/8" x 5/8" x 3" vertical-
grain balsa shear webs These are now trimmed and
accurately installed between each rib starting from
W 4B out to W 20 Note that these webs must be
carefully fitted in place between each r i b and the top
and bottom spar locations—do not allow any gaps or
bad joints, the integrity of your wing depends on
these webs!
15 Use the 1/16" x 1 " x 36 balsa strips provided to cut, fit
and glue in place the horizontal grain web facing
caps which are full depth, from W 9 through W 20
These are glued to the front faces of all the 3/8" vertical
webs just installed—see plans and cross sections
16 In this step we want to prepare the top of the wing for
sheeting This is best done with the largest, longest
Sanding bloc k that you have with light sandpaper
The tops of the 1 / 4 " sq trailing edges and the 1/4" sq.
aileron and flap leading edges have to be tapered as
shown on the plans Also, the bottom, trailing edge
sheeting must be tapered as shown Take your time
here to ensure accuracy We have used masking tape
over the ribs, in front of and behind the 1/4" sq.
material to avoid gouging Once satisfied, cut, fit and
glue the 3/32" ply aileron and flap horn mounts into the
locations shown (riblet 8 and 16) These too are
tapered—see cross sections
17 Locate and mark the required hole positions for the
aileron and flap horns (4 40 flat head bolts) The
measurement from the hinge line back to the center-
line of these holes is 5/16" Drill these holes, at right
angles to the work surface with either a 5/64" dia drill
bit or a #42 index bit
12