Top Flite Antares User Manual
Page 11
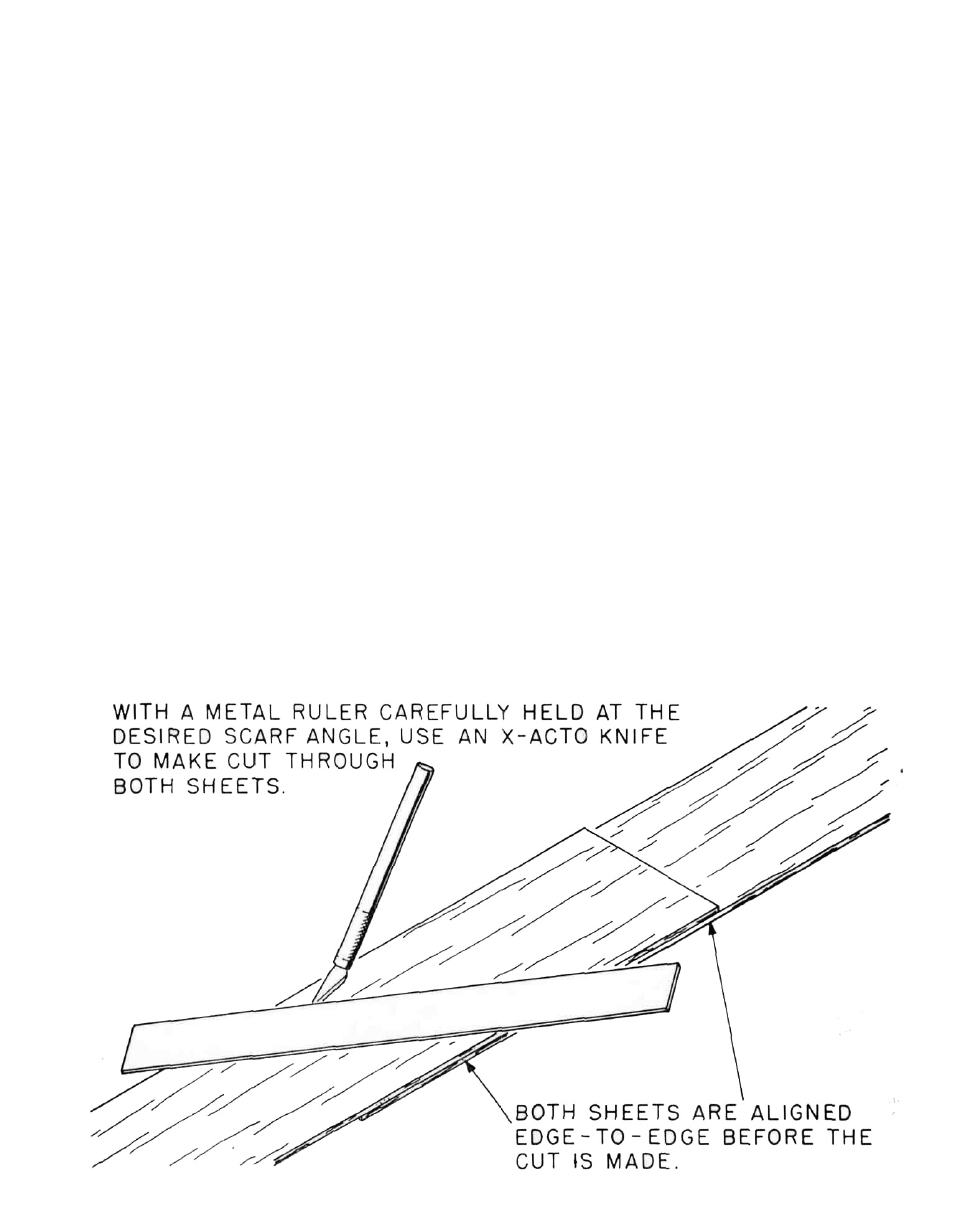
2 pcs 1/16" x 3 " x 48" scarfed from 36" and 18" lengths,
top center section
2 pcs.
1/16"x3"x 18"
unscarfed, bottom center section
It is important to note that all of the wing sheeting
pieces have clean, s t r a i g h t edges Use a metal
straight edge and a razor to do this Lastly use the
straight edge to accurately cut the taper into the four
trailing edge sheets, 3-1/8 at the root to 3-1/2 at W 20
3. Lay the bottom trailing edge sheeting in place on the
plans and with a pencil mark the aileron flap hinge
line at each end of it—1 1/2" ahead of the trailing edge
Use a straight edge to connect these two marks with a
soft pencil Now note the location, at W 12 of the
aileron/flap break line Again using a straight edge,
cut this line through the sheeting from the hinge line
back to the trailing edge Now accurately pin the
trailing edge sheeting directly over the wing plan
(your plans should be c o v e r e d with clear plastic
material such as the backing from a rollofMonokote)
4 Now accurately position and pin in place the bottom
leading edge sheeting on the plan—note that this
sheet extends from the rear edge of the bottom spar,
forward to the front edge of the 3/8 sq leading edge
Cut, fit and glue the bottom center section sheeting in
place Using the rib tick marks provided on the
plan, mark the location of all ribs—W 2 through W 20
on the bottom wing sheeting Cut, fit and glue all
bottom 1/16" x 1/4" cap strips in place from W 7 out to
W 20 Accurately locate and glue in place the bottom
1/8" x 3/8" x 48 spruce spar Use a straight edge to make
certain that it is truly straight and use pins and blocks
to hold it that way.
5 Once again using your straight edge for alignment,
gluethe1/4 sg x 4 8 " w i n g trailing edge in place along
the hinge line drawn earlier The 1/4" sq leading edges
for the ailerons and flaps (two pieces, one for each
surface, cut from the 48 stock provided) are now
glued in place to the bottom sheeting, also along the
hinge line—do not glue these to the wing's trailing
edge—spacing these two pieces from the trailing
edge of the wing with scraps of common card stock.
6 Using the top spars (1/8" x3/8" x 48"), lift and support the
bottom leading edge sheeting to conform to the
bottom, forward shape of the ribs Take care to accu-
rately position this spacer" to provide uniform
sheeting curvature from the root to the tip Check this
curvature with the ribs you are looking for uniform
contact with them from the spar forward
7. Locate and remove both W 21 's and W-22's (ply) from
their sheets Note that these parts are tapered and
that the wing root angle is in their root ends, therefore
there is a definite way they are to be installed Use
your sanding block to clean up their edges Glue the
forward W 21 in place to the bottom sheeting and the
leading edge of the spar, with its angled inboard end
terminating at the inboard edge of the wing sheeting
—be sure that W 21 is in place at 90° to the bottom
sheeting to assure proper rib-end contact
8 Locate ply root rib W 1 and the 1/8" W-2A "half-rib".
Hold W 1 in place against the inboard end of the
wing, W 21 and the 1/4" sq trailing edge Hold W-2A in
place against W 1,with its rear edge up against W-21.
Use a pencil to outline the forward 1/4"dia hole drilled
in W 1 for the aileron linkage onto W-2A, set aside
W-1 for now Drill a 1/8 dia hole through the approxi-
11