Station preset (◄/►), Q> subwoofer level, Memory – Philips MX920AHT-37 User Manual
Page 14: 0> phones, Standby-on, Standby/mute led, Display, Sleep, Demo/set, Remote sensor
Attention! The text in this document has been recognized automatically. To view the original document, you can use the "Original mode".
F
ront
P
anel
C
ontrols
(
continued
DSC
Press to select a PRESET EQUALIZER mode
(JAZZ, CLASSIC, ROCK, or POP).
For details, see page 18.
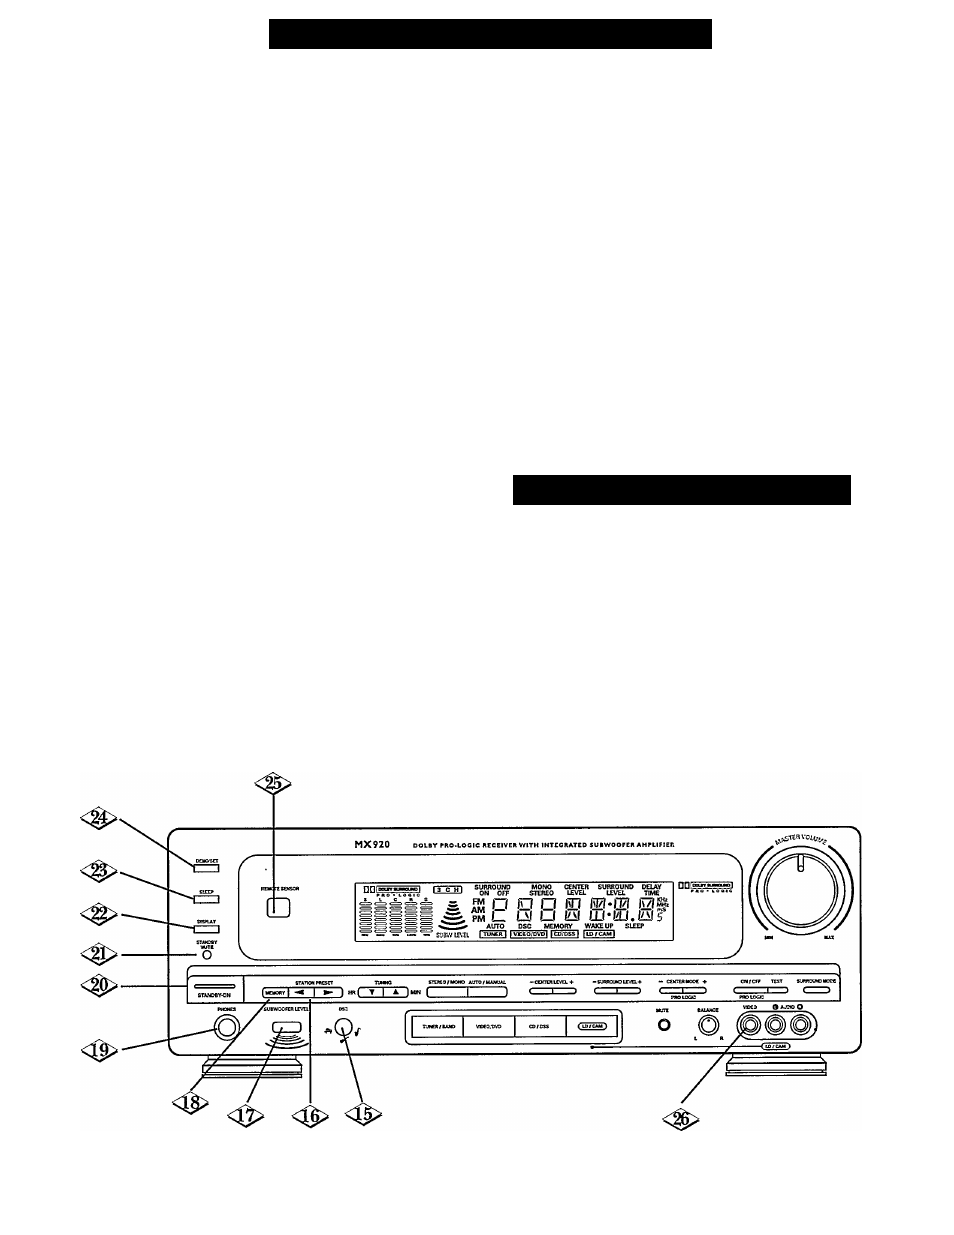
STATION PRESET (◄/►)
Press the (-^) or (►) button to select a preset
station. For details, see page 23-24.
SUBWOOFER LEVEL
Press to cyclic adjust the SUBWOOFER LEVEL
up or down.
For details, see page 18.
MEMORY
Press to store AM/FM stations in memory.
For details, see pages 23-24.
<0> PHONES
Plug in your Headphones here. Use the MASTER
VOLUME control to adjust the Headphones
sound level.
NOTE: When Headphones are plugged into the
Receiver, no sound will come from the Speakers.
STANDBY-ON
Press to turn the Receiver on. Press again to
turn the Receiver off.
STANDBY/MUTE LED
This LED will light up when the Receiver is
plugged into a household wall outlet. When the
Receiver is turned on, the STANDBY LED will
become brighter. Also, the LED will flash when
the Receiver is in the MUTE mode.
DISPLAY
Press to change the Receiver’s display from
CLOCK SET mode, SLEEP mode, WAKE UP
mode, to TUNER mode. For details, see page 25.
SLEEP
Press this button to select the SLEEP mode.
For details, see page 25.
DEMO/SET
Press to start a DEMO(nstration) mode. Press
any button to stop the Demonstration.
This button is also used to adjust the SLEEP
and WAKE UP times. For details, see page 25.
Also, this button is used to select a 12-hour or
24-hour CLOCK display. For details, see page 25.
REMOTE SENSOR
Receives the signal from the (wireless) remote
control.
F
ront
P
anel
C
onnections
LD/CAM INPUT
For hookup to the VIDEO and L/R AUDIO
outputs of a Camcorder or other AudioWideo
component.
NOTE: To hook up a Laser Disc Player or Camcorder to
this input, simply connect the VIDEO OUT and AUDIO
OUT(s) of the equipment to the VIDEO and L/R AUDIO
inputs on the Receiver. Turn the Receiver on by pressing the
POWER button and then press the LD/CAM SOURCE
SELECTOR button.
14