Heckler&Koch MR762A1-LRP User Manual
Page 20
38
39
Section 8 — CLEANING & Maintenance
Cleaning of the MR762A1
There are no special requirements, cleaners, or lubricants required for cleaning the
MR762A1. The standard HK cleaning kit that is used for all 7.62 mm HK rifles may be
used for this firearm. Cleaning may be completed using dry cleaning solvent, bore
cleaner, wiping with a cloth or an all-purpose nylon brush. Using these guidelines will
determine which applies. Cleaning materials are pipe cleaners, swabs, all-purpose nylon
brush and rags.
NOTE: If a solvent is used for cleaning, ensure all residual solvent is removed after
cleaning, and then a coat of lubricant must be applied for protection against rust and
the elements. Dry cleaning solvent may be used to completely remove lubricants.
For example, when using the rifle in extreme cold weather, dry cleaning solvent may
be used to remove traces of heavy lubricants before applying LAW. The following
lubricants (or their commercial equivalents) can be used: TW25 B, Shooter Choice,
LSA, LAW, or OX24.
Use solvents as follows:
1. Place a few drops on a swab or rag.
2. Clean the firearm with these swabs and rags until they come out clean.
3. Thoroughly purge all surfaces when solvents were applied.
4. Lubricate well in accordance with manufacturers’ recommendations.
CAUTION: Don’t “dry clean” your firearm.
General Cleaning is required under normal conditions and the following procedures apply.
1. Always clean after firing, after the firearm is wet or in adverse weather conditions.
Remove areas of powder fouling, debris and grit, corrosion and dirt. Clean the
bore with a bore brush and a cable cleaning rod. Pull the brush from the chamber
to the muzzle. Complete this several times with bore cleaner and let soak several
minutes if time permits. Clean the chamber with the chamber brush and a solid
cleaning rod handle. Rotate the chamber brush with bore cleaner by pushing and
twisting and also let it soak for several minutes while the upper receiver, piston,
piston rod and bolt carrier assembly are cleaned with the all purpose brush using
bore cleaner. Wipe excess cleaner off with a rag and then run several patches
through the bore with the cable rod from the chamber to the muzzle until there is
no residue on the patch.
2. Use an all purpose nylon brush or swab and apply a light coat of lubrication with
a clean swab to all the metal surfaces, including the bore, the locking lugs in the
chamber and on the bolt. A drop of oil should be placed on the ejector, extractor,
cam pin, trigger pin, hammer pin, charging handle spring and forward assist.
3. If the firearm has been disassembled, then all parts should be thoroughly cleaned
and lubricated before assembly. This is the best time to inspect all the parts before
assembly.
LUBRICATION
All firearms require proper lubrication to function as designed and the MR762A1 is
no exception. Absence of lubrication may impede the operation of the MR762A1,
particularly in load-bearing or friction contact areas. Excessive lubrication may also cause
function problems by acting as a magnet for dirt, grit, sand, and fouling. Many high
quality, medium weight lubricants (oils) specifically designed for use on firearms, including
those cited earlier will work well on the MR762A1. Do not use lubricants that boast of
their ability to penetrate metal as these substances may deaden cartridge primers.
UPPER RECEIvER
Apply a light coat of a suitable lubricant to the interior of the upper receiver, bore and
chamber, barrel nut, outer surfaces of barrel, barrel nut, front sight, surfaces under
handguard and forward assist.
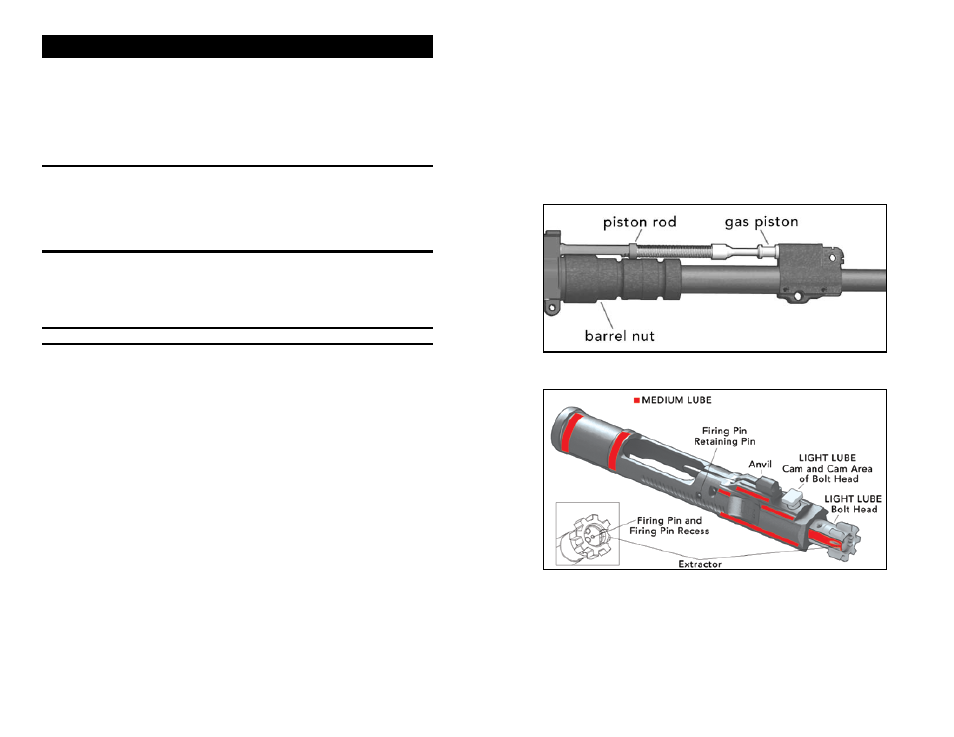
Fig. 56 – Lubrication of the MR762A1 Bolt Carrier Assembly
Fig. 57 – Lubrication of the Gas Piston, Piston Rod, and Barrel Nut Exterior
1. Apply a medium coat of lubricant on the gas piston and operating rod (Fig. 56)
2. Apply a light coat of lubricant to the extractor pin, the firing pin, firing pin spring, firing
pin recess in the bolt. Apply a medium coat of lubricant to the red areas (Fig 57).
3. Apply a medium coat of lubricant to the extractor (Fig. 57).