Heckler&Koch MR762A1-LRP User Manual
Page 18
34
35
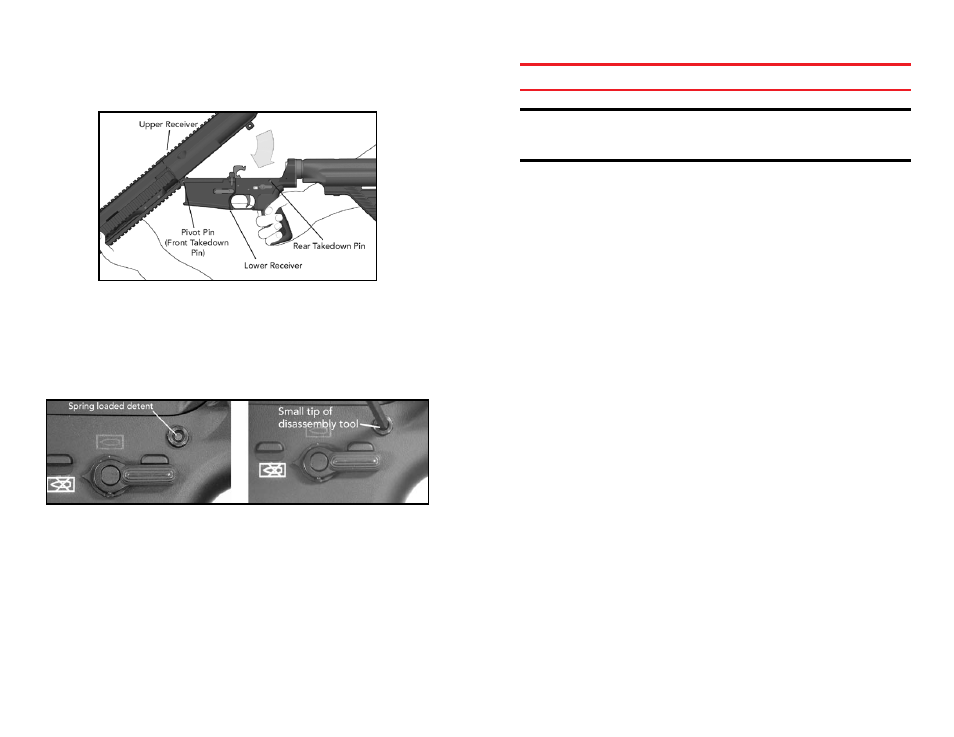
d. Insert the small tip of the disassembly tool into the spring loaded detent located in
the center of the rear pivot pin. While pushing on the disassembly tool, drift the pivot
pin from right to left until the pivot pin reaches its limit of lateral travel. The tip of the
pivot pin should be visible on the left hand side of the lower receiver (Fig. 52).
Fig. 51 – Closing Upper and Lower Receiver
e. Insert the small tip of the disassembly tool into the spring loaded detent located in the
center of the rear takedown pin. While pushing on the disassembly tool, drift the rear
takedown pin from right to left until the rear takedown pin reaches its limit of lateral
travel. The tip of the rear takedown pin should be visible on the left hand side of the
lower receiver.
Fig. 52 – Detail of the rear Takedown Pin showing spring loaded detent.
f. Install the disassembly tool into the storage channel located at the back of the
buttstock.
g. Mount the recoil pad onto the back of the buttstock with the recoil pad perpendicular
to the buttstock. Ensure that the recoil pad is flush with the buttstock and rotate the
recoil pad clockwise one quarter turn until the recoil pad engages the locking surfaces
located on both the top and bottom of the buttstock.
FUNCTION CHECK
WARNING: Always ensure the MR762A1 is unloaded prior to attempting to perform
a function check.
NOTE: The MR762A1’s selector lever can be placed on safe regardless of the
position of the hammer. Legacy AR15/M16 platforms and many of their large caliber
counterparts (7.62 x 51 mm/.308 caliber) require that the hammer be cocked prior to
attempting to place the firearm on “SAFE”.
FUNCTION CHECK PROCEDURE
1. Perform clearing procedure (see above) and ensure selector lever is set on “Safe”.
2. Place the muzzle in a safe direction and rack the bolt to the rear three or four
times in quick succession by using the charging handle. The bolt should not bind
when traveling back and forth in the receiver.
3. “SAFE”: Let the bolt go forward and completely go into battery. With an
unloaded MR762A1 and the muzzle in a safe direction, ensure the selector lever is
set on “Safe” and attempt to pull the trigger. The hammer must not fall.
4. “SEMI-AUTOMATIC”: Rotate the selector lever to “Semi-Automatic” (Single Shot)
and with an unloaded MR762A1 and the muzzle in a safe direction, attempt to
pull the trigger and hold to the rear. The hammer must fall.
5. While maintaining pressure on the trigger, rack the bolt and release. The hammer
should be held by the disconnector.
6. Release the trigger. The hammer should be caught by the sear as signified by a
metallic click. Release the trigger completely and re-engage the trigger. Hammer
must fall.
7. Insert an empty magazine into the magazine well and pull back on the charging
handle. The magazine follower should engage the bolt catch and lock the bolt to
the rear on an empty chamber.
8. Remove the magazine and allow the bolt to go into battery, either by depressing
the bolt catch or by pulling the charging handle slightly back towards the rear and
then releasing.
9. Ensure that the MR762A1 is unloaded, place the muzzle in a safe direction and
pull the trigger to ease the tension on the trigger spring.
10. Place the selector lever back on “Safe” and snap the dust cover into position over
the ejection port.