Great Planes Venus II 60 ARF - GPMA1027 User Manual
Page 10
❏
4. Connect a 12" [300 mm] servo extension wire to each
aileron servo. Cut one of the included black heat shrink
tubes in half, making two 1-1/2" [40 mm] pieces. Center the
pieces of tubing over the connections between the servo
wires and the extensions and use a heat gun to shrink the
tubing, making the connections secure.
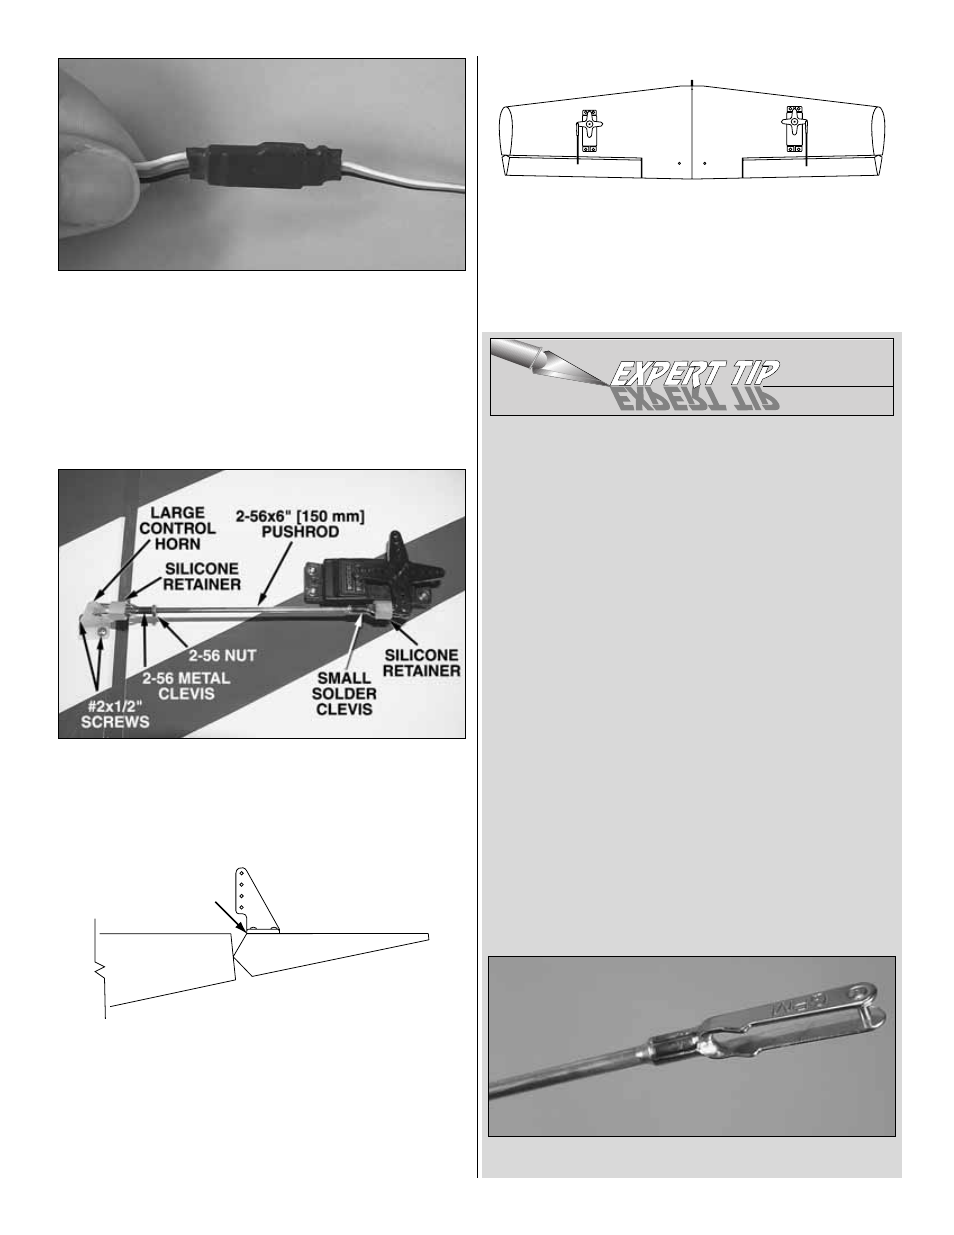
Refer to this photo while mounting the servos
and hooking up the ailerons.
❏
5. Use the string in the wings to pull the servo wires out
while placing the servos in the openings. With the servos in
position, drill 1/16" [1.6 mm] holes into the wing for all the
servo mounting screws. Temporarily mount the servos with
the servo mounting screws that came with your servos.
❏
6. Read the Expert Tip below on how to solder. Then
connect the aileron servos to the ailerons using the
hardware shown in the photo. When mounting the horns,
place the front edge at the front edge of the aileron as
indicated by the arrow in the illustration. Drill 1/16" [1.6 mm]
holes through the ailerons for the screws. If using new, four-
arm servo arms, do not cut the extra arms off until instructed
to do so when setting up the radio later.
Note: Set up the ailerons so the servo arms that the
pushrods will be mounted to are opposed.
HOW TO SOLDER
❏
A. Use denatured alcohol or other solvent to thoroughly
clean the pushrod. Roughen the end of the pushrod with
coarse sandpaper where it is to be soldered.
❏
B. Apply a few drops of soldering flux to the end of the
pushrod, and then use a soldering iron or a torch to heat it.
“Tin” the heated area with silver solder (GPMR8070) by
applying the solder to the end. The heat of the pushrod
should melt the solder—not the flame of the torch or
soldering iron—thus allowing the solder to flow. The end of
the wire should be coated with solder all the way around.
❏
C. Place the clevis on the end of the pushrod. Add
another drop of flux, then heat and add solder. The same as
before, the heat of the parts being soldered should melt the
solder, thus allowing it to flow. Allow the joint to naturally cool
without disturbing. Avoid excess blobs, but make certain the
joint is thoroughly soldered. The solder should be shiny, not
rough. If necessary, reheat the joint and allow to cool.
❏
D. Immediately after the solder has solidified, but while it
is still hot, use a cloth to quickly wipe off the flux before it
hardens. Important: After the joint cools, coat with oil to
prevent rust. Note: Do not use the acid flux that comes with
silver solder for electrical soldering.
This is what a properly soldered clevis looks like—shiny
solder with good flow, no blobs, flux removed.
CONNECT THE PU
S
HROD
S
TO THE
S
ERVO
ARM
S
S
O THEY ARE OPPO
S
ITE, A
S
S
HOWN.
10