Preflight, Set the control throws, At home – Dynaflite GPMA0090 Butterfly User Manual
Page 37
37
battery pack aft. If possible arrange the battery
pack and receiver to achieve balance but make
sure they remain secure in the fuselage so they
cannot shift during fl ight or a rough landing. If you
must add additional weight to the nose or tail of
the Butterfl y to achieve balance use Great Planes
adhesive lead weights (GPMQ4485). An alternative
to stick-on nose weight (if your model is tail heavy)
is a Great Planes brass spinner nut (GPMQ4640).
It has 1/4-28 threads so it will fi t most engines.
Set the Control Throws
Measure the throws at the widest part of the
trailing edge of the rudder and elevator. After
a few fl ights you may change the throws to suit
your fl ight style or the weather conditions.
We recommend the following control surface
throws:
Elevator:
3/4" up and down
Rudder:
1-1/2" left and right
Throttle:
Set the throttle so that at “high stick”
the carburetor barrel is fully open and at low
stick with full to half throttle
trim
, the carburetor
barrel is nearly closed. At this position the engine
should run reliably at a low RPM (idle). To shut
the engine off, decrease the throttle trim tab.
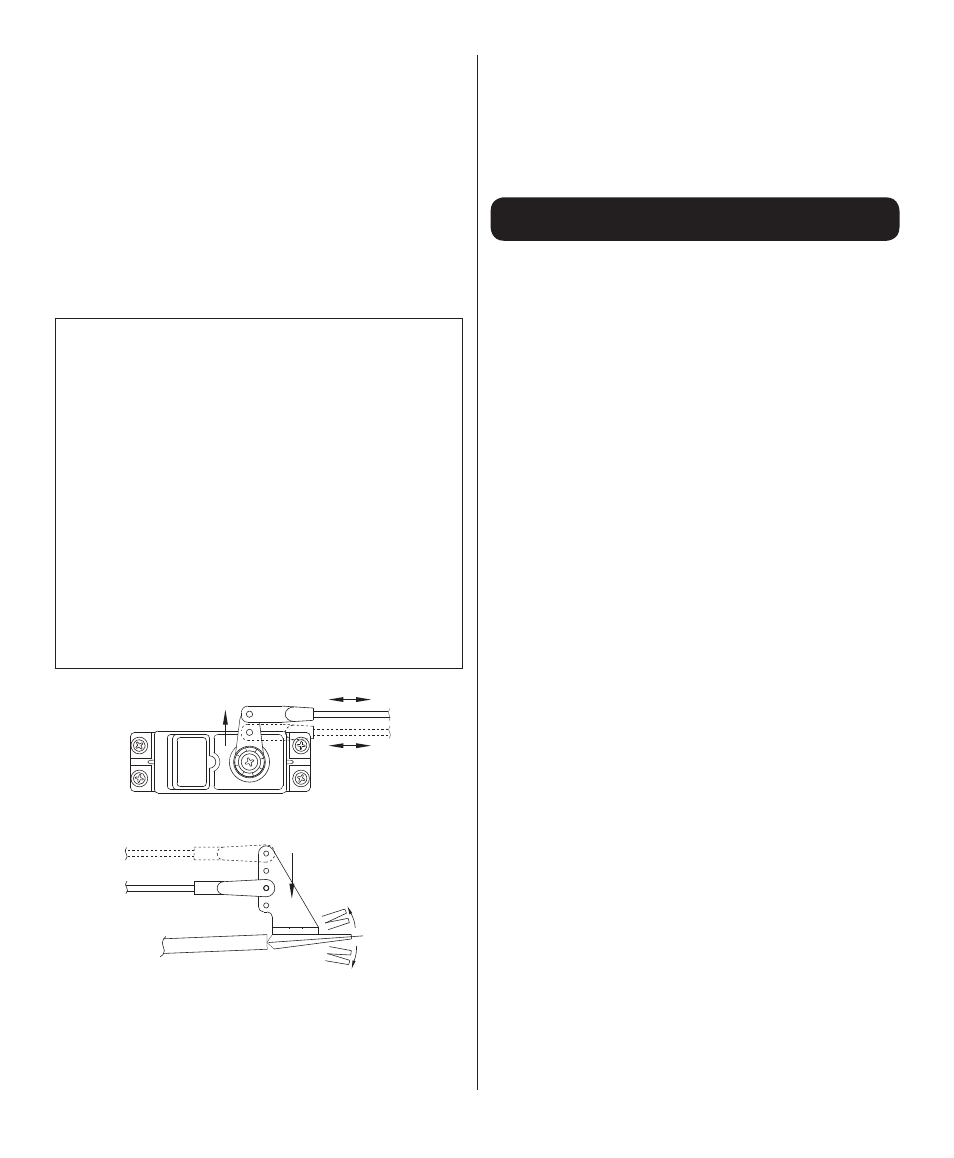
results in more throw.
Moving the clevis inward on the control horn
throw
More
throw
More
More
movement
results in more pushrod movement.
Moving the clevis outward on the servo arm
Less
movement
More movement
The closer the clevis is to the base of the control
horn on the control surface and/or the further the
pushrod is from the center of the servo arm, the
more control throw you will have. To decrease
control throw, move the clevis on the control horn
outward and/or move the pushrod on the servo arm
inward. Combinations of the above arrangements
will provide the control throw you require. Of course,
if your transmitter has ATV (adjustable travel
volume), use them to fi ne-tune the control throws.
Preflight
At Home
Balance Your Propellers
Balancing the propeller seems like one of those
things that you can skip, but many problems are
the result of vibration caused by an unbalanced
propeller. Nuts and bolts can vibrate loose and
vibration can damage delicate radio components
inside your receiver and servos. Vibration can even
damage the delicate glow plug element which could
result in an engine that is diffi cult or impossible
to start. Purchase a Top Flite Precision Magnetic
Balancer™ (TOPQ5700) or a Great Planes fi ngertip
prop balancer (GPMQ5000) to accurately balance
your propellers.
Charge Your Batteries
Follow the battery charging instructions in the
instruction manual that came with your radio control
system. You should
always
charge your batteries
the night before you fl y.
Ground Check Your Model
Inspect all nuts, screws and wheel collars.
Make
sure you install the screw that holds the servo
arm onto the servos
and the servo cords are
securely connected to the receiver.
If you are not thoroughly familiar with R/C models,
ask an experienced modeler to inspect your radio
installation and make sure the control surfaces
respond correctly. The engine must be “broken-
in” according to the engine manufacturer’s
recommendations for break-in. Refer to the
Engine
Safety Precautions
on page 42 before you start
your engine. After you run the engine on the model
make sure all screws remain tight, the hinges are
secure and the prop is on tight.