Testing the thermostat, Troubleshooting – Braeburn 3300 User Manual
Page 9
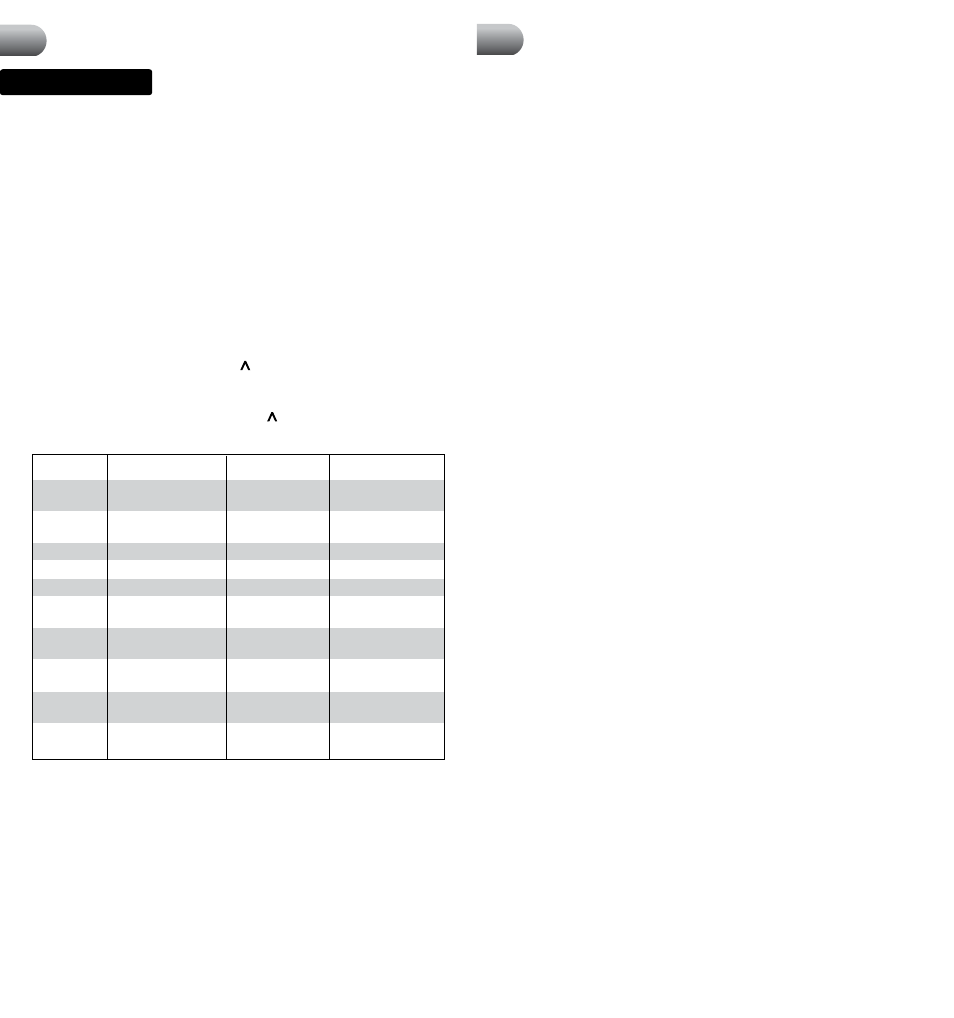
Test Type
System Function
System Type
Active Terminals
Cooling
1st Cooling Stage
Conventional
Y1, O, G
or Heat Pump
Cooling
2nd Cooling Stage
Conventional
Y1, Y2, O, G
or Heat Pump
Heating
1st Heating Stage
Conventional
W1, B, G*
Heating
1st Heating Stage
Heat Pump
Y1, B, G
Heating
2nd Heating Stage
Conventional
W1, W2, B, G*
Heating
2nd Heating Stage
2 Stage
Y1, W2, B, G
Heat Pump
Heating
2nd Heating Stage
3 Stage
Y1, Y2, B, G
Heat Pump
Heating
3rd Heating Stage
3 Stage
Y1, Y2, W3, B, G
Heat Pump
Heating
Emergency Heat
2 or 3 Stage
E, B, G*
Heat Pump
Fan
Fan Only
Conventional
G
or Heat Pump
To provide time to verify equipment operation, a test will run for 5 minutes. At
the end of that time, the thermostat will return to normal operating mode. To
stop a test early press
BACK and NEXT at the same time for 3 seconds.
NOTE: Only tests that apply to the current thermostat settings will be displayed.
As an example, tests for 3rd stage compressor will not be available on a
thermostat configured for a 2 stage conventional system.
*Notes on Fan (G Terminal) Function: The G terminal will only be active if the
stages are configured as electric heat. Systems that have the heating stages
configured as gas will not activate the fan (G) terminal.
7
Testing the Thermostat
This thermostat features a menu driven operational test mode. This test
mode is intended for use by trained HVAC technicians. If you are unfa-
miliar with the operation of this equipment, please contact a qualified
service technician to perform these tests.
To START TEST MODE, Press
BACK and at the same time for 3 seconds.
To EXIT TEST MODE, Press
BACK and NEXT at the same time for 3 seconds.
To NAVIGATE TEST MODE, Press
NEXT to move forward to the next test type. Press
BACK to move back to the previous test. Press to start and stop each test. To
EXIT TEST MODE, Press
BACK and NEXT at the same time for 3 seconds.
15
8
Troubleshooting
Symptom: Thermostat does not turn on heating or cooling system.
Potential Solution: Check to see if OFF is shown in display. This indicates that the
system is turned off at the thermostat. Change the system to
HEAT or COOL. After the
compressor short cycle protection period expires, the system should start.
Compressor protection feature may be in effect due to compressor short cycle
conditions. See page 13.
Heating or cooling system may be malfunctioning. Call a professional service techni-
cian immediately to verify system operation.
Symptom: Thermostat turns on heating instead of cooling or cooling instead of heating.
Potential Solution: Check thermostat wiring to make sure that the heating
and cooling stages are connected to the correct terminals on the wiring terminal
block. See section 9, Wiring Diagrams.
Symptom: Thermostat turns heating or cooling system on too often or not often enough.
Potential Solution: Increase or decrease temperature differential settings as ap-
propriate to provide the desired performance level. See page 9.
Symptom: Low battery indicator is shown in thermostat display.
Potential Solution: Replace batteries immediately to maintain proper system
operation. See page 14.
Symptom: Thermostat display is blank.
Potential Solution: It is possible that AC power is not present at the thermostat
and/or the batteries are drained. Check fuse, circuit breaker and thermostat
wiring as appropriate to verify AC power is available. Replace batteries before
reprogramming thermostat. See page 14. If AC power is present, call a professional
service technician to verify thermostat and system performance.
Symptom: The room is too warm or too cold.
Potential Solution: Review current set point and change as necessary. See page 12.
Symptom: Fan runs intermittently or when system is off.
Potential Solution: Fan switch is in Recirculate Mode (CIRC).
Symptom: HI is shown in the thermostat display.
Potential Solution: The temperature sensed by the thermostat is higher than the
99˚ F (37˚ C) upper limit of the thermostats display range. The display will return to
normal after the sensed temperature lowers within the 40˚ to 99˚ F (4˚ to 37˚ C) display
range. Turn on the cooling system or use other methods to lower the temperature
accordingly.
This condition could occur from the system being turned off during an exceptionally
warm period or upon installation when the thermostat has been stored for a long
period of time in a warm vehicle or location prior to being installed.
Symptom: LO is shown in the thermostat display.
Potential Solution: The temperature sensed by the thermostat is lower than the
40˚ F (4˚ C) lower limit of the thermostat’s display range. The display will return
to normal after the sensed temperature rises within the 40˚ to 99˚ F (4˚ to 37˚ C)
display range. Turn on the heating system to raise the temperature as needed for
comfort within the room.
This condition could occur from the system being turned off during a cold weather
period or upon installation when the thermostat has been stored for a long period of
time in a cold vehicle or location prior to being installed. The thermostat should be
allowed to warm up prior to installation in order to provide proper heating control
once installed.
16
• Do not short (or jumper) across terminals on the gas valve or at the heating
or cooling system control board to test the thermostat installation. This
could damage the thermostat and void the warranty.
• Do not select COOLING test modes if the outside temperature is below
50° F (10° C). Doing so could possibly damage the compressor system and
may cause personal injury.
• This thermostat includes an automatic compressor protection feature
that is DISABLED during test mode. When testing, DO NOT quickly switch
the compressor on, off and on. Doing so could possible damage the
compressor system and may cause personal injury.
WARNING!
Read BEFORE Testing