Adaptive Technologies MM-008-BT User Manual
Page 2
©2004 Allen Products Co., Inc. Signal Hill, CA 90755
(562) 424-1100
10/04-rev01
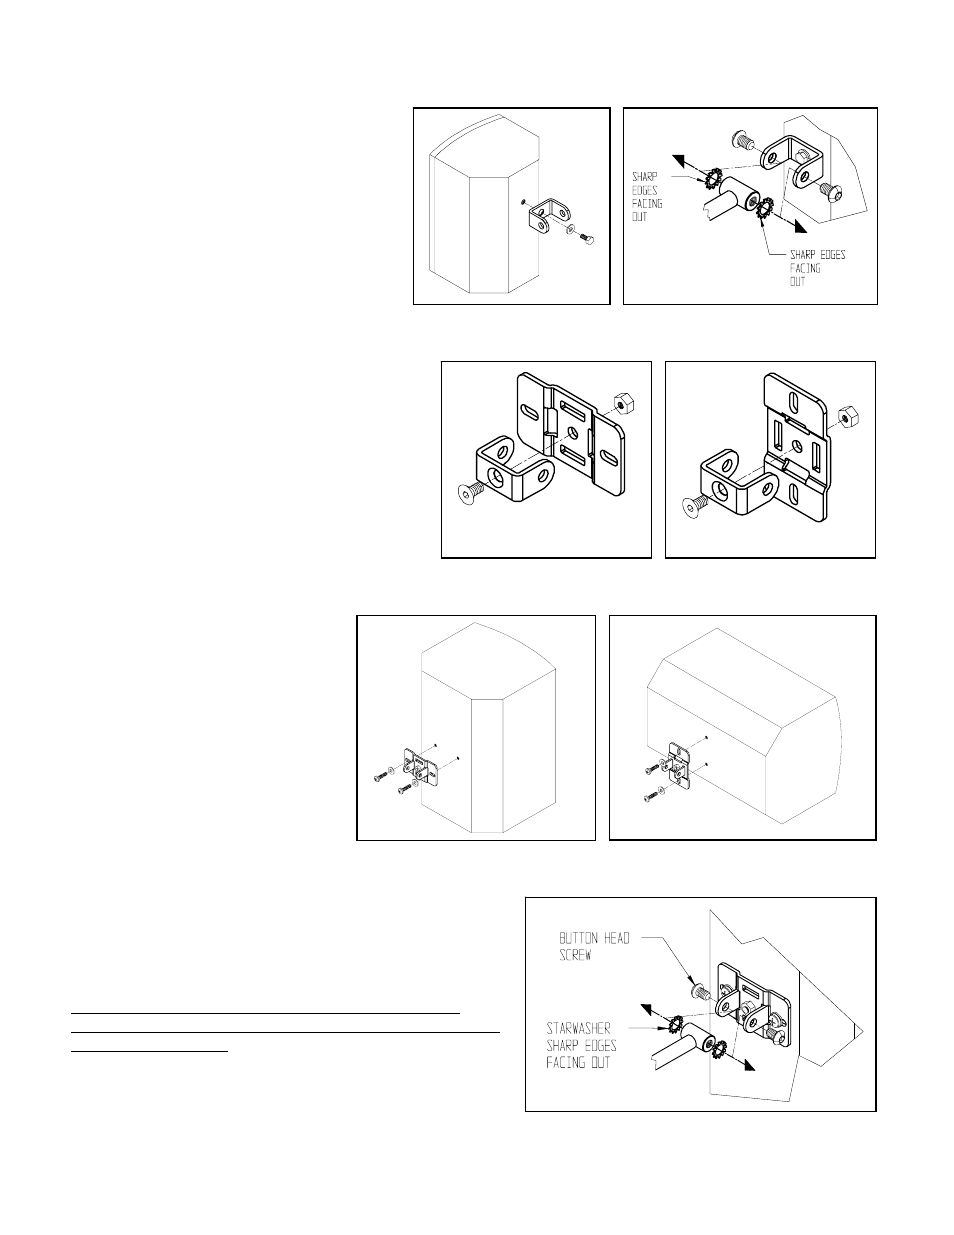
Figure 4A: Horizontal Installation Figure 4B: Vertical Installation
Figure 3A
Figure 3B
Step 2: Decide Vertical or Horizontal
Speaker Orientation:
Horizontal (Figure 2A) or vertical installation
(Figure 2B).
For speakers with one mounting hole:
Use the speaker’s mounting screw to install the
adapter’s U-bracket to the speaker (Figure 3A)
then attach the support arm to the U-bracket
using the included 5/16” button head screws
and star washers (Figure 3B).
Important:
The sharp edges of the star washer must
face the inside surface of the speaker
adapter plate flanges to achieve proper tilt
locking (Figure 3B).
For speakers with two mounting holes.
Insert the legs of the U-bracket through the
desired slots of the speaker adapter plate that puts
the speaker into the desired vertical or horizontal
orientation. Secure parts with the flat head screw
and nylock nut (See Figure 4A and 4B for
horizontal and vertical orientations).
Step 3. Attach adapter plate to speaker:
For vertically oriented speaker installations see
figure 5A. For horizontally oriented
speakers see figure 5B.
If threaded
inserts and/or mounting screws are not
included on the speaker, consult the
speaker manufacturer for proper
mounting procedures.
Attach the speaker adapter plate to the
appropriate mounting holes of the
speaker using the manufacturer’s
suggested screws and washers.
Tighten these fasteners permanently.
Step 4.
Assemble support arm to the speaker
adapter plate by bolting the support arm inside the flanges of
the U-bracket using the 5/16 button head screws and star
washers in between the flanges and the support arm (Figure
6).
Important:
The sharp edges of the star washer must face the inside
surface of the speaker adapter plate flanges to achieve proper
tilt locking (Figure 3B).
Step 5. Install Speaker to Wall/Ceiling Plate:
Lift the speaker and insert the support arm through the
mounting plate’s rubber grommet until it reaches the bottom
flange of the mounting plate (Figure 7). Use glass cleaner as
a lubricant between the grommet and the support arm.
Figure 6
Figure 5A
Figure 5B
Figure 4A: Horizontal Installation
Figure 4B: vertical Installation