Adaptive Technologies MM-008-CM User Manual
Multimount, Mm-008-cm, Universal ceiling mount installation instructions
© 2004 APC Incorporated. Signal Hill, CA 90755 USA
(562) 424-1100
10/04-rev01
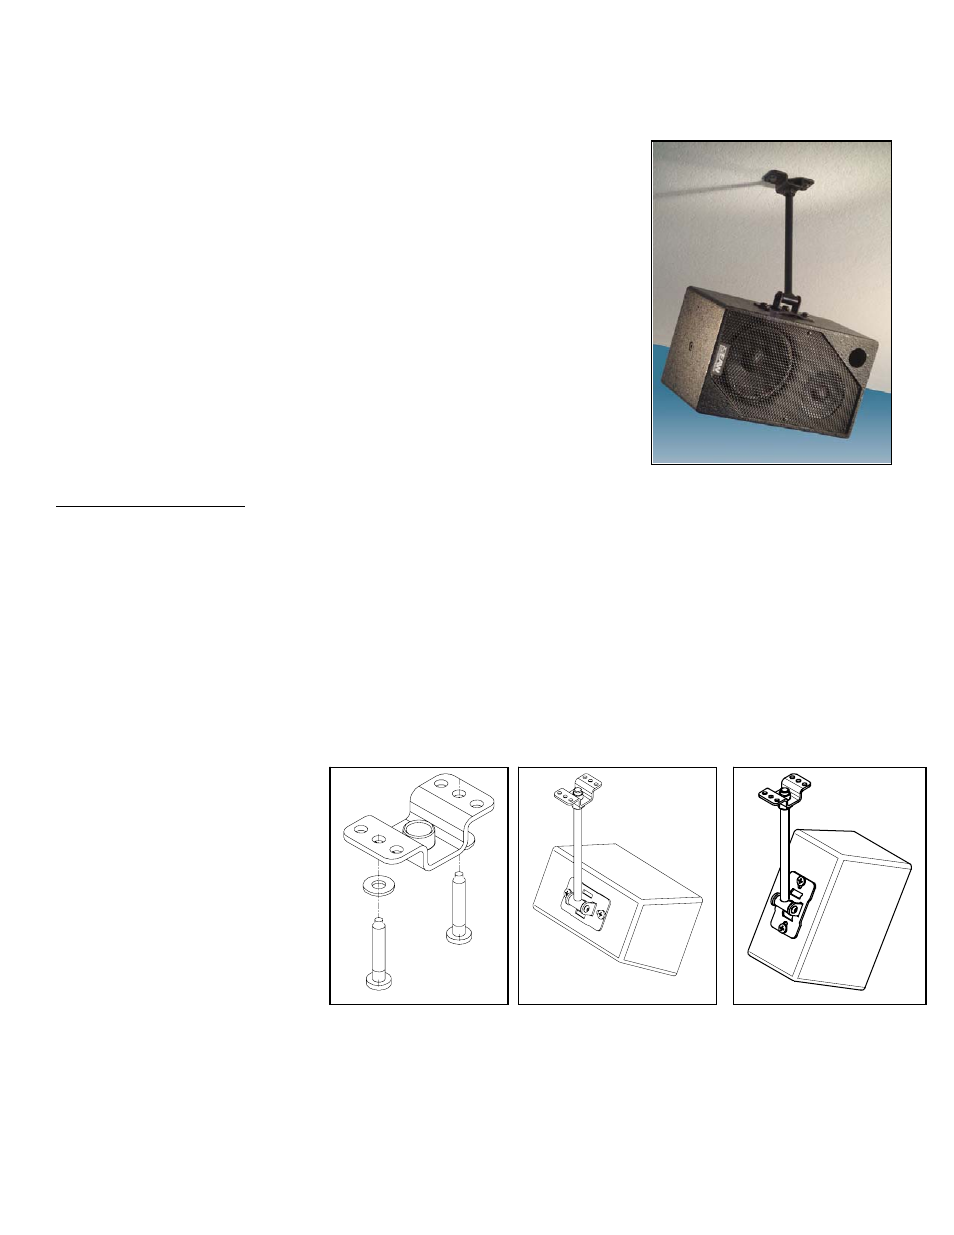
Figure 1
Figure 2A: Horizontal speaker
adapter plate installation
MultiMount
™
MM-008-CM
Universal Ceiling Mount Installation Instructions
Thank you for selecting the all weather MultiMount™ MM-008-CM speaker mounting
kit. This mounting kit contains two speaker mounts that independently aim and tilt
speakers weighing up to 15 lbs/6.8 kg from most ceiling structures. The MM-008-
CM accommodates speakers with both single and two hole mounting patterns.
Warning:
Mounting and/or rigging loudspeakers requires experienced professionals.
Improperly installed loudspeakers can result in property damage,
personal injury or liability to the installing contractor.
To assure a trouble free installation, read through and follow these instructions
carefully before beginning. If you have doubts about the integrity of the structure
you are mounting to or you are not sure about the hardware to use, consult a
structural and/or hardware specialist.
Be sure that all of the following items are included in this kit before
proceeding:
Package Contents:
Item #: Qty
Description
1.
2 pcs. Ceiling mounting plate
4.
2 pcs. U shaped rotator bracket
2.
2 pcs. Support arm
5.
2 pcs. Hardware kit
3.
2 pcs. Speaker adapter plate
Note to installing contractor:
Due to the wide variety of ceiling structures, materials and mounting methods, these instructions assume that the
installer will exercise good judgment in selecting the proper mounting area and hardware.
As a guide, the installation, when complete should be capable of supporting 5 to 10 times the actual applied load. We
recommend the use of a safety cable (sold separately).
Step 1. Install Mounting Plate:
Predetermine the desired direction of the speaker then install the mounting plate and support arm using the appropriate
hardware for a ceiling mounted application (Figure 1)
Step 2: Decide Vertical or
Horizontal Orientation:
Horizontal (Figure 2A) or vertical
installation (Figure 2B).
For speakers with one mounting
hole:
Use the speaker’s mounting screw to
install the adapter’s U-bracket to the
speaker (Figure 3A) then attach the
support arm to the U-bracket using
the included 5/16” button head
screws and star washers (Figure 3B).
Important:
The sharp edges of the star washer must face the inside
surface of the speaker adapter plate flanges to achieve proper tilt locking (Figure 3B).
For speakers with two mounting holes.
Insert the legs of the U-bracket through the desired slots of the speaker adapter plate that puts the speaker into the
desired vertical or horizontal orientation. Secure parts with the flat head screw and nylock nut (See Figure 4A and 4B for
horizontal and vertical orientations).
Figure 2B: Vertical speaker
Adapter plate installation