Installing the evaporator unit with attic access – Vintage Cellars Ceiling Mount User Manual
Page 21
www.whisperkool.com | Page 19
INSTALLING THE EVAPORATOR UNIT WITH ATTIC ACCESS
CONNECTING THE EVAPORATOR UNIT
IN THE ATTIC
12.
If you have purchased the Active Humidity Option, connect a water line
to the water connection port on the evaporator unit, shown in Figure 5
(see page 27 for more Active Humidity Option Information).
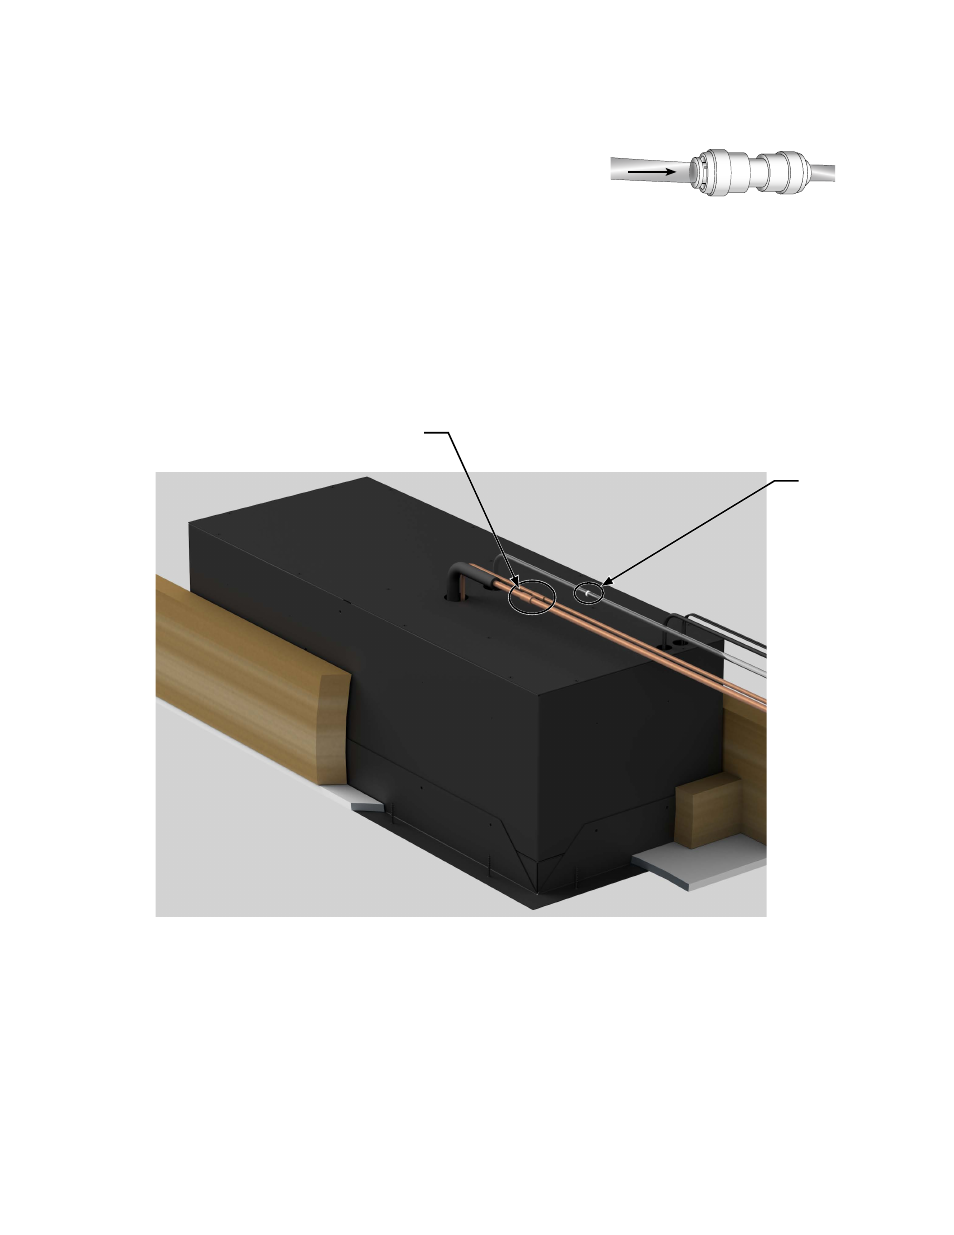
Figure 5 (Optional)
13.
Connect the drain line following the directions on page 24.
14.
Remove the caps on the end of the line set.
15.
Purge nitrogen through the system.
16.
Braze the line set to the suction and liquid line ports on the evaporator unit.
17.
Seal all gaps around the unit using expanding foam.
18.
Using fiberglass insulation, wrap any part of the wrapper that is not inside the cellar. This will prevent
condensation from forming on the wrapper.
19.
If desired, paint the mounting bracket and Front Access Panel to match the color of the ceiling.
BRAZE LINE SET USING
COUPLING
CONNECT THE
DRAIN LINE
TUBING
THE NEXT SECTION IS AN INSTALLATION PROCESS FOR
SITUATIONS WHERE ATTIC ACCESS IS NOT AN OPTION.
- VintageView 3' Island Display Rack (2 pages)
- VintageView 4' Island Display Rack Assembly Instructions (2 pages)
- VintageView 4' Half Island Display Rack Assembly Instructions (2 pages)
- VintageView 7' Island Wine Rack w/ Presentation Row (2 pages)
- Evolution 81 Bottle Wine Rack (2 pages)
- VintageView Magnum Wall Mounted 9 Bottle Rack (2 pages)
- VintageView Backer Bar Set for FCF - Single sided (1 page)
- IBR-L-3H-8C EcoWineracks (2 pages)
- REC-L-36x9.52 EcoWineracks (2 pages)
- DIAB-L-36x36 EcoWineracks (2 pages)
- RR-U-3H-2C EcoWineracks (2 pages)
- ARCHLAT-U-48x36 EcoWineracks (2 pages)
- TR-UN-GR (4 pages)
- Kessick Estate Series (1 page)
- Kessick Wine Cellar Preparation (3 pages)
- 144 Bottle Black Tie Grid (1 page)
- 96-Bottle Antiqued Steel Wine Jail (7 pages)
- Transtherm Loft Wine Cellar Glass (17 pages)
- Transtherm Double Bastide Solid Door Black (21 pages)
- Transtherm Castel Glass Door Wine Cellar Black (22 pages)
- Trilogy Wine Cellar (7 pages)
- Trilogy Wine Cellar Credenza (8 pages)
- Classic Wine Cellar (7 pages)
- N'FINITY PRO 29 Dual Zone Wine Cellar (11 pages)
- N'FINITY PRO HDX 46 Dual Zone Wine Cellar (12 pages)
- N'FINITY PRO HDX 94 Dual Zone Wine Cellar (12 pages)
- N'FINITY PRO HDX 166 Dual Zone Wine Cellar (12 pages)
- N'FINITY PRO HDX RED Wine Cellar (12 pages)
- N'FINITY PRO HDX 187 Dual Zone Wine Cellar (12 pages)
- Giant Wine Cellar (9 pages)
- LECBILD1400 (29 pages)
- LECBILD1800 (31 pages)
- LECBILDBLK3000 (30 pages)
- Le Cache Delivery and Inspection Instructions (3 pages)
- Le Cache Cabinet Owners Manual (34 pages)
- CellarPro Owners Manual (26 pages)
- Le Cache Placement Requirements (3 pages)
- Le Cache Setup Instructions (5 pages)
- LOFT 1200 (10 pages)
- WineKoolR (19 pages)
- WineKoolR Slimline 120 (20 pages)
- WineKoolR Slimline 250 (24 pages)
- WineKoolR Slimline 240 (20 pages)
- WineKoolR Slimline 400 (24 pages)
- CL:EV504ZXUL (25 pages)