Smarttote, Permastore, Hose support kit – Thetford 40538 SmartTotes User Manual
Page 2
1. Place tank on one side.
2. Remove two screws from Skid Plate.
Slide Skid Plate down and pop it off
of Axle Assembly. Set Skid Plate and
screws aside.
3. Release old Hose Support from tank.
Set tank with Axle facing up.
4. Pop Axle Assembly up and out of tank
by hand (one side at a time).
5. Set Axle Assembly vertically on one
wheel on solid surface.
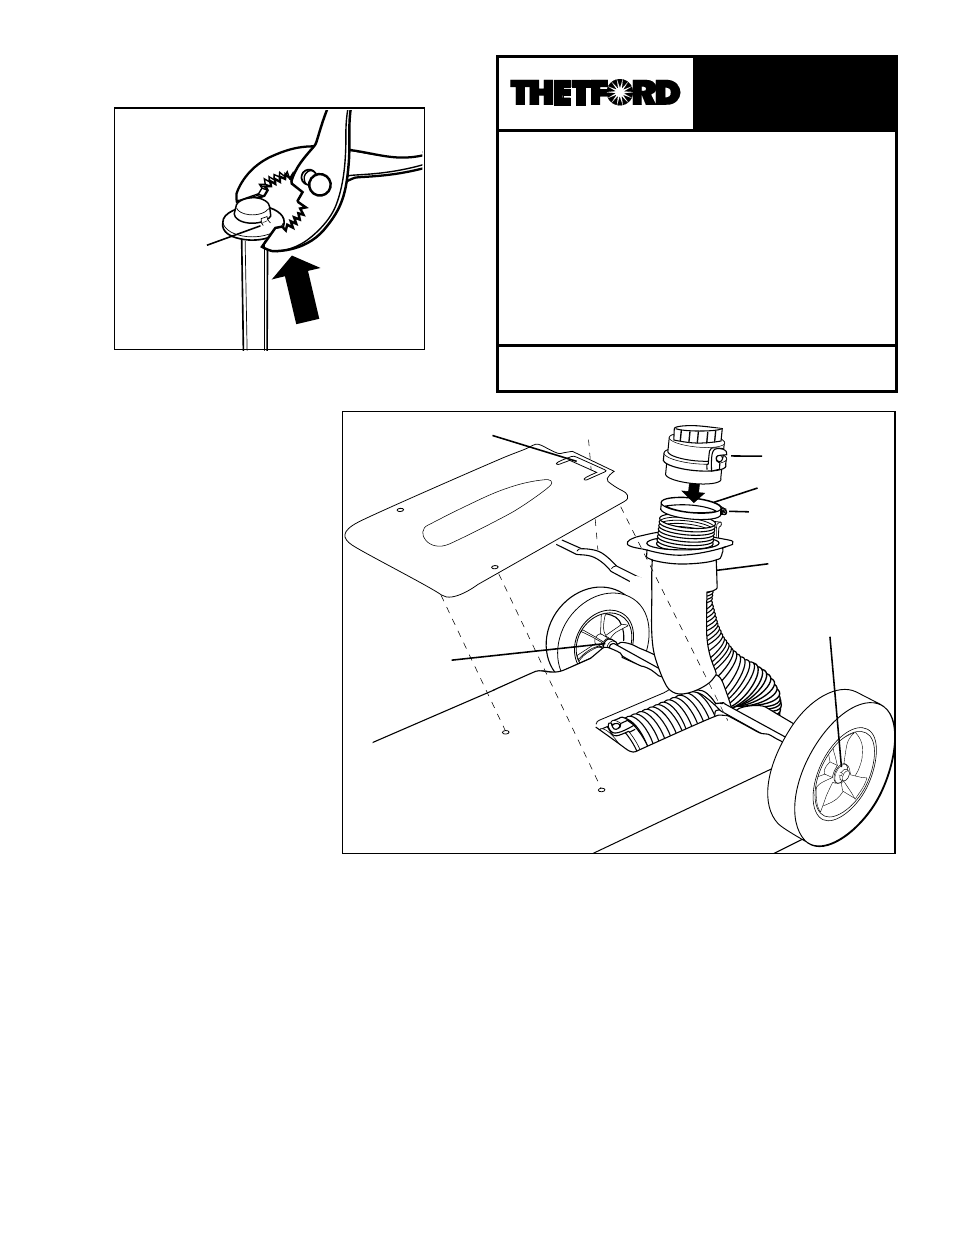
6. Use pliers to remove one Push Nut as
shown in Fig. A. Discard Push Nut.
7. Slide top Wheel and Bushing off Axle.
Set aside.
8. Slide old Hose Support off of Axle.
9. Slide new Hose Support onto Axle.
10. Slide Bushing and then Wheel, with
three “spokes” oriented up/out, onto
Axle.
11. Align new Push Nut on Axle. Pound in
place with hammer.
12. Rest Axle Assembly in axle groove on
tank. Make sure both Bushings are
next to Wheels. Press and snap Axle
Assembly into place one Wheel at a
time.
13. Keeping Hose end up above tank for
hygienic reasons, remove Bayonet
SmartTote
®
Permastore
TM
Hose Support
Kit
Made in the USA
Thetford Corporation
Ann Arbor, MI 1-800-521-3032 www.thetford.com
F#
40621
2/07
Part No.
40533
Holding Tank Accessories
Before Beginning
4
Read all instructions completely.
4
Wear protective gloves, glasses, long
sleeves, and nose/face mask to avoid
contact with human waste.
4
For hygienic reasons, rinse tank and
hose thoroughly.
fitting/cap from hose: Loosen Hose
Clamp Screw with Philips screwdriver.
14. Slide Bayonet fitting/cap off hose.
Set aside. Remove and discard Hose
Clamp.
15. Slide old Hose Support off Hose. Dis-
card old Hose Support.
16. Snake Hose through new Hose Sup-
port.
17. Slide new Hose Clamp over Hose.
Fig. A Removing Push Nut from Axle
Note tabs on
each side of
Push Nut
Fig. B Hose Support and Tank component assembly
Bayonet Fitting/Cap
Hose Clamp
Hose Clamp Drive Head
Window in rear face
of Hose Support
Axle Bushing
Bend in Axle snaps into
slot on Skid Plate
Wheel retaining
Push Nut
Insert Bayonet fitting/cap into Hose.
Position Clamp so Clamp Drive Head is
up and Drive Head will align with Hose
Support window (Fig. B).
18. Tighten Hose Clamp Screw securely.
Rest Hose Support Assembly on solid
surface.
19. Position Skid Plate on Axle to remount.
Lock axle bend into Skid Plate slot.
20. Fasten Skid Plate to tank with Screws.