Operation instructions – Qmark Mechanical Artisan - Heavy-Duty Architectural Wall Heater User Manual
Page 5
OPERATION
INSTRUCTIONS
1. Heater must be properly installed before operation.
2. Turn power supply ON at the service panel for this heater.
3. Rotate the thermostat fully clockwise. This should energize
the heating elements and cause warm air to flow from the hot
air discharge at the openings in the bottom front part of the
grille. This may take a minute or two for the fan delay to oper-
ate the fan.
4. After the operation check, rotate the thermostat counterclock-
wise to the desired position to obtain room comfort.
Note: For best results, the heater should be left “ON” constantly
during the heating season because the thermostat, when
properly set, will maintain the desired temperature.
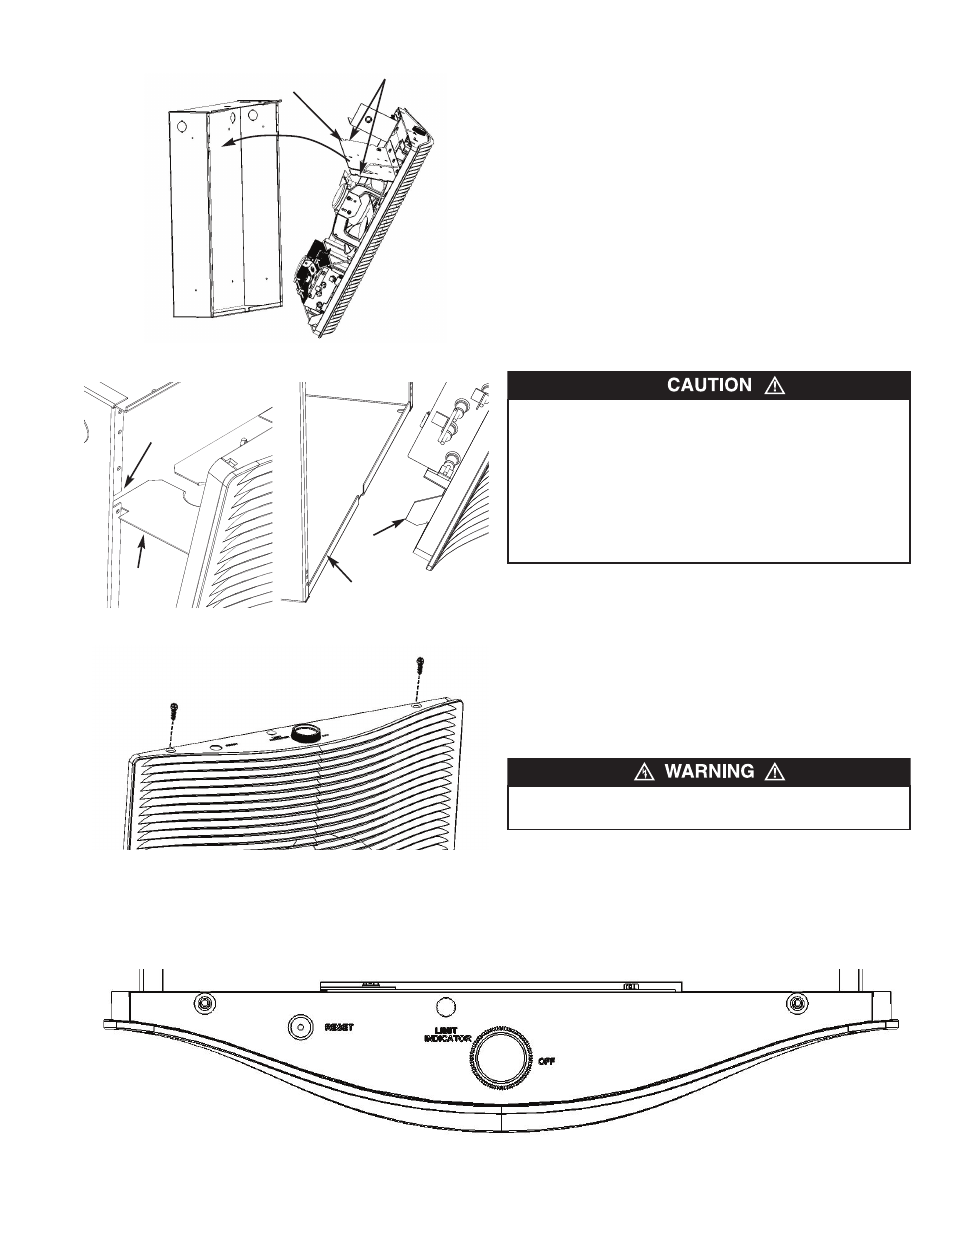
TO RESET THERMAL LIMIT CONTROL
Your heater is equipped with a manual reset safety thermal limit
control that will automatically turn the heater OFF to prevent a
fire if the heater overheats. This control is mounted inside the
heater (top left). On the top cover of the grille assembly it is
marked “Reset Button.” REMOVE the plug button that covers the
hole. To reset, allow the heater to cool, then push the red button
that is visible through the hole downward (you may have to use
a pencil- blunt side) to reach the button. The heater should
immediately return to normal operation.
NOTE: The unit is provided with an End of Life “oneshot” protec-
tive device. This serves as a back up protector in extreme condi-
tions if the overheat protector fails to maintain safe temperatures
during an overheat condition. If the end of life control activates,
the heater must be checked by a reputable repairman.
THE ACTIVATION OF THE THERMAL LIMIT CONTROL AND
RED WARNING LIGHT OCCURS IF THE HEATER OVER-
HEATS. CHECK HEATER TO MAKE SURE IT IS NOT
BLOCKED – IF SO, REMOVE THE BLOCKAGE. IF THERE IS
NO BLOCKAGE, IT IS RECOMMENDED THAT THE HEATER
BE INSPECTED BY A REPUTABLE ELECTRICIAN OR
REPAIR SERVICE TO ENSURE THE HEATER IS NOT
DAMAGED. DO NOT CONTINUE TO USE HEATER IF IT
REPEATEDLY CYCLES OFF ON THIS THERMAL LIMIT.
DO NOT TAMPER WITH OR BYPASS ANY THERMAL LIMITS
INSIDE HEATER.
5
Figure 6- Installation of Heater/Grille Assembly
Figure 9- Top Panel Layout
Figure 8- Securing Bezel
Control
Shelf
Notches
Figure 7- Heater / Grille Assembly Detail, Grille Supported for Wiring
Flange
Tab
Back Box
Notch
Control
Shelf