Dell PowerVault 110T LTO2 (Tape Drive) User Manual
Page 28
Removing the Cartridge
If a tape cartridge fails to eject from the tape drive, you can manually remove the cartridge. The following tools are required for the procedure:
l
2.5-mm allen wrench
l
Small-blade screwdriver or potentiometer-setting tool
l
2-mm hex wrench
l
#3 Phillips screwdriver
l
Needle-nose pliers
l
Flashlight (optional)
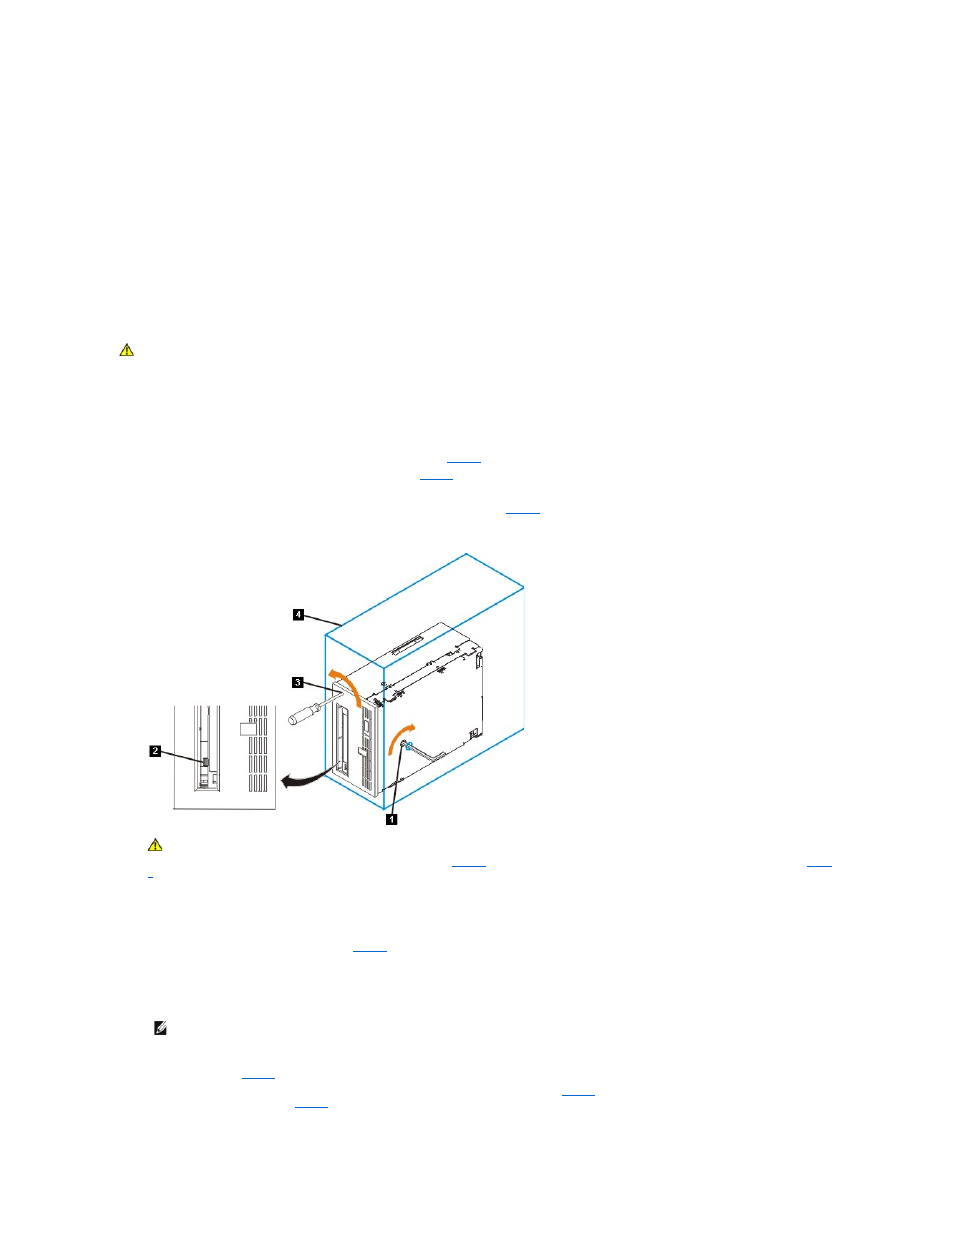
To manually remove a tape cartridge, perform the following steps:
1. Place the drive so that the front faces you, then tilt it on its left side (see
2. Locate the access hole at the bottom of the unit (see number 1 in
).
3. Insert a 2.5-mm allen wrench into the access hole and position the wrench so that it is seated in the screw of the supply reel motor.
4. Push open the door of the tape load compartment and locate the flag (See number 2 in
Figure 3. Determining whether the tape is broken
5. To determine whether the tape is broken, watch the flag (See number 2 in
) on the drive's takeup reel while you rotate the allen wrench (See number 1 in
) clockwise (do not let the wrench move counterclockwise):
¡
If you feel resistance to the allen wrench while attempting to turn the supply reel motor screw clockwise, go to step 7.
¡
If the takeup reel turns when you rotate the supply reel motor screw clockwise with the allen wrench, the tape is not broken. Go to step 6.
¡
If the takeup reel does not turn when you rotate the supply reel motor screw clockwise with the allen wrench and if supply reel motor screw rotates freely, the
tape is broken. You must determine the location of the leader block. To do so, insert a small-blade screwdriver or potentiometer-setting tool into the access hole
for the loader motor gear (See number 3 in
). Rotate the screwdriver counterclockwise. You may have to rotate for a lengthy period:
n
If the cartridge moves up, the tape is completely in the cartridge and the leader block is in the home position. Continue rotating the screwdriver until the
cartridge ejects. Remove the cartridge.
n
If you feel resistance and the cartridge does not move up, the leader block is not in the home position. Call your service representative.
6. Continue to rotate the allen wrench until you feel resistance. The tape has been rewound as far as it can go without unthreading.
7. With the allen wrench still inserted into the bottom access hole, insert a small-blade screwdriver or potentiometer-setting tool into the access hole for the loader motor
gear (See number 3 in
).
8. While keeping torque on the supply reel motor screw and rotating the allen wrench (See number 1 in
) clockwise, rotate the loader motor gear with the small-
blade screwdriver (See number 3 in
) counterclockwise (see arrow). As you rotate the screwdriver, the allen wrench moves slightly.
CAUTION: Before performing this procedure, note the following:
l
Ensure that you have attempted all normal methods of removing the tape cartridge from the drive.
l
This procedure may damage the stuck tape cartridge. If you use this procedure, copy the data from the stuck cartridge to another cartridge. If
you believe the cartridge has been damaged, replace it.
l
Do not use a power screwdriver to perform this procedure because it can destroy the tape.
l
Never touch the head or electronic components within the drive. Touching may cause contamination or damage by electrostatic discharge.
CAUTION: In the following step, rotate the allen wrench clockwise, not counterclockwise. A counterclockwise motion may damage the tape.
NOTE: The number of required rotations depends on where the beginning of the tape is on the cartridge's takeup reel. You may have to rotate the allen wrench for
a lengthy period.