Update seed tube – Great Plains YP825AR Material Rate User Manual
Page 52
48
YP825AR
Great Plains Manufacturing, Inc.
401-923B
2013-11-11
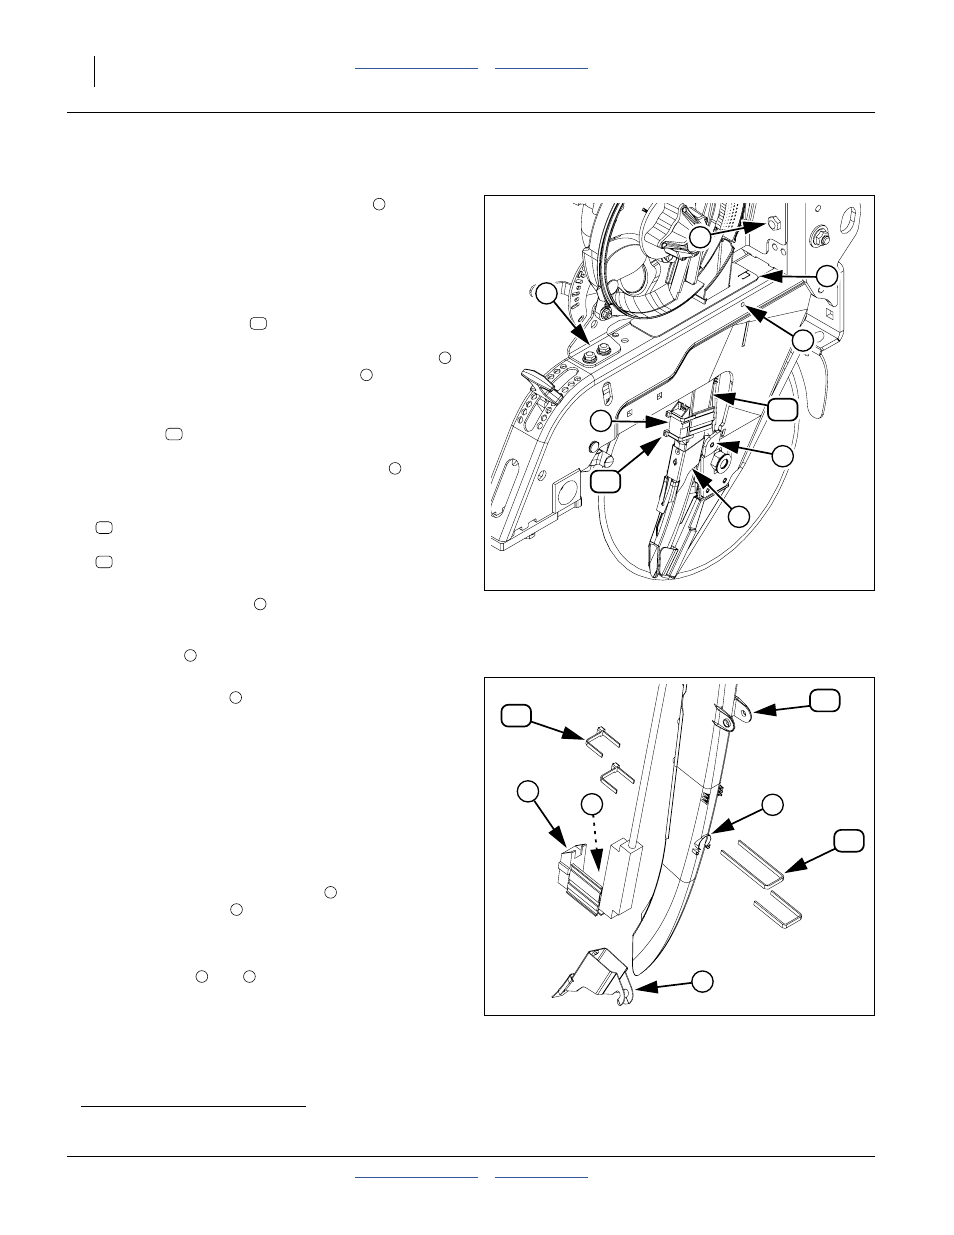
Update Seed Tube
Refer to Figure 24
8.
Remove and save the seed tube gasket
.
Note: If the planter has Row-Pro™ servo down-pressure,
several rows have an extra cable from load cell to
harness that routes through the gasket. It is not
possible to completely remove the gasket on these
rows. Slide the gasket up out of the way.
9.
Pull the old seed tube
up and out of the opener
shank. Be careful to not damage the extra cable on
rows with Row-Pro™ load cells. The seed sensor
and its cable, and seed tube hook clip
will come
out with the seed tube.
10. Note how the sensor is aligned on the tube. Cut the
cable ties
securing the seed sensor to the seed
tube. Remove and save the sensor components.
Remove and save the seed tube hook clip
.
Discard
a
the seed tube.
11. Select one new:
817-827C SEED TUBE AIRMETER 25 SER
and two new:
800-244C CABLE TIE .19X15 PANDU BT4S-C0
Refer to Figure 25
12. Clean and dry the face
of the sensor receiver. This
may require carefully removing existing silicone
sealant. Clean and dry the front face of the sensor
locating ring
on the new tube.
13. Apply a generous dab of clear silicone sealant to the
front (outside) face
of the sensor locating ring.
Avoid introducing any air bubbles.
14. Re-attach the saved seed sensor to the new seed
tube. Secure with new ties.
15. Snap the saved seed tube hook clip on the new seed
tube. Verify that the rear center hole in the clip is over
the alignment stud on the seed tube (not shown).
16. Insert the new seed tube assembly into the shank.
Take care not to snag any Row-Pro™ load cell cable
present. Note that a lower hook on the seed tube
hook clip needs to engage a pin
. Secure seed
tube with clevis pin
and cotter.
17. Re-install the saved seed tube gasket.
18. Swing meter assembly back into position. Secure
with four bolts
and
.
19. Install next used seed disk. Re-install rain cover.
a. Older seed tubes do not support detection (including blockage detection) of very small seeds.
13
11
6
9
7
5
2
4
3
Figure 24
Canola Field Update: Seed Tube
36068
5
13
6
7
11
7
13
11
8
8
11
6
13
7
8
11
8
Figure 25
Canola Field Update: Sensor
36080
8
9
2
3
4