Install forward components, Front drives without fertilizer, Clutch bearing plate components – Great Plains 3S-4000HD Assembly Instructions User Manual
Page 15
Great Plains Manufacturing, Inc.
Installation Instructions
11
2012-12-11
133-322M
Install Forward Components
Front component installation is different for each drill
section, and is different for drills with and without the
Fertilizer option. The front Small Seeds drive assembly is
installed in all cases.
Page 11 step 42: If the drill does not have fertilizer, your
Small Seeds kit includes an empty Fertilizer drive mount,
bearing, jackshaft, sprockets, idler and chain for each
drill section.
Page 16 step 75: With Fertilizer installed, the Small
Seeds front drives mount on top of the existing Fertilizer
drive mounts. The jackshaft is already installed, and only
requires adding a sprocket to each jackshaft.
Front Drives without Fertilizer
Clutch Bearing Plate Components
Start with the left section. This work is similar for all
sections.
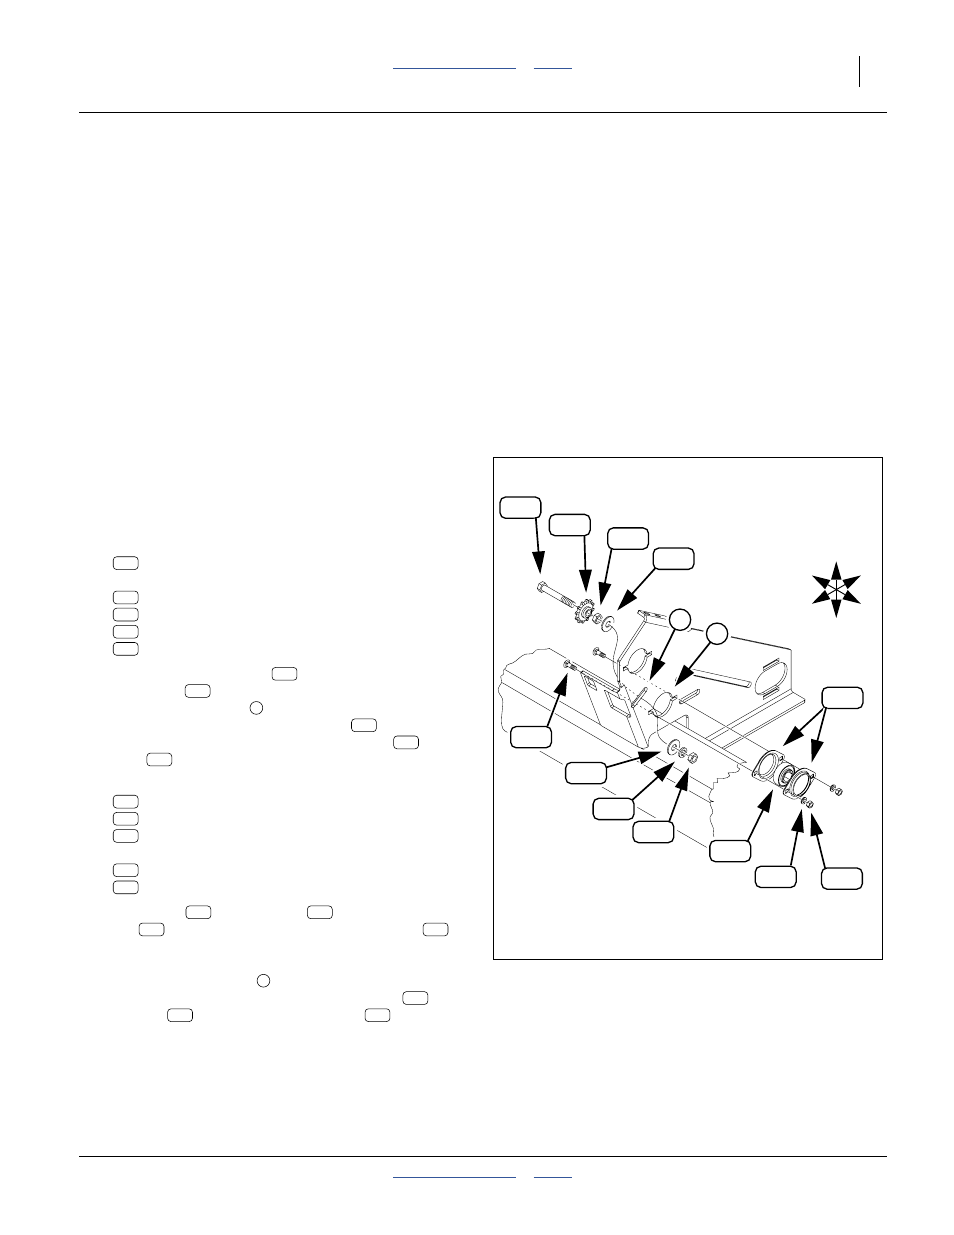
Refer to Figure 14, which depicts the clutch bearing plate with
numerous components removed for clarity.
42. Select one new:
822-119C BRG 7/8HEXX2.05OD SPH
and two sets new:
822-032C FLANGETTE 52 MST
802-282C RHSNB 5/16-18X1 GR5
804-009C WASHER LOCK SPRING 5/16 PLT
803-008C NUT HEX 5/16-18 PLT
43. Sandwich the bearing
between the
flangettes
, and mount the assembly at the low
open flangette hole
of the clutch bearing plate.
Mount from the left, with the bolts
inserted
from the right. Secure with lock washers
and
nuts
.
44. Select one each new:
802-041C HHCS 1/2-13X3 1/2 GR5
817-025C NO. 40 12T IDLER SPKT.
804-015C WASHER LOCK SPRING 1/2 PLT
two each new:
803-036C NUT HEX JAM 1/2-13 PLT
804-113C WASHER FLAT 1/2 USS HARD PLT
45. Slide idler
onto the bolt
, secured by a jam
nut
spun on finger tight. Add flat washer
.
From the right side, insert the idler assembly into
the forward idler slot
of the clutch bearing plate.
Loosely secure it with another flat washer
, lock
washer
and the second jam nut
.
46. Repeat step 42 through step 45 for the center and
right sections.
U
D
F
B
L
R
Figure 14:
Clutch Bearing Plate
27440
126
153
1
132
152
139
128
2
149
128
128
143
135
153
152
128
139
132
153
152
1
128
139
132
126
149
135
143
149
126
135
143
2
143
135