Unit properties, Site properties – ClearOne XAP Net User Manual
Page 8
XAP Net — Connecting and Configuring
13
Technical Services Group ~ 1-800-283-5936 (USA) ~ 1-801-974-3760
12
Technical Services Group ~ 1-800-283-5936 (USA) ~ 1-801-974-3760
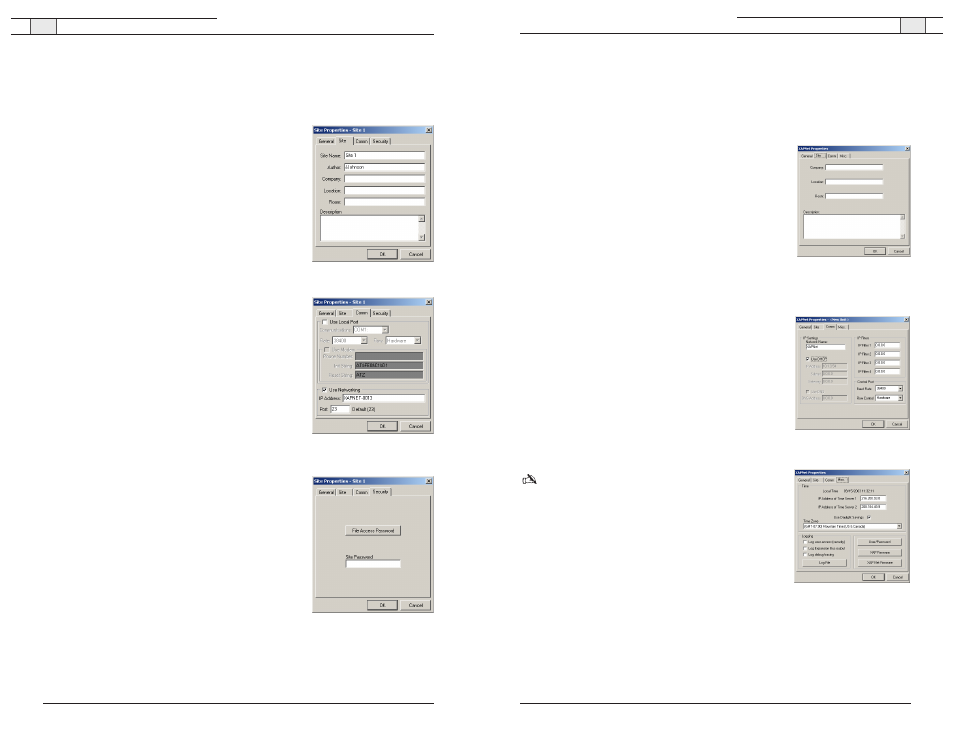
Unit Properties
In the Unit Properties window, you can configure the IP settings and communication rates,
enter a time server address and access the XAP Net firmware utilities.
To add a unit description
1. Open the Unit Properties window by right-clicking on the
XAP Net icon in the Site pane and selecting
Unit
Properties
from the shortcut menu.
2. The General tab displays the Unit Identification number,
MAC Address and Firmware Version. If you have not
connected to the unit, this area is blank. Click the
Site
tab.
3. Enter descriptive information about your unit including
Company Name, Location, and Room. Click
OK
to save and
close the window.
To set up IP filters
1. Click the
Comm
tab in the Unit Properties window.
2. In the IP Filters section, enter specific IP addresses that
will be allowed to access the XAP Net system.
You can specify a range of IP addresses by using zeros. For
example, entering 192.168.105.0 will allow any IP
addresses in the 192.168.105.1 to 192.168.105.254 range
to access the XAP Net.
3. Click
OK
to save the settings and close the window.
To specify a time server
Note: You should specify a time serve to ensure an accurate
time stamp on log files.
1. Open the Unit Properties window and click the
Misc
tab.
2. Enter the
IP address
for the time server. Two addresses can
be specified.
3. Select
Use Daylight Savings
if your region observes
daylight savings time.
4. Select your
Time Zone
and click
OK
to save settings.
Figure 23. Unit description
Figure 24. Network settings
Figure 25. Time server
XAP Net — Connecting and Configuring
Site Properties
In the Site Properties window, you can configure communication settings, add site
descriptions and set the file access and site passwords.
To add a site description
1. Open the Site Properties window by right-clicking on the
XAP Net icon in the Site pane and selecting
Site
Properties
from the shortcut menu.
2. The General tab displays the site file name, path and
creation date. Click the
Site
tab.
3. Enter descriptive information about your site including
Company Name, Location and Room. Click
OK
to save
and close the window.
To configure site communication properties
1. Click the
Comm
tab in the Site Properties window.
2. Select the connection option you will be using.
• If connecting serially, select
Use Local Port
and
specify the baud rate and flow control.
For the initial connection to XAP Net, the Baud Rate
must be set to 38,400 bps with Flow set to Hardware.
• If connecting through the network, select
Use
Networking
and enter the IP Address.The default Port
is 23, which is the port XAP Net uses for Telnet client.
To set site passwords
1. Click the
Security
tab.
2. Click
File Access Password
to create a password for the
site file. Users attempting to open the site file will need
to supply this password.
3. Click
OK
to save settings and close the window.
Figure 20. Site description
Figure 21. Comm properties
Figure 22. Security settings