Connecting to a non-dhcp network – ClearOne XAP Net User Manual
Page 6
XAP Net — Connecting and Configuring
9
Technical Services Group ~ 1-800-283-5936 (USA) ~ 1-801-974-3760
XAP Net — Connecting and Configuring
8
Technical Services Group ~ 1-800-283-5936 (USA) ~ 1-801-974-3760
!
Connecting to a non-DHCP network
This procedure requires two 9-pin serial cables (one is included with your XAP Net). Once
you have properly configured XAP Net with the correct IP address through a serial
connection, you can connect it to your LAN.
To connect serially to XAP Net
1. Place your unit in a standard 19" rack and attach it securely. Rack ears are included.
2. Connect the power supply to the XAP Net. Use only the provided power supply.
3. Connect a 9-pin serial cable from the
To XAP
port to the
RS-232
port on the XAP 800,
XAP 400, XAP TH2 or PSR unit. The status light on the XAP Net will turn green when
the XAP Net is properly connected to a XAP/PSR unit.
Note: The XAP Net will change the baud rate on the XAP RS-232 port to 57,600 bps.
4. Connect a 9-pin serial cable from the
Control
port to a
COM
port on the PC or laptop that
has G-Ware 5.0 installed.
5. Start G-Ware.
6. Click the
New Site
button on the G-Ware toolbar
to open the Site Properties window.
7. Click the
Comm
tab. Select the COM port your PC
is using to connect to XAP Net. Ensure the Rate is
38,400
and that Flow is set to
Hardware
.
8. Click
OK
to close the Site Properties window.
9. Click the
Connect
button on the G-Ware toolbar to
connect to the XAP Net. Icons representing the
XAP Net and other connected XAP/PSR units
appear in the Site pane.
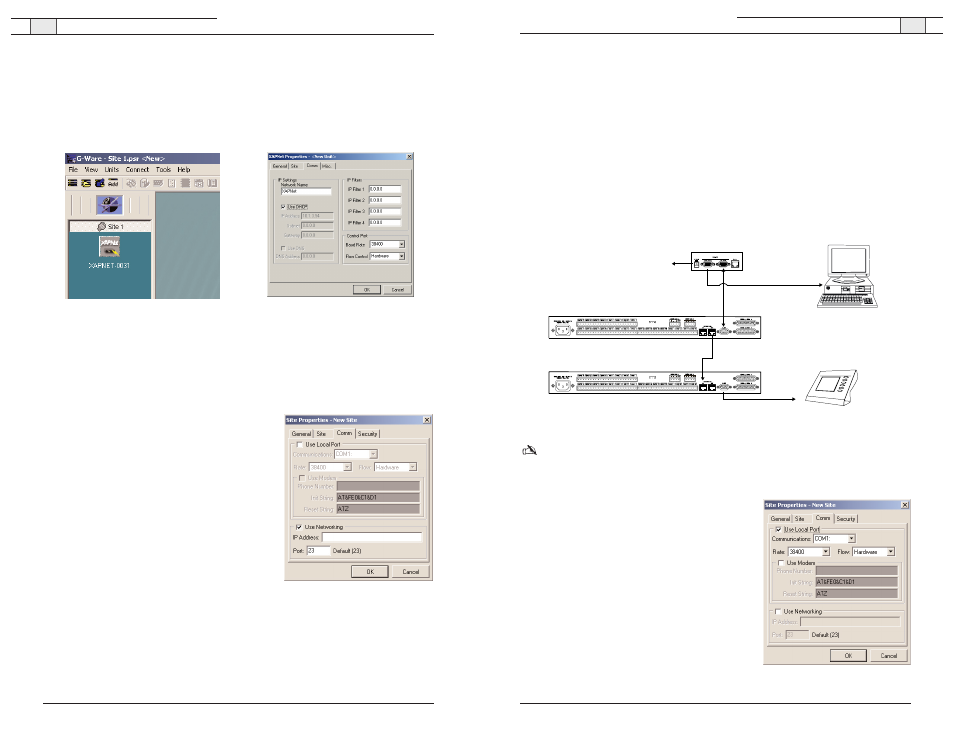
Serial connection
to XAP system
To 5 VDC
power supply
PC running G-Ware
XAP 800
XAP Net
Serial connection
to PC/laptop
XAP 800
Serial control device
Figure 15. Making the initial serial connection
Figure 16. Site Properties, serial settings
To retrieve the XAP Net IP address
1. Connect a 9-pin serial cable from the
Control
port on the XAP Net to the PC COM port.
2. Start G-Ware and create a new site. Verify the
Baud Rate
is set to 38,400 and
Flow
is on.
3. Click the
Connect
button on the G-Ware toolbar to connect to the XAP Net. Upon
successful connection, a XAP Net icon will appear in the Site pane.
4. Right-click on the XAP Net icon to open the Unit Properties window.
5. Make a note of the
IP address
and default
network name
. If you want to use a different
unique network name, enter it in the Network Name field. You will use either the IP address
or the network name when you establish a connection through the network.
To connect through the network with G-Ware
1. Click the
New Site
button on the G-Ware toolbar to
open the Site Properties window.
2. Click the
Comm
tab.
3. Select
Use Networking.
In the
IP Address
box, type
the IP address or the unique network name for the
XAP Net.
4. Click
OK
to close the Site Properties window.
5. Click the
Connect
button on the G-Ware toolbar to
connect to the XAP Net.
6. You will be prompted to enter a user name and
password. The default user name is
clearone
and
the password is
xapnet
. The password and user
name are not case sensitive.
If the connection is successful, the XAP Net status light will turn green and icons
representing the XAP Net and other connected XAP/PSR units will appear in the Site
pane. If the connection is not successful, refer to the troubleshooting section on page 20.
Figure 12. Connected XAP Net unit
Figure 13. XAP Net IP settings
Figure 14. Site Properties