Upgrading g-ware, Upgrading xap and psr unit bootcode and firmware – ClearOne XAP Net User Manual
Page 4
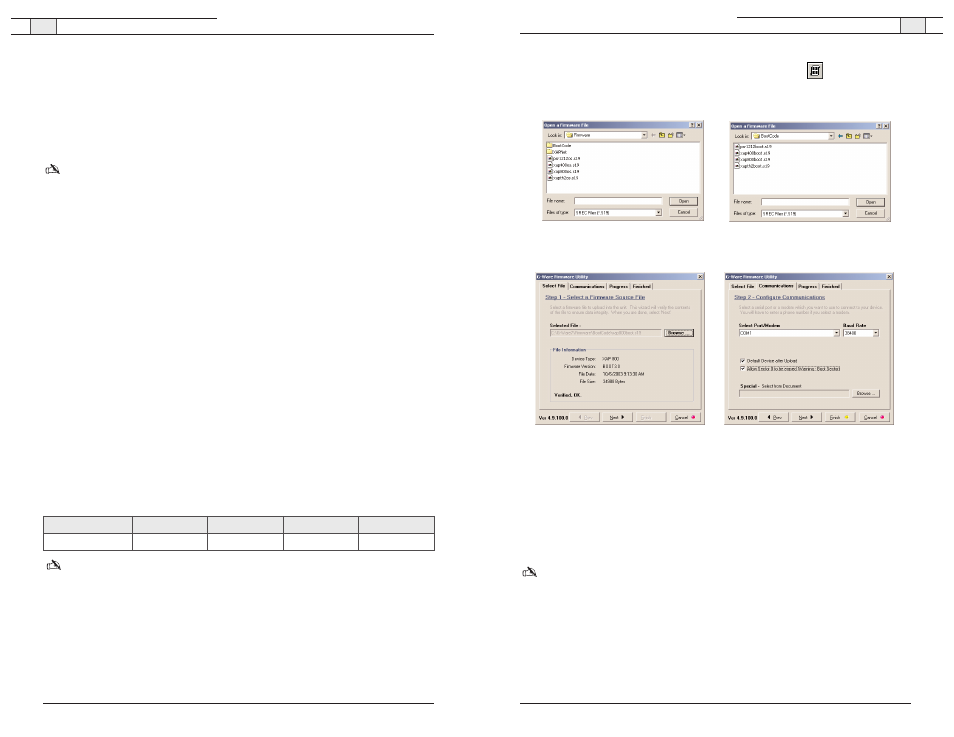
5. Open the G-Ware Firmware Utility by clicking the
G-Firm
button
located on the
G-Ware toolbar.
6. Click
Browse
to display the upgrade folders. Select the
Bootcode
folder and click
Open
.
7. Select the bootcode that corresponds with the unit you are upgrading. Click
Open
.
8. The selected bootcode file will self-verify and display the message Verified, OK. Ensure that
you have selected the correct bootcode file and click
Next
to advance to the
Communications tab.
9. Select the PC
COM port
you are using to connect to the unit. Confirm that the
Baud Rate
matches the baud rate of the selected unit.
10. Click
Next
. You may be prompted to save site files. If you have saved your site files, click
Yes, Continue
to begin bootcode upload.
Note: When the bootcode upload is finished, the unit should automatically reboot. If it doesn't,
power cycle the unit before continuing with the firmware upgrade procedure.
11. On the Finished screen, click
Start Over
.
You are now ready to upgrade the unit firmware. Refer to the "To upgrade unit firmware"
section on the following page.
XAP Net — Before You Install
5
XAP Net — Before You Install
4
Upgrading G-Ware
Before you can use XAP Net, you must install G-Ware 5.0. G-Ware is the configuration
software for the XAP and PSR products. While some configuration can be done using the
XAP Net web interface, G-Ware is required to complete the custom configuration of your
audio conferencing system. Please ensure that you have administrative privileges before
attempting to install on computers running Windows 2000 or later.
Note: If you work with multiple XAP systems and need to keep previous versions of G-Ware
installed on your PC/laptop, change the directory name where the new version will be installed.
Otherwise, you will overwrite the previous version. Use G-Ware Switcher to alternate between
versions. See the XAP_G-WARE 109 technical note on the ClearOne web site at www.clearone.com,
for more information on G-Ware Switcher.
To install G-Ware 5.0
1. Close all programs or applications running on your PC or laptop and insert the Audio
Product CD that shipped with your XAP Net into the CD-ROM drive.
• If the Autorun feature is enabled on the PC, the CD will run automatically.
• If the Autorun window does not open, select
Run
from the Start menu.Type
where
D:\\clearone.exe).
2. Click the
G-Ware 5.0
link.
3. Click
INSTALL NOW
on the G-Ware page.
4. Follow the onscreen instructions.You must restart your computer once installation is
complete. You can start G-Ware by double-clicking the desktop icon. If you did not create a
desktop icon during the installation process, you can also start G-Ware from the Start menu.
Upgrading XAP and PSR unit bootcode and firmware
After installing G-Ware 5.0, you must upgrade
both
the unit bootcode and firmware. These
are separate upgrades and require a direct serial connection to each unit. Once the unit
bootcode is updated, you can upgrade the unit firmware to the versions shown below.
Note: Turn off your screensaver before beginning the upgrade procedure.
To upgrade unit bootcode
1. Save your site file before beginning the bootcode upload procedure.
2. Turn down amplifiers. The units will be reset to default settings, which may affect output
levels and routing.
3. Disconnect from the site in G-Ware and remove all expansion bus connections.
4. Use a 9-pin serial cable to connect your PC to the first unit.
Technical Services Group ~ 1-800-283-5936 (USA) ~ 1-801-974-3760
Technical Services Group ~ 1-800-283-5936 (USA) ~ 1-801-974-3760
Figure 3. Bootcode folder in Browse window
Figure 4. Bootcode files in Browse window
Figure 5. File verifications
Figure 6. File upload options
XAP 800
XAP 400
XAP TH2
PSR1212
New Firmware
3.0
2.0
3.0
4.0