Keypad 10 line lock, Step #8 – security of outside escutcheon, Step #9 – installation of inside escutcheon – SARGENT Keypad Cylindrical Locks User Manual
Page 11
9
A7113E • 800-810-WIRE (9473) • www.sargentlock.com
Keypad 10 Line Lock
8
/1
4
/0
8
C
o
p
yr
ig
h
t
©
2
0
0
5
,2
0
0
7
,2
0
0
8
,S
A
R
G
EN
T
M
a
n
u
fa
c
tu
ri
n
g
,a
n
A
S
S
A
A
B
LO
Y
G
ro
u
p
c
o
m
p
a
n
y.
A
ll
ri
g
h
ts
re
se
rv
e
d
.
R
e
p
ro
d
u
c
ti
o
n
in
w
h
o
le
o
r
in
p
a
rt
w
it
h
o
u
t
th
e
e
xp
re
ss
w
ri
tt
e
n
p
e
rm
is
si
o
n
o
f
S
A
R
G
EN
T
M
a
n
u
fa
c
tu
ri
n
g
is
p
ro
h
ib
it
e
d
.
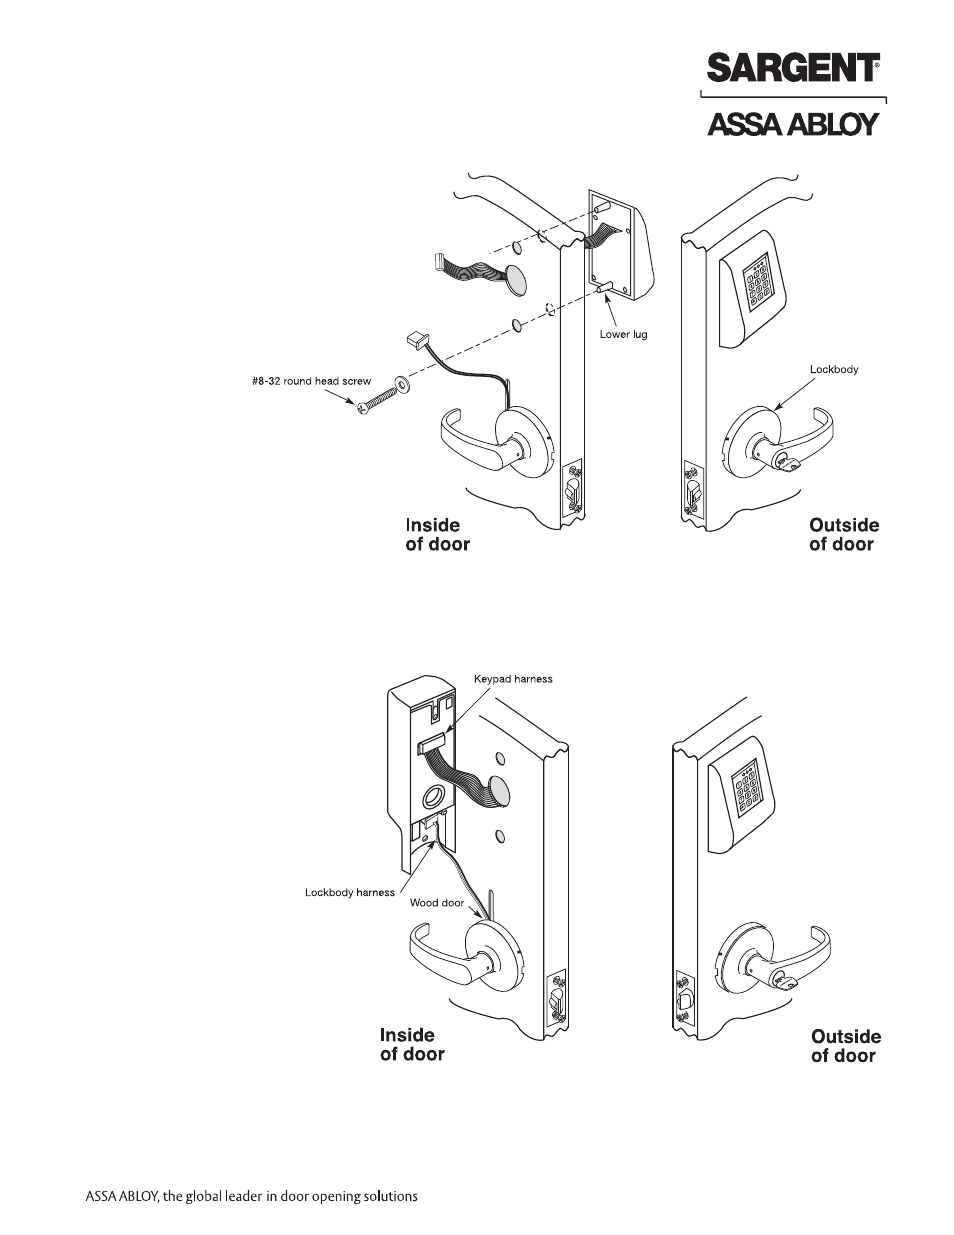
Step #8 – Security of Outside Escutcheon
• From the inside of the door, use
the #8-32 x 1 1/4” round head
screw with the flat washer to
attach the escutcheon thru the
lower lug
• Straighten escutcheon and tighten
the #8-32 round head screw
Step #9 – Installation of Inside Escutcheon
• Plug the smaller lockbody
wires into the inside
escutcheon. Access holes
vary based on wood or
metal door application
• Plug keypad ribbon
cable connector into
inside escutcheon
IMPORTANT: Both wire
plug connectors go on
only one way. Do not
offset the connectors.
If not seated, keypad
will not function properly
- Profile Series v.G1.5 Cylindrical Locks (26 pages)
- Profile Series Mortise Locks (1 page)
- Profile Series Mortise Locks (14 pages)
- Profile Series v.G1.5 Cylindrical Locks (12 pages)
- Profile Series v.G1.5 Cylindrical Locks (2 pages)
- Profile Series v.G1.5 Exit Devices (16 pages)
- Profile Series v.G1.5 Exit Devices (26 pages)
- Profile Series Mortise Locks (1 page)
- Profile Series Mortise Locks (8 pages)
- Profile Series Mortise Locks (2 pages)
- Keypad Mortise Locks (23 pages)
- Keypad Exit Devices (26 pages)
- Profile Series v.G1.5 Mortise Locks (20 pages)
- Profile Series v.G1.5 Mortise Locks (22 pages)
- Profile Series v.G1.5 Mortise Locks (12 pages)
- Profile Series Exit Devices (28 pages)
- Profile Series v.G1.5 Cylindrical Locks (18 pages)
- Profile Series v.G1.5 Cylindrical Locks (12 pages)
- Passport 1000 PG Exit Devices (28 pages)
- Passport 1000 PG Mortise Locks (22 pages)
- Passport 1000 PG Cylindrical Locks (22 pages)
- Passport 1000 P2 Mortise Lock (1 page)
- Profile Series v.S2 Mortise Locks (2 pages)
- Profile Series v.S2 Mortise Locks (2 pages)
- IN100 Mortise Locks (20 pages)
- 11 Line Lever Lock (1 page)
- 11 Line Lever Lock (4 pages)
- 10 Line Cylindrical Lock (2 pages)
- 10 Line Cylindrical Lock (1 page)
- 7 Line (4 pages)
- 10 Line Cylindrical Lock (1 page)
- 10 Line Cylindrical Lock (2 pages)
- 10 Line Cylindrical Lock (4 pages)
- DL Series Tubular Lock (3 pages)
- RDL Tubular Lock with Simpli Roseless Trim (2 pages)
- 6500 Line (2 pages)
- GX Series (3 Line) (2 pages)
- GX Series (3 Line) (4 pages)
- 9898 Reversible Rim (2 pages)
- 8200 Ecoflex Electrified Mortise Lock (8 pages)
- 9200 High Security Locksets (1 page)
- 50- Prefix/185S Kit Secured Indicator Rose (2 pages)
- 3P8225 Levers (4 pages)
- 8200 Lever Lock (4 pages)