Winchester Repeating Arms 101 User Manual
Page 27
24
25
a
DjuStable
S
tock
(S
pecial
m
oDelS
)
beFore PerForMing stocK adjustMent
Procedures, Place the “saFety” in the on saFe
Position. oPen the action and MaKe certain your
shotgun is coMPletely unloaded. KeeP the
MuZZles Pointed in a saFe direction. Failure to
Follow these warnings could result in serious
injury or death.
Some shotguns are fitted with an adjustable stock that
allows you to make adjustments to the stock for cast and
drop. This feature is usually found on target models where
shooters benefit from highly customized settings.
a
DjuSting
c
aSt
o
n
anD
c
aSt
o
ff
Adjusting cast on and cast off allows you to achieve a
perfect fit from the stock to your face. This is a most
crucial adjustment, as it determines how correctly and
consistently your eye will line up with the sight plane
along the barrel rib. A shotgun correctly adjusted for
cast on and cast off will have you looking directly down
the center of the rib with the front and middle beads
in alignment.
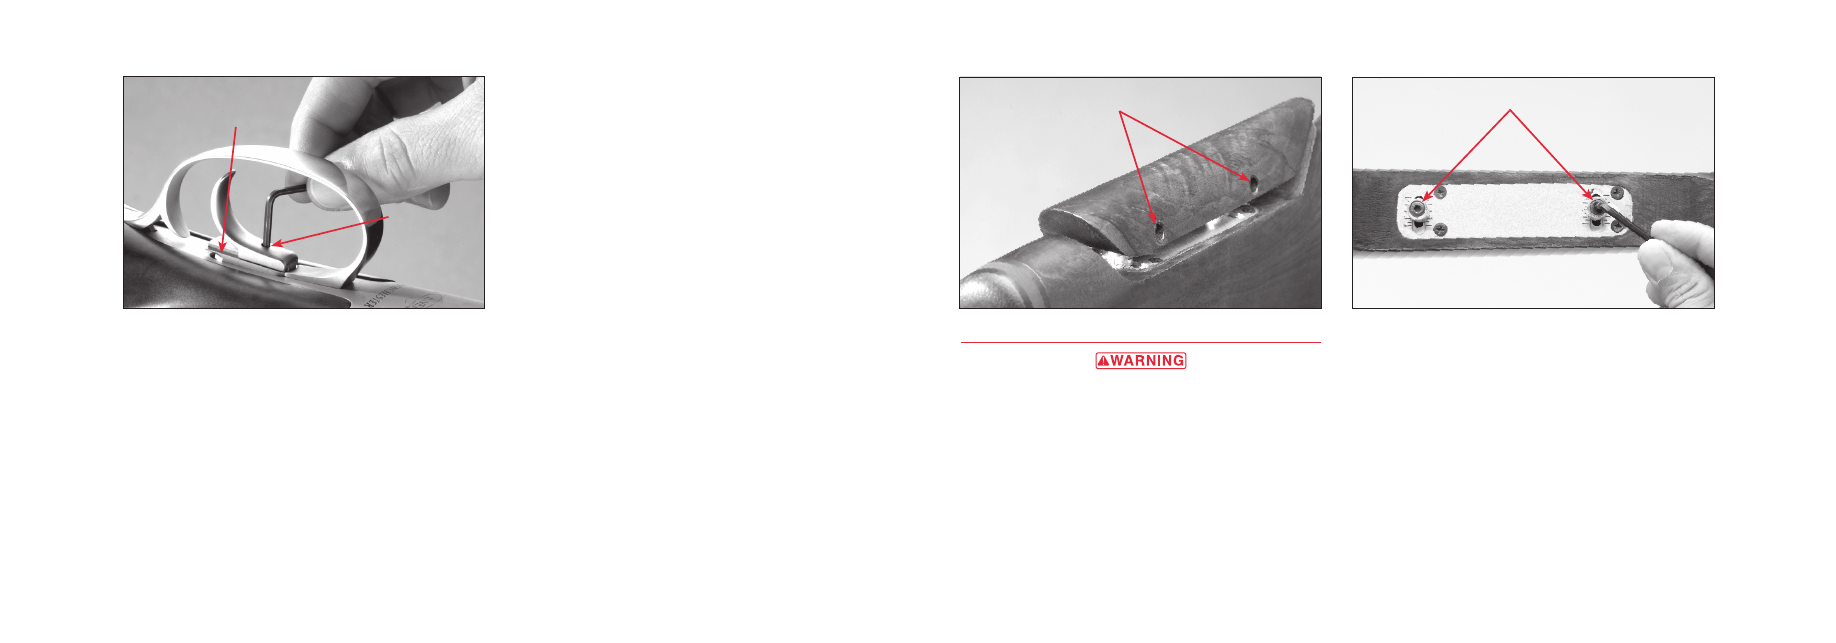
1. Using a 3mm Allen wrench, loosen the two comb
retaining screws on the right side of the removable
cheekpiece and remove the cheekpiece by lifting
upward (Figure 22). This exposes the cast on and cast
off adjustment mechanism. (The cheekpiece comes
set from the factory with cast in the center position.)
certain the chaMbers are unloaded. KeeP the
MuZZles Pointed in a saFe direction. Failure to
Follow these warnings could result in serious
injury or death.
Some shotguns are fitted with a special trigger shoe system
that allows you to make small adjustments to the length of
pull. This feature is usually found on target models where
shooters benefit from highly customized settings. It is easy
to change the length of pull using the 1.5 mm Allen (hex
head) wrench included with your firearm.
1. Place your firearm upside down on a secure, padded
surface to prevent marring the finish.
2. Using the Allen wrench provided (any good 1.5mm
Allen wrench will work) loosen the trigger shoe from
the trigger plate by inserting the wrench from the
bottom into the set screw head (Figure 21). Turn in a
counterclockwise direction to loosen.
3. When the screw is sufficiently loose you will be able
to move the trigger shoe along the trigger plate with
your fingers. There are indexing dots on the trigger
shoe and on the plate. Line up the dots to make
length of pull longer or shorter as desired.
4. Tighten the set screw snugly (do not overtighten)
with the Allen wrench to secure the trigger shoe to
the plate (turn in a clockwise direction to tighten).
Make sure you have aligned the indexing dots in
order to prevent marring the bottom of the trigger
plate with the set screw.
5. With your firearm unloaded, and pointed in a safe
direction, shoulder your firearm several times to feel
how the adjustment changes fit you. Increase or
decrease the length of pull following the instructions
above if necessary. Do not adjust more than allowed
by the “dot” index marks on the plate and trigger
shoe. When you find your preferred adjustment, tighten
the set screw. Always make sure the trigger shoe is
secure before firing. Checking the tightness of the set
screw should be part of your regular maintenance.
FIGURE 22
Loosen the comb retaining screws.
FIGURE 23
Loosen the comb adjustment screws.
FIGURE 21
Insert the Allen
wrench and loosen
the set screw.
Loosen the set screw and slide the
trigger shoe into the indexing dots
on the trigger plate to personalize
length of pull.