Winchester Repeating Arms 101 User Manual
Page 17
the muzzles at a downward angle with respect to the
receiver. Then push the top lever to the right.
Carefully engage the surfaces of the trunnions (located
inside the forward portion of the receiver) with the
curved trunnion surfaces on the monoblock, located
on each side of the bottom barrel (Figure 14, page 14).
4. With the monoblock properly seated on the trunnions,
lift up on the barrels and close the action. Make sure
the monoblock and trunnions remain in proper
alignment. When performing assembly procedures it
also helps to keep the top lever pushed fully to the
right with your thumb until the action is closed. When
the action is fully closed release the top lever and the
action will be locked in the closed position.
If the action seems difficult to close, the monoblock
and trunnions may not be properly engaged. Release
the upward pressure and carefully separate the barrels
from the action again. If forced, you may mar and
damage the fine fit of your shotgun’s action.
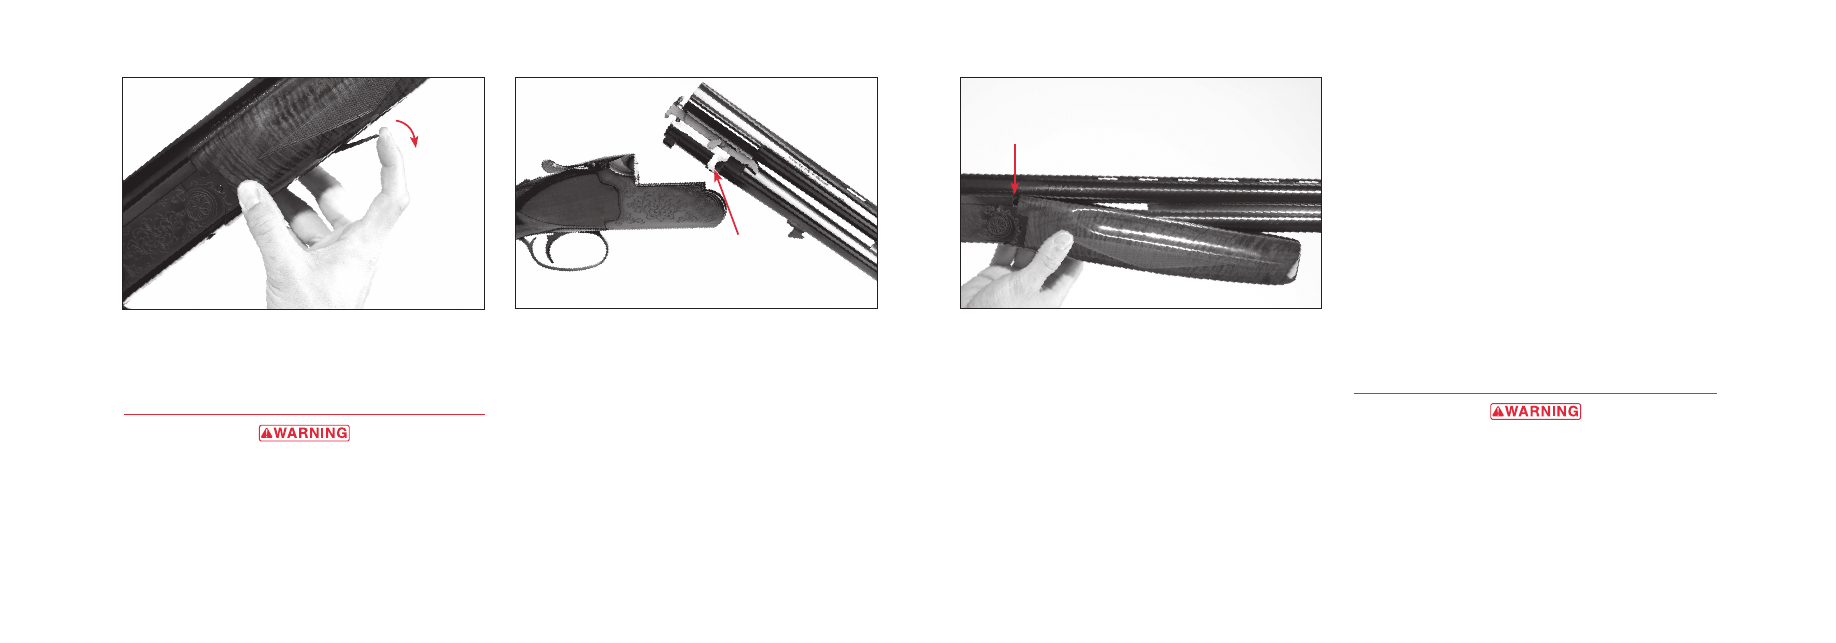
5. Once the barrels are installed and the action closed,
replace the forearm on the shotgun by sliding the
radiused rear surface of the forearm extension at an
angle into the radiused front edge of the receiver.
Match the shape of the rear of the forearm to the
shape of the front of the receiver (Figure 15). Lift the
front of the forearm until it engages with the barrels
with an audible click. If it does not click, gently slap
the forearm just above the latch with the palm of your
hand. If the forearm release latch protrudes carefully
push it into place, but do not force the latch. Your
shotgun is now fully assembled.
D
iSaSSemblY
always KeeP the MuZZles Pointed in a saFe
direction. beFore starting disasseMbly
Procedures, oPen the action and visually
insPect the chaMbers to be absolutely certain
the FirearM is coMPletely unloaded. Place the
“saFety”/selector in the on saFe Position.
Failure to Follow this warning could result in
serious injury or death.
15
This is the result of tight tolerances which assure your
shotgun of excellent receiver-to-barrel fit for many years
to come and is the sign of a finely crafted firearm.
a
SSemblY
always KeeP the MuZZles Pointed in a saFe
direction. beFore starting asseMbly
Procedures, visually insPect the chaMbers to
be absolutely certain the FirearM is
coMPletely unloaded. Place the “saFety” in the
on saFe Position. Failure to Follow this warning
could result in serious injury or death.
Your shotgun will come from the factory partially
disassembled. Prior to assembly clean and lightly oil
component parts as explained under “Initial Cleaning
and Oiling” (Page 10).
It is important to carefully follow the assembly
instructions below to assure the proper assembly of
your shotgun.
1. Inspect the chambers and action areas, and clean dirt
and/or excess oil from them as explained on page 10.
2. Remove the forearm from the barrels by holding the
barrels with one hand and pull out on the forearm
release latch with the other (Figure 13).
3. Attach the barrels (without the forearm attached to
them) to the action by first holding the barrels with
14
FIGURE 14
Angle the two halves
as shown.
Attach the barrels by aligning the
trunnion surfaces on the barrels with
the trunnions on the receiver.
Trunnion Surface
FIGURE 13
Pull out on the forearm’s release
latch and angle the forearm
down and off.
FIGURE 15
Reattach the forearm by lining up the
forearm extension with the receiver.
Hold at an angle.