Triton ABA 020 User Manual
Page 4
6
7
GB
GB
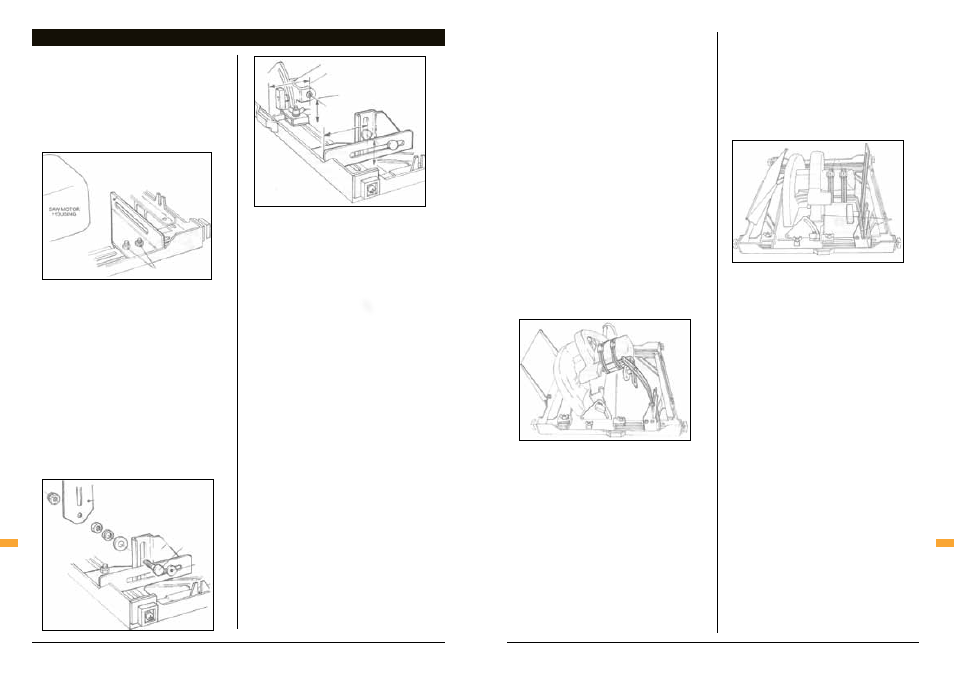
Fitting the Base Bracket
1. Loosely fit the Base Bracket (A) onto the slide
chassis, as in Fig 1, so that its vertical section is
in line with or just clear of the end of the saw’s
motor housing.
2. Use two of the ¼” x ½” Coach Bolts (I), Spring
Washers (K) and ¼” Nuts (J), and finger tighten
only.
Fitting the Pivot Mounting Bracket
1. Loosely attach the Pivot Mounting Bracket (B) to
the Base Bracket (A) using the remaining ¼” x
½” Coach Bolt (I), a Spring Washer (K) and a ¼”
Nut (J). Again, finger tighten only.
NOTE: Fig 2 shows the way in which the bracket is
attached, but the exact position of the bracket is
determined in the next steps.
2. Loosely fit the pivot bolt assembly - consisting
of a ¼” x ¾” Coach Bolt (H), the ¾” x 5/16” Flat
Washer (M), Spring Washer (K) and ¼” Nut (J) -
into the slot of the Pivot Mounting Bracket (B) as
shown in Fig 2.
NOTE: Do not yet fit Slotted Strap (C) and Nyloc Nut
(L) shown in Fig 2.
3. The next step is to ensure that this pivot bolt
assembly is in line with the saw’s front pivot,
both vertically and horizontally. This will enable
you to change the saw blade height without
having to change the stabilising bracket setting.
NOTE: Fig 3 shows the pivot bolt set in line with the
saw’s front pivot. It is possible to achieve this by
carefully lining up by eye, but it is preferable to
measure the relative pivot points from your slide
plate, as shown, using a ruler or measuring tape.
4. When the pivot bolt has been located correctly,
firmly tighten the nut, and also the nut fastening
the Pivot Mounting Bracket (B) to the Base
Bracket (A).
NOTE: If you have a vertical lift saw, this lining up
procedure is unnecessary. Simply locate the
pivot bolt low in its slot so that it will not foul the
T-Knob (G) to be fitted later.
5. Fit the Slotted Strap (C) onto the pivot bolt, using
the ¼” Nyloc Nut (L), as shown in Fig 2. Tighten
the nut so that the strap is firmly attached but
still free to pivot.
6. Position the strap so that it is approximately
vertical.
Fitting the Saw Motor Bracket
1. Slip the Band Clamps (D) over the saw motor
casing with the wormdrive fasteners on top
of the motor, and the screwdriver slots of the
wormdrives facing the rear. Do not fully tighten
the clamps yet.
2. The Saw Motor Bracket (E) has two arms, one
with a long slot and one with a short slot. For
most saws, fit the bracket with the short slotted
arm against the front of the motor casing.
3. Position the Rubber Cushion Strip (F) between
the motor casing and the bracket arm. Fit the arm
in position under the band clamps, and against
the rubber strip.
4. Position the long slotted arm of the bracket so
that it is touching the inside face of the Slotted
Strap (C).
5. Find the best positions on the motor casing for
the band clamps. Have the clamps as far apart
as you can, but avoid clamping too close to the
outside edge of the casing, especially if it is
tapered. Partially tighten the two band clamps.
6. Before fully tightening the clamps, fit the
remaining ¼” x ¾” coach bolt through the Slotted
Strap (C) and the slot in the Saw Motor Bracket
(E), fit the ¾” x ¼” flat washer, and fasten with
the T-Knob (T-Knob to the inside).
7. Check that the lower edge of the Saw Motor
Bracket (E) does not hit the Nyloc Nut (L) of
the pivot bolt assembly. You may need to move
the Saw Motor Bracket (E) slightly up the
motor casing. This bracket does not need to be
horizontal and may be angled slightly upwards to
provide increased clearance away from the pivot
bolt.
8. Before fully tightening all the fastenings, check
that the saw can be adjusted through its full
range in both depth of cut and angle of cut. Note
that the Slotted Strap (C) is designed to flex in a
curve when the saw is angled for bevel cutting,
see Fig 4.
9. If the saw can be adjusted smoothly through its
full range, loosen the T-Knob and fully tighten the
Band Clamps (D). Do not overtighten the band
clamps as you could damage the motor casing.
10. Also, ensure that the arm of the Saw Motor
Bracket (E) which extends forward is parallel to
the edge of the saw’s base plate, see Fig 5. If
it is not parallel, either remove the bracket and
slightly bend the bracket in a vice, or use shim
packing on one side between the rubber cushion
strip and the bracket.
11. Re-tighten the T-Knob (G), ensuring that the
Slotted Strap (C) remains in the vertical position,
and that the extended arm of the Saw Motor
Bracket (E) does not flex or distort as you tighten
the knob.
12. Finally, tighten the nuts fastening the Base
Bracket (A) to the slide chassis.
Assembly
Assembly
ASSEMBLY
Fig: 1
Fig: 2
Fig: 3
Fig: 4
Fig: 5