Caution – Landoll BPSB6 Till-N Seed User Manual
Page 22
2-8
3P091
OPERATION
CAUTION
NOTE
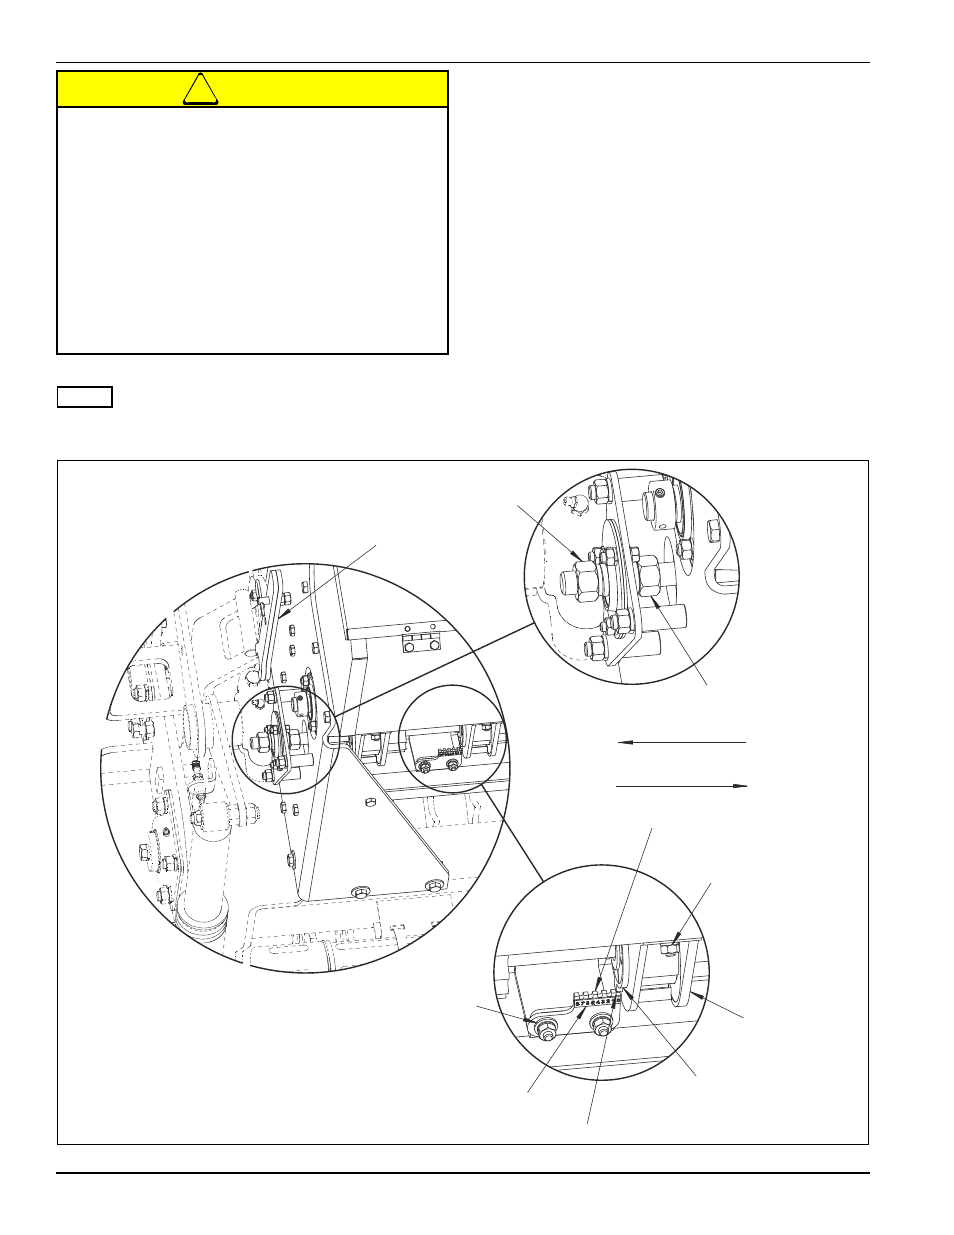
Front Seedbox Seed Cups discharge to the front of the
machine.
• All cups must be set the same to seed uniformly.
Check by using the wrenches provided and loosening
the Inner Adjusting Nut and turning the Outer Seed
Rate Adjusting Nut so that the Seed Cups close.
• All cups should be completely closed. If not, individual
cups can be adjusted by loosening their mounting
bolts, moving the cups, and then re-tightening.
• With Seed Cups completely closed, Indicator edge
marked "0" should align with Seed Cup Cut-off end. If
it does not, loosen Indicator mounting hardware and
adjust it until it does. Re-tighten.
• Use Seed Chart located inside Seedbox Cover as a
guide, increase or decrease the Seed Rate by using
the wrenches provided and loosening the Inner
Adjusting Nut and turning the Outer Seed Rate
Adjusting Nut to the desired number setting on
Indicator. Re-tighten the Inner Nut.
Figure 2-8: Front Seedbox Cups
To prevent damage to seed meters, do not apply
excessive force to adjusting nuts. This is
especially important when closing meters as
seed in flutes can be pinched between seed cup
cutoff and washer.
Do not close meters more than 1/8" when there is
seed in the meters without rotating the seed shaft
to prevent damage to the rotating washers and
retainer rings in the seed meters.
Do not attempt to open meters more than 1".
(feed rolls could become disengaged from the
seed cup washer.)
Shaft moves to increase seed rate
Shaft moves to decrease seed rate
Wrenches
Outer Seed Rate
Adjusting Nut
Inner Seed Rate
Adjusting Nut
Seed Cup Mounting
Hardware
Indicator
Large
Seed Cup
Seed Cup
Cut-off
Indicator Mounting
Hardware
Indicator Scale
Indicator must read "0"
when Seed Cups are closed