Applications, Ultra on the router table, Incra jig ultra on the router table – INCRA Ultra 24 User Manual
Page 8: Zeroing” the bit to your fence, Fig. 10, Fig. 9, Fig. 12, Fig. 11
APPLICATIONS
FIG. 10
Router table top
(suggested dimensions)
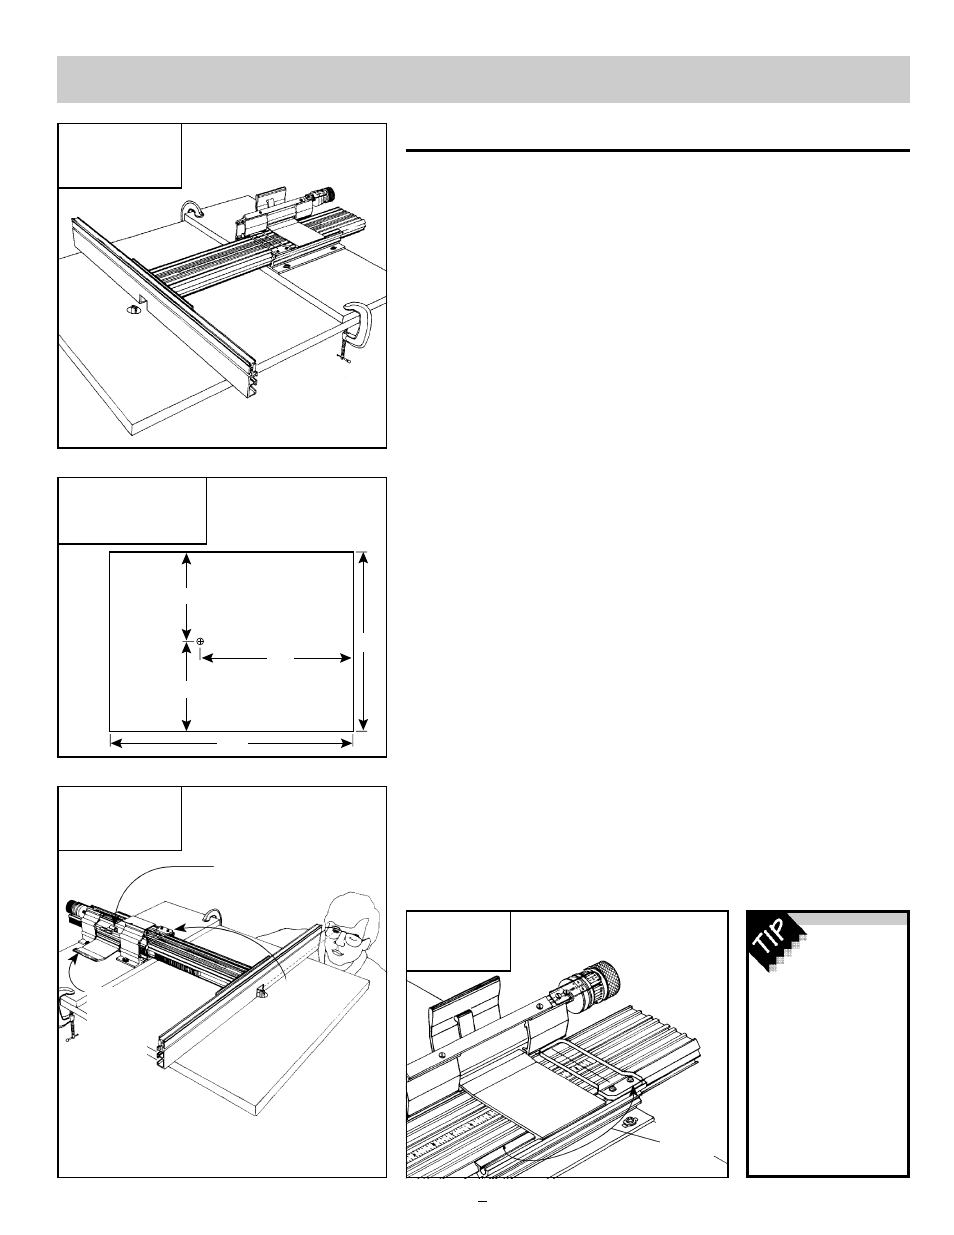
FIG. 9
INCRA JIG ULTRA
on the router table
FIG. 12
Alternate cursor
placement
In addition
to the manual
"centering" method
described on pg. 9,
you can automatically
center your work
using the INCRA
Auto-Center
(available from your
INCRA Dealer).
It instantly centers
ANY board up to
16" in width.
INCRA JIG ULTRA on the Router Table
INCRA JIG ULTRA is unsurpassed for making dovetails on the router
table. Just about any dovetail is possible - sliding, half blind, or through -
both equally spaced and variably spaced. Even imaginative joints like the
INCRA Double Dovetail can be made. But INCRA JIG ULTRA is much
more than a dovetail jig. You can also make perfect box joints with any pin
spacing imaginable. And with INCRA JIG ULTRA’s precise positioning
capabilities, geometric patterns for such things as trivets or decorative
panels are both easy and fun. If you are interested in making precise,
intricate models, you’ll find that INCRA JIG ULTRA is just what you have
been looking for. In general, any operation on the router table requiring a
fence will be accomplished with much greater accuracy, speed, and ease
using INCRA JIG ULTRA.
To use INCRA JIG ULTRA on your router table, position the
3
/
4
" plywood
base on your router table top as shown in Fig. 9. The fence should always
be on the right hand side of the router bit as seen from the operator’s side
of the table. If you do not yet own a router table top, the dimensions shown
in Fig. 10 will produce a comfortable table size which allows enough room
to use the full range of your INCRA JIG ULTRA.
“Zeroing” the bit to your fence
If you wish to set the fence to bit distance equal to zero, release the
carriage clamp and slide the fence as close as possible to the router bit.
Place the INCRA JIG ULTRA in the micro adjust mode as described on
page 7, Steps 1 and 2. With the router turned off and unplugged, sight
down the fence as shown in Fig. 11 and turn the micro adjusting knob. As
you turn the knob, the gap between the fence and the cutting wing of the bit
will get smaller. Continue turning the knob until the gap of light disappears.
When this happens, the bit will be “zero” distance from the fence. Check to
make sure that the bit is safely centered on the fence notch. Return
the carriage clamp to the “locked” position and slide the primary scale to
position the 0" mark directly under the cursor.* You have now positioned
your fence so that all of your cuts will be made relative to the edge of your
stock. (Example: By setting your INCRA JIG ULTRA to a scale reading of
1" and making a cut, you will produce a groove 1" from the edge of your
stock.) If you wish, you can return the micro adjust scale to a “0” reading by
rotating the scale (not the knob) to position the “0” mark under the micro
adjust cursor. (See Fig. 6, page 6.)
* On some smaller router tables you may find that the 0" mark on the scale
does not reach the cursor. To remedy this, simply move the hairline cursor
to the rear of the base as shown in Fig. 12. This allows the 0" mark on the
scale to easily reach the hairline cursor.
12"
12"
20"
Move
cursor to
rear of base
for use on
smaller
tables
FIG. 11
"Zeroing" the bit
to your fence
Third:
"Lock" carriage clamp
Fourth:
Slide primary scale to
read 0" under the
hairline cursor
Second:
Press micro adjust lever down
and turn micro adjusting knob
until the gap between the
fence and bit disappears
First:
"Unlock"
carriage
clamp and
slide fence
up to the bit
24"
32"
8