Mounting to the new style incra pro fence, Fig. 3, Fig. 4 – INCRA Ultra 24 User Manual
Page 5: Detail 3a, Initial alignment for the primary scale
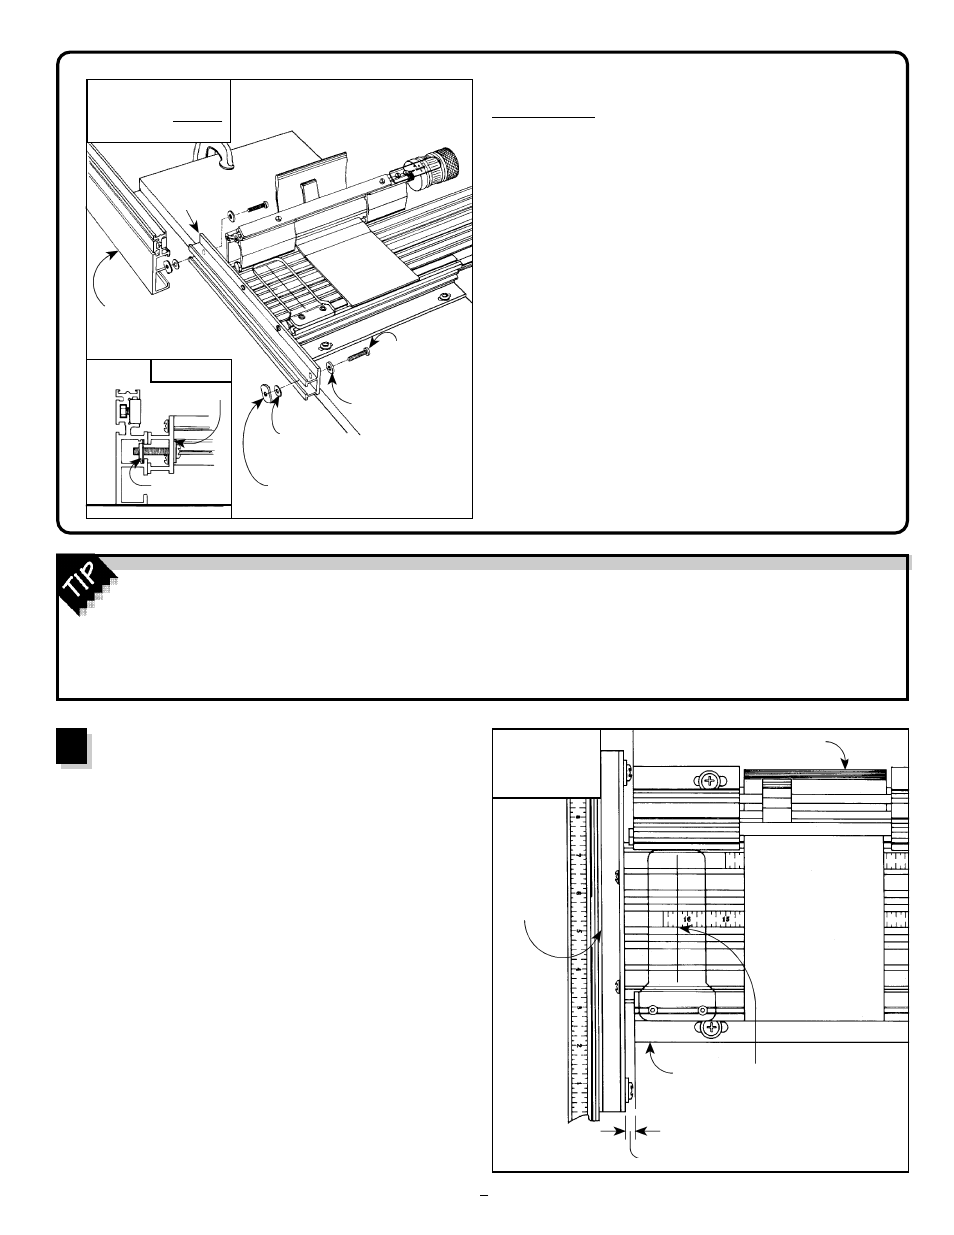
Mounting to the
new style INCRA PRO Fence
Insert the #10-32 x 1
1
/
8
" phillips pan head screws
through the thick (gold) washers then through the holes
on the back of the fence mounting bracket. Place a thin
(silver) washer on each screw then loosely attach the
rectangular nut. See Fig. 3. The raised rim on the
rectangular nut should face the mounting bracket. Now
slide the fence onto the thin washer and rectangular nut
so that both are captured in the T-slot on the back of the
fence. Make sure the washer is captured in the T-slot
provided as shown in Detail 3a. Position the fence so
that the carriage is approximately centered on the fence
length and tighten the two mounting screws.
NOTE: The spacer plate shown in mounting the original
INCRA Fence in Fig. 2 is not needed for mounting the
new style fence.
FIG. 3
Mounting the new style
INCRA PRO Fence
FIG. 4
Initial primary
scale alignment
1
/
4
" approx.
Carriage clamp in locked position
Slide primary scale
to read 16
1
/
4
" here
Base
Fence
mounting
bracket
Thin (silver)
5
/
8
" O.D. flat washer
Detail 3a
Thick (gold)
washer
Thin washer
captured here
#10-32 x 1
1
/
8
"
phillips pan
head screw
Thick (gold)
5
/
8
"
O.D. flat washer
Raised rim on rectangular nut
faces the mounting bracket
New style
INCRA PRO Fence
Fence
mounting
bracket
To achieve a silky smooth carriage motion, it is important that your table surface is flat and smooth, and that the
carriage is installed parallel to it. If you find that your carriage tends to bind slightly during some portion of its
travel, the following additional step should take care of it. Simply place 3 or 4 pieces of paper under the infeed end of
the fence before tightening the screws in the final step of the fence mounting procedure described above, and then
remove the paper. If the problem still persists, either add a few more pieces of paper, or place the paper under the
other end of the fence before tightening.
Initial alignment for the
primary scale
NOTE: Before installing or sliding a scale or template in any of
the five scale slots on the carriage, the carriage clamp must be
pulled up into the “locked” position.
Before continuing to the operations section of this owner’s
manual, it is a good idea to set a preliminary alignment
between the primary or center scale and the hairline cursor.
Your INCRA JIG ULTRA should still be in the closed position.
(In the closed position, the fence mounting bracket should be
about
1
/
4
" from the front end of the base.) The carriage clamp
should be pulled up into the “locked” position. Slide the
primary scale in the center scale slot to position 16
1
/
4
" directly
under the hairline cursor. (See Fig. 4) Your new INCRA JIG
ULTRA is now ready for operation.
IMPORTANT: Whenever moving the INCRA JIG ULTRA’s
carriage and fence during cutting operations, always locate the
carriage so that the mark on the scale or template is aligned
directly under the hairline cursor before locking the carriage
clamp in place.
3
5