Half blind dovetails, Set the depth of cut, Center” the bit on your stock width – INCRA Ultra 24 User Manual
Page 13: Cut the joint, Fig. 26, Fig. 28 fig. 27, Fig. 25
1 3
1
Half Blind Dovetails
You’ll want to begin this exercise by cutting some stock to
length and width. Use
1
/
2
" thick stock and cut (6) boards 3
3
/
4
"
wide x 6" long. You will be making an equally spaced half blind
dovetail requiring a
1
/
2
" 14
°
dovetail bit.
Set the depth of cut
Install the
1
/
2
" 14
°
dovetail bit in your router table and set
the initial depth of cut to slightly less than
1
/
4
". Position
the fence as shown in Fig. 25 so that about half of the bit is
inside the fence notch. Slide the middle “primary” scale to
read 0" under the cursor. (On some smaller router tables you
may find the 0" mark will not reach the hairline cursor. To
remedy this, simply move the hairline cursor to the rear of the
base. See Fig. 12 on page 8.)
Clamp two of your boards to the INCRA Right Angle Fixture
as shown in Fig. 26 and make cuts at scale readings of 0" and
7
/
8
". Make sure you are reading the middle “primary” scale set
above.
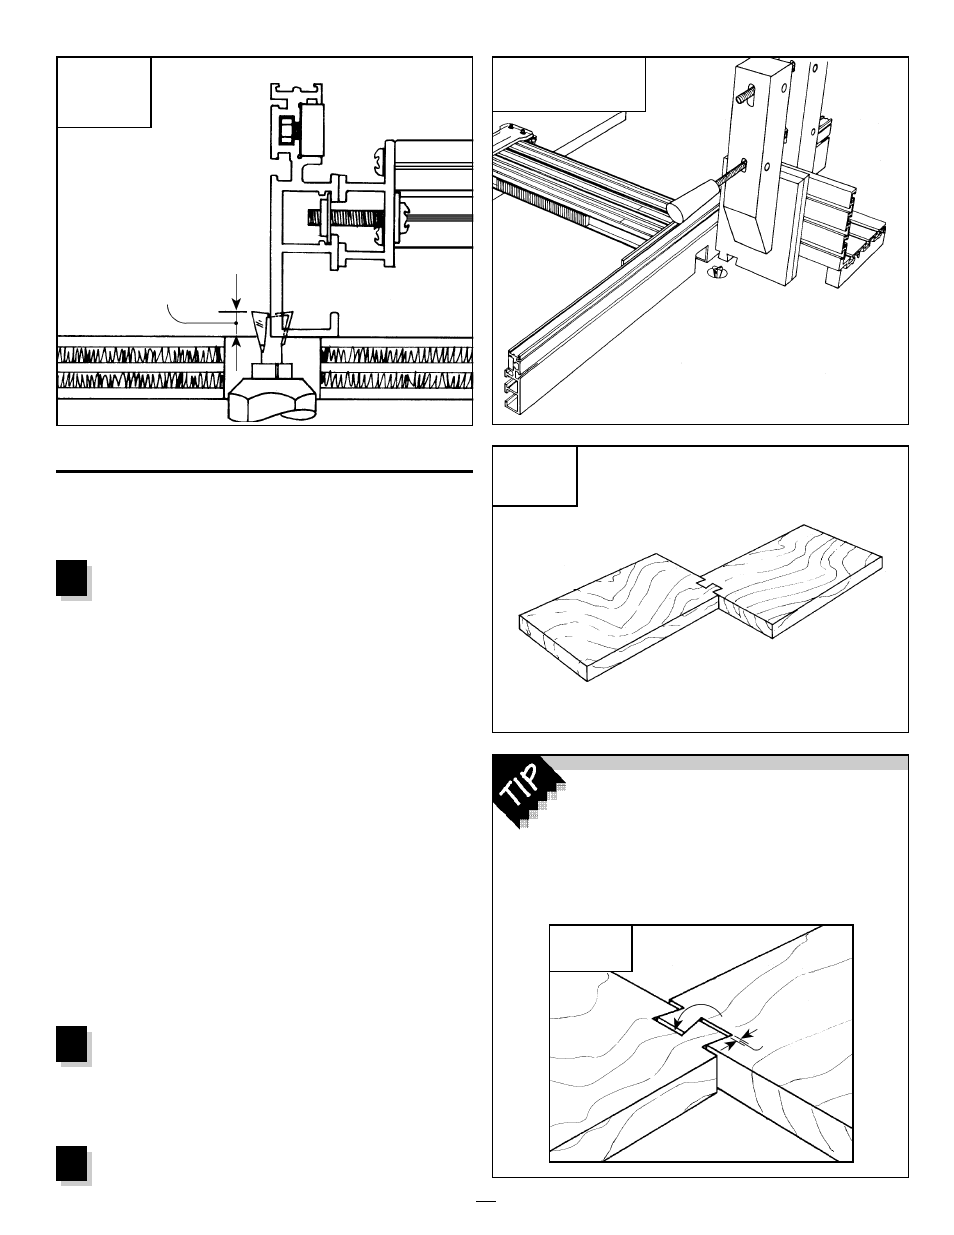
Unclamp the two boards and test the fit by joining them as
shown in Fig. 27. As with any half blind dovetail jig, a little trial
and error is necessary to achieve a snug fitting joint. The fit
can be fine-tuned by adjusting the dovetail bit’s depth of cut.
To tighten the fit, raise the bit up slightly. To loosen the fit,
lower the bit slightly. Just remember this phrase: Heighten to
tighten, lower to loosen. After adjusting the bit height, make
a new set of trial cuts (two cuts
7
/
8
" apart) on the opposite end
of the boards. After a few adjustments and trial cuts, you’ll
have a perfect fit. If you mark the good fitting cuts on one of
the boards, you can save this piece to use as a depth gauge
the next time you set up your
1
/
2
" dovetail bit for joinery.
When the fit is too loose, the trial cuts provide a
gauge to let you know how much to raise the bit.
Just join the trial pieces end to end and gently pull the
two boards to wedge the dovetails together. The gap
that appears is the distance you need to raise your
dovetail bit to achieve a tight fit.
“Center” the bit on your stock
width
Use the “centering” method described on page 9 to find
the center of the 3
3
/
4
" wide board with your dovetail bit. After
you have found the center, slide the extra
1
/
32
" floating scale to
position the 1
7
/
8
" mark directly under the hairline cursor.
Cut the joint
2
3
FIG. 26
Depth of cut - trial cuts
FIG. 28
FIG. 27
Test the fit
Gap
Raise this much
FIG. 25
Set initial
depth of cut
Position fence so that
about half of the bit is
inside the fence notch
Slightly less
than
1
/
4
"
Make cuts at the following scale
settings (use primary scale):
0",
7
/
8
"