FasTest TwistMate Series Seal Replacement User Manual
Replacment instructions
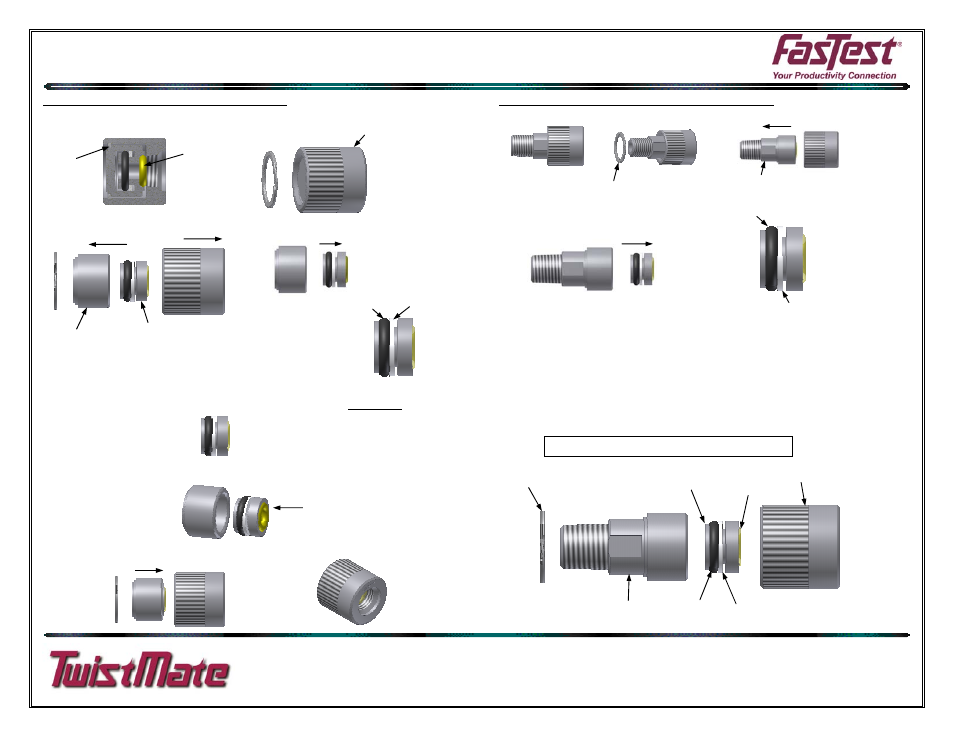
REPLACMENT INSTRUCTIONS
Roseville, MN
Ph: 1-800-444-2373
Fax: 651-645-7390
www.fastestinc.com
WP111 10/7/2010
RET.
RING (A)
SLEEVE (B)
O-RING (F)
PISTON (D)
PISTON INSTALL
WITH SLIGHT TWIST
SLEEVE
FINISHED
ASSEMBLY
TEFLON
BACK-UP RING (E)
FACE SEAL
SLEEVE
O-RING
BACK-UP RING
THREADED BODY
RET. RING
EXPLODED VIEW OF THREADED BODYCONNECTOR
CAP BODY (C)
PISTON
O-RING
TEFLON BACK-UP RING
RET. RING
THREADED BODY
FACE
SEAL
1. Cap Body Connector Seal Replacement:
1. Using a sharp stiff pick remove ret. ring (A) from connector and discard.
NOTE: WHEN THE END OF THE RING IS FREE ‘WALK’ RING OUT OF GROVE WITH PICK.
2. Push body (C) and piston (D) out of sleeve (B). Then remove piston from body.
3. Remove o-ring (F) and back-up ring (E) from piston and discard.
4. Before Installing new back-up ring and o-ring make sure piston and inside of body are clean and free of
dust and dirt.
5. Install new back-up ring as shown on piston. Then lubricate new o-ring with petroleum jelly and install as
shown.
6. Install piston with new o-ring and back-up ring into body with a slight twist as you push into body.
7. Slide body/piston assembly into sleeve and install new ret. ring, making sure it is completely seated in its
groove.
2. Threaded Body Connector Seal Replacement:
1. Follow the steps to the left for this style connector as well.