2 fuel tank, Fuel tank – JLG G6-42A Service Manual User Manual
Page 127
7-11
G6-42A, G9-43A, G10-43A
Engine
7.6.2
Fuel Tank
Note: The fuel tank is a one piece unit. It is located on the
rear of the cab. If it is determined that the fuel tank must be
removed, the fuel must be drained before tank removal.
Always dispose of fuel properly.
a. Fuel Tank Removal
1. Park the machine on a firm, level surface, level the
machine, fully retract the boom, lower the boom,
place the travel select lever in the (N) NEUTRAL
position, engage the parking brake, and shut the
engine OFF.
2. Place a Do Not Operate Tag on both the ignition key
switch and steering wheel.
3. Open the engine cover. Allow the system fluids to
cool.
4. Properly disconnect the battery.
Note: If replacing the tank, remove all internal and
external components from the old tank, and retain for
use on the replacement tank.
Note: Have a dry chemical (Class B) fire extinguisher
near the work area.
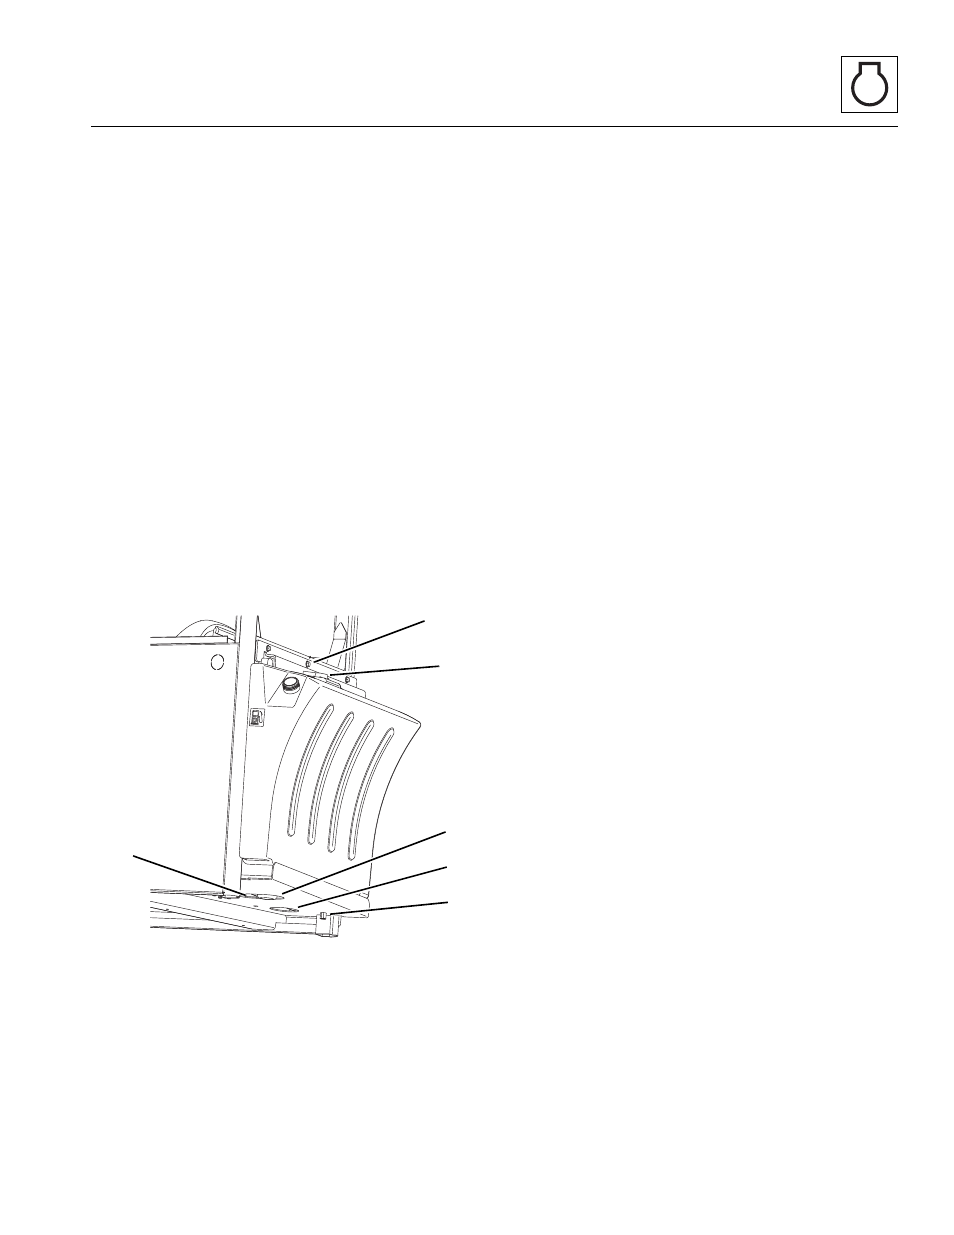
5. Remove fuel tank drain plug (1), and drain fuel into
an approved and suitable container. Dispose of fuel
properly.
6. Label, disconnect and cap the supply fuel line (2)
from the bottom of the fuel tank.
7. Label, disconnect and cap the return fuel line (3)
from the bottom of the fuel tank.
8. Disconnect the fuel gauge harness (4).
9. Remove screws securing fuel sender (5) to the tank.
Remove fuel sender from tank.
10. Remove the bolts on the fuel tank hold down bar
(13).
11. Lift the empty fuel tank from the rear of the cab.
b. Disassembly
The fuel tank is a one-piece unit and cannot be
disassembled. The fuel level indicator can be removed and
reused on the new replacement tank. Dispose of the old
tank according to local regulations concerning hazardous
materials disposal.
c. Cleaning and Drying
If contaminated fuel or foreign material is in the tank, the
tank can usually be cleaned.
Note: If a leak is suspected in the fuel tank, contact JLG
Service Department.
To clean the fuel tank:
1. Have a dry chemical (Class B) fire extinguisher near
the work area.
2. Remove the fuel or oil tank drain plug, and safely
drain any fuel into a suitable container. Dispose of
fuel properly.
3. Clean the fuel tank with a high-pressure washer, or
flush the tank with hot water for five minutes and
drain the water. Dispose of contaminated water
properly.
4. Add a diesel fuel emulsifying agent to the tank. Refer
to the manufacturer’s instructions for the correct
emulsifying agent-to-water mixture ratio. Refill the
tank with water, and agitate the mixture for 10
minutes. Drain the tank completely. Dispose of
contaminated water properly.
5. Refill the fuel tank with water until it overflows.
Completely flush the tank with water. Empty the fuel
tank, and allow it to dry completely.
d. Assembly
The fuel level indicator can be removed and reused on the
new replacement tank. Dispose of the old tank according
to local regulations concerning hazardous materials
disposal regulations.
e. Inspection
Note: If a leak is suspected in the fuel tank, contact a
JLG Service Department.
MY4230
1
2
6
5
3
4