Setting the hdmi options, Setting the hdmi control mode, Before using synchronization – Pioneer LX01BD User Manual
Page 46
09
46
En
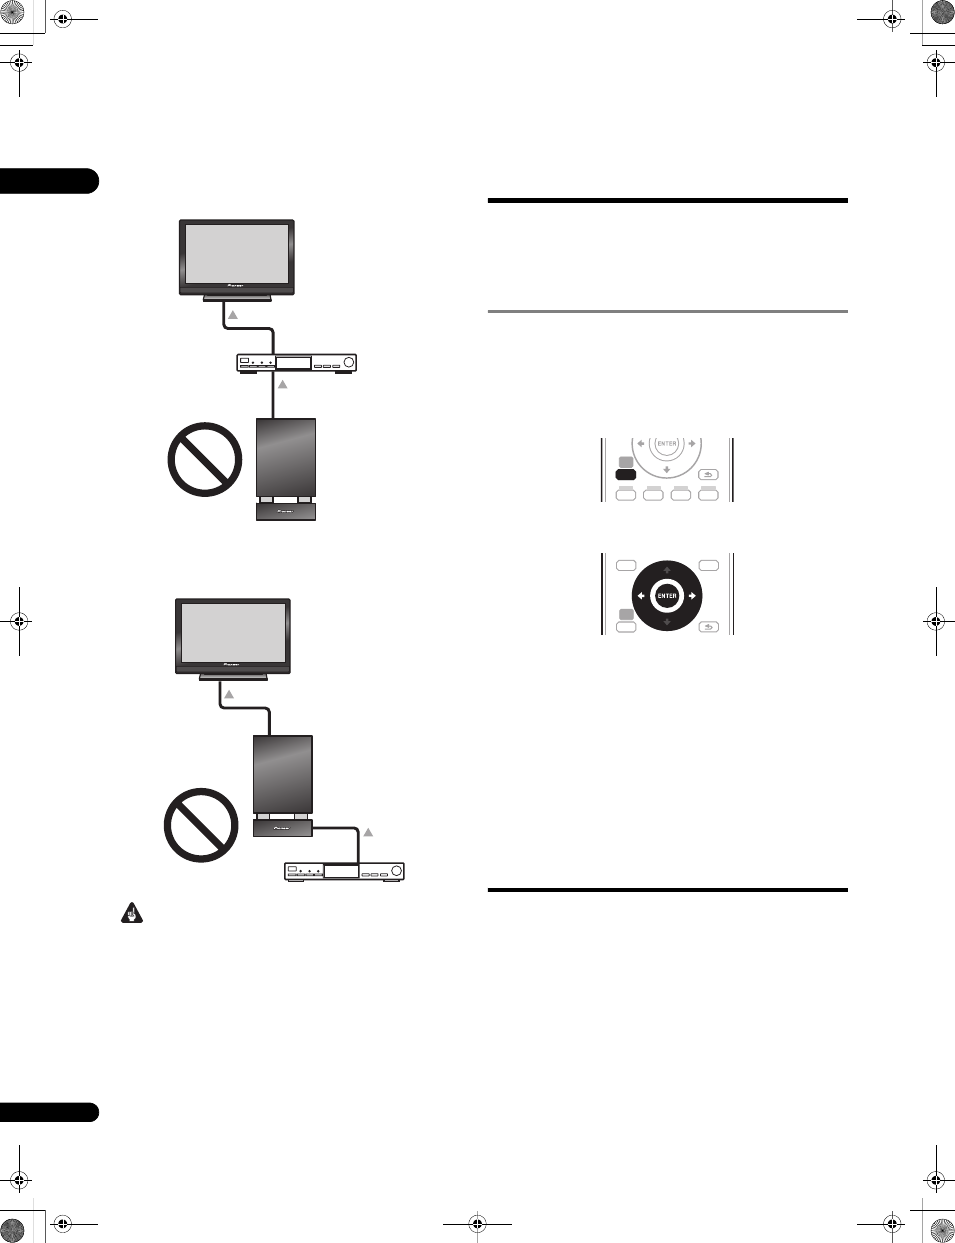
• Connect the Flat Screen TV directly to this unit. Interrupting a
direct connection with other amps or an AV converter (such as
an HDMI switch) can cause operational errors.
• Only connect components you intend to use as a source to the
HDMI input of this unit. Interrupting a direct connection with
other amps or an AV converter (such as an HDMI switch) can
cause operational errors.
Important
• When connecting this system or changing connections, be sure
to switch the power off and disconnect the power cord from the
wall socket.
After completing all connections, connect the power cords to
the wall socket.
• After connecting this unit to an AC outlet, a 15-second
initialization process begins. You cannot carry out any
operations during initialization. The
HDMI indicator on the
display unit blinks during initialization, and you can turn this
unit on once it has stopped blinking.
• To get the most out of this function, we recommend that you
connect your HDMI component not to a Flat Screen TV but
rather directly to the HDMI terminal on this unit.
Setting the HDMI options
You must adjust the settings of this unit as well as HDMI Control-
compatible connected components in order to make use of the
HDMI Control function. For more information see the operating
instructions for each component.
Setting the HDMI Control mode
Choose whether to set this unit’s HDMI Control function
On or Off.
You will need to set it to
Control On to use the HDMI Control
function.
• When using a TV not manufactured by Pioneer, put this setting
to
Control Off.
1
Press SETUP.
2
Select ‘HDMI Setup’.
Use
/ to select, then press ENTER.
3
Select ‘HDMI Ctrl’.
Use
/ to select, then press ENTER.
4
Adjust the setting.
Use
/ to adjust, then press ENTER to confirm.
•
Control On – Enables the HDMI Control function. When this
unit’s power is turned off and you have a supported source begin
playback while using the HDMI Control function, the audio and
video output from the HDMI connection are output from the Flat
Screen TV.
•
Control Off – The HDMI Control is disabled. Synchronized
operations cannot be used. When this unit’s power is turned off,
audio and video of sources connected via HDMI are not output.
Before using synchronization
Once you have finished all connections and settings, you must:
1
Put all components into standby mode.
2
Turn the power ON for all components, with the power for
the Flat Screen TV being turned on last.
3
Choose the HDMI input to which the TV is connected to this
unit, and see if video output from connected components
displays properly on the screen or not.
HDMI Control-compatible
Pioneer Flat Screen TV
HDMI input
HDMI cable
HDMI cable
HDMI input
HDMI output
HDMI OUT
Receiver subwoofer
HDMI Control-compatible
Pioneer Flat Screen TV
HDMI input
HDMI output
HDMI cable
HDMI cable
Receiver subwoofer
HDMI IN
HDMI OUT
SETUP
HOME
MENU
RETURN
SETUP
SETUP
TOP MENU
DISC
NAVIGATOR
HOME
MENU
TOOLS
MENU
RETURN
LX01BD_1.book Page 46 Tuesday, September 2, 2008 12:33 PM