5) delete user, 6) show the list of authorized users, 7) add group – AMX NETLINX MASTER NXC-ME260 User Manual
Page 38
NetLinx Security
34
NXC-ME260 NetLinx Master-Ethernet Card/Module
5) Delete user
1.
Type
5
and
at the Security Setup prompt (at the bottom of the Main Security Menu)
to delete an existing user account. A sample session response is:
Select from the following list of enrolled users:
1) Fred
2) Betty
3) Bilbo
Select User ->
2.
Select the user to delete and press
to delete the user account, and return to the
Security Setup menu.
6) Show the list of authorized users
1.
Type 6 and
at the Security Setup prompt (at the bottom of the Main Security Menu)
to view a list of currently enrolled users.
2.
Press
to return to the Security Setup menu.
7) Add Group
1.
Type 7 and
at the Security Setup prompt (at the bottom of the Main Security Menu)
to add a group account. A sample session response is:
The following groups are currently enrolled:
administrator
Enter name of new group:
2.
Enter a name for the group. A group name is a valid character string (4 - 20 alpha-numeric
characters) defining the group. This string is case sensitive, and each group name must be
unique.
3.
Press
to display the following Edit Group menu:
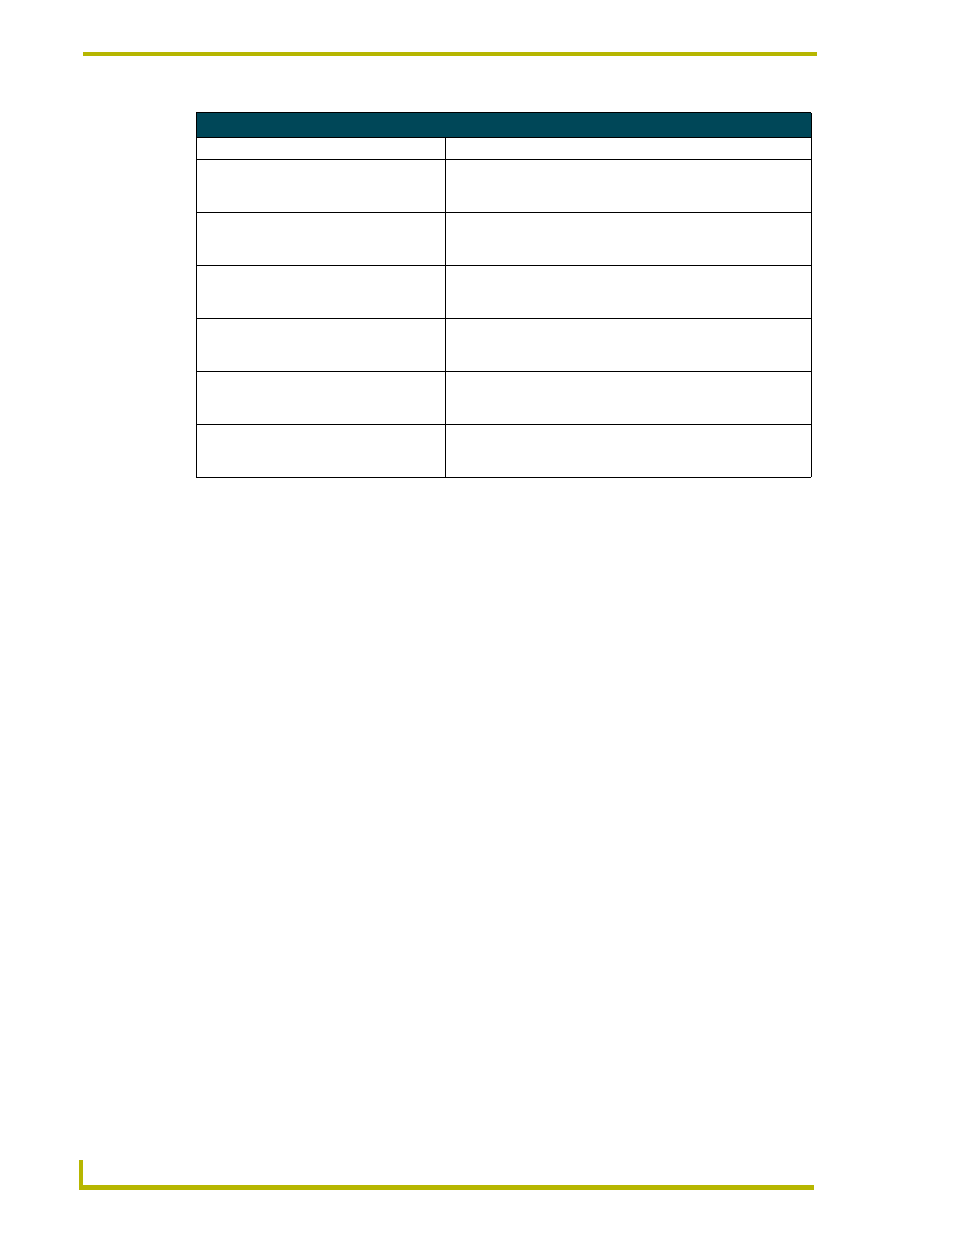
Access Rights Menu
Command
Description
1) Terminal (RS232) Access
(Enable/Disable)
Enables/disables Terminal (RS232 Program port) Access. The
account has sufficient access rights to login to a Terminal session
if this option is enabled.
2) Admin Change Password Access
(Enable/Disable)
Enables/disables Administrator Change Password Access. The
account has sufficient access rights to change the administrator
password if this option is enabled.
3) FTP Access
(Enable/Disable)
Enables/disables FTP Access. The account has sufficient access
rights to access the NetLinx Master's FTP Server if this option is
enabled.
4) HTTP Access
(Enable/Disable)
This selection enables/disables HTTP (Web Server) Access. The
account has sufficient access rights to browse to the NetLinx
Master with a Web Browser if this option is enabled.
5) Telnet Access
(Enable/Disable)
This selection enables/disables Telnet Access. The account has
sufficient access rights to login to a Telnet session if this option is
enabled.
6) Security Configuration Access
(Enable/Disable)
This selection enables/disables Security Configuration Access.
The account has sufficient access rights to access the Main
Security Menu if this option is enabled.