Kramer Electronics RB-6 User Manual
Page 11
RB-6 - Defining the RB-6 6 Channel Power Controller
7
7
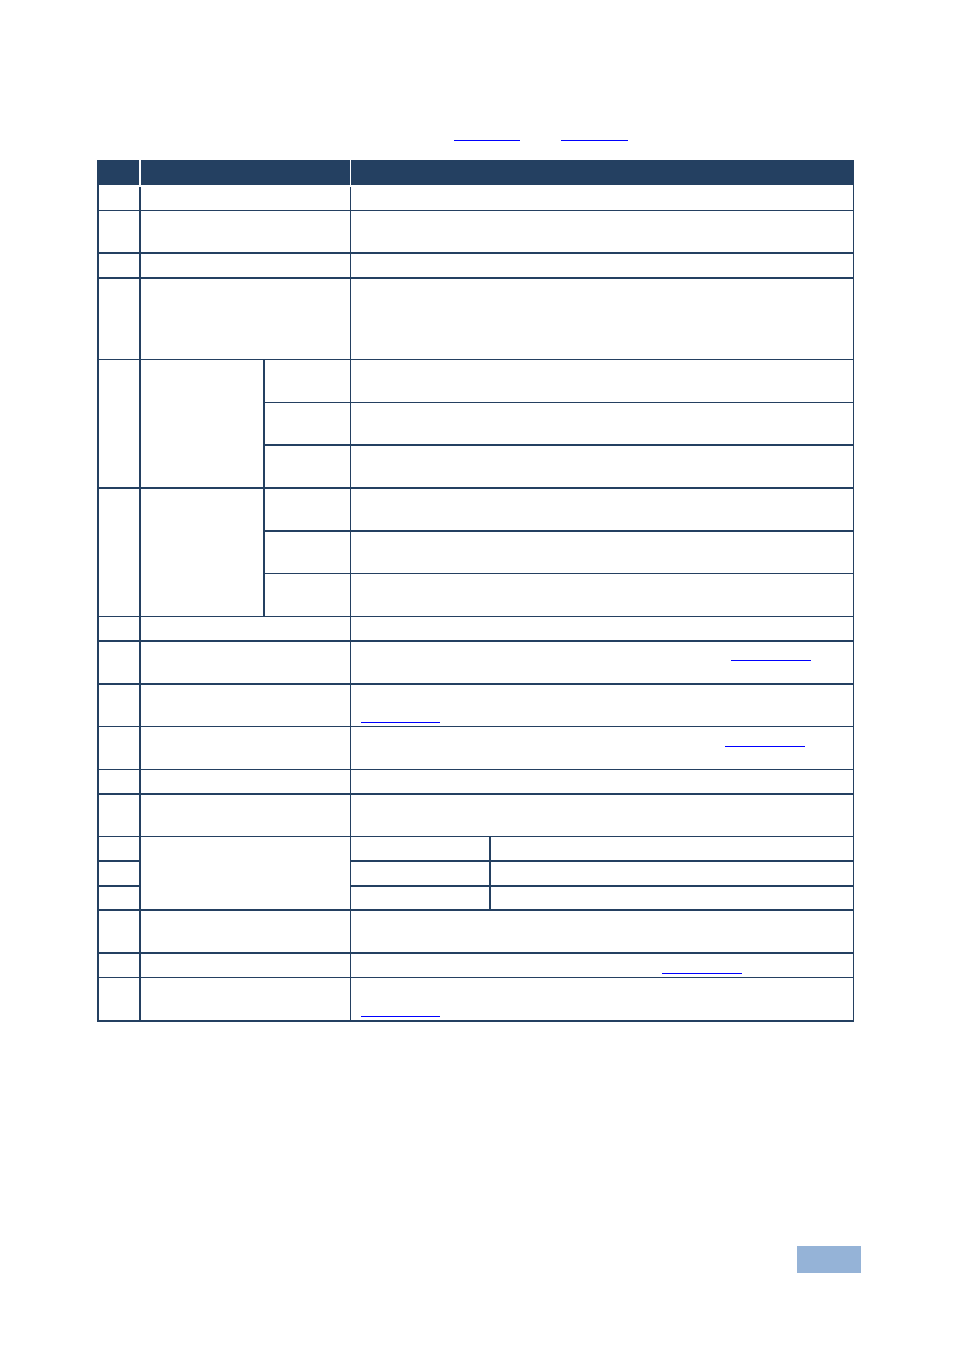
The following table refers to both
#
Feature
Function
1
IR Receiver
Infrared remote control sensor
2
IR LED
Lights yellow when receiving commands from the IR remote control
transmitter
3
POWER LED
Lights green when the device is powered on
4
ACTIVE OUTPUTS
Buttons (1 to 4)
Press a button to turn on the output. The relevant button LED lights
red.
Press the button again to turn the output off. The button LED no
longer lights
5
ACTIVE
OUTPUTS 5
Controls
MAX
Press to set the output voltage to maximum. Press and hold to set
the current setting as the maximum voltage
MIN
Press to set the output voltage to minimum. Press and hold to set
the current setting as the minimum voltage
Rotary
control
Turn clockwise to increase or anti-clockwise to decrease the output
voltage
6
ACTIVE
OUTPUTS 6
Controls
MAX
Press to set the output voltage to maximum. Press and hold to set
the current setting as the maximum voltage
MIN
Press to set the output voltage to minimum. Press and hold to set
the current setting as the minimum voltage
Rotary
control
Turn clockwise to increase or anti-clockwise to decrease the output
voltage
7
PROGRAM Switch
For the use of Kramer service personnel only
8
RS-232 9-pin D-sub
Connector (F)
Connect to an RS-232 controller, such as a PC (see
9
REMOTE IR 3.5mm
Opening
For installing the optional external IR receiver 3.5mm mini jack (see
10
ETHERNET RJ-45
Connector
Connect to a remote PC controller over a LAN (see
11
OUT 1~4 Power Sockets
Plug in devices to be controlled only on and off
12
OUT 5~6 Power Sockets
Plug in devices to be controlled on/off, and a dimming function using
the minimum/maximum rotary controls (see 5 and 6)
13
IN
—POWER—ON
Power Socket
Connect to the mains power
14
Mains Fuse
Fuse for protecting the RB-6
15
Mains Switch
Switch for turning the device on and off
16
RESET Switch
Press and hold while turning power on to reset the device to factory
default condition
17
TERM RS-485 Switch
Push up to terminate the RS-485 bus (see
18
RS-485 3-pin Terminal
Block
Connect to a controller equipped with an RS-485 port (see