Pulley and belt replacement, Bearing replacement – COOK Propeller Wall Fans User Manual
Page 6
6
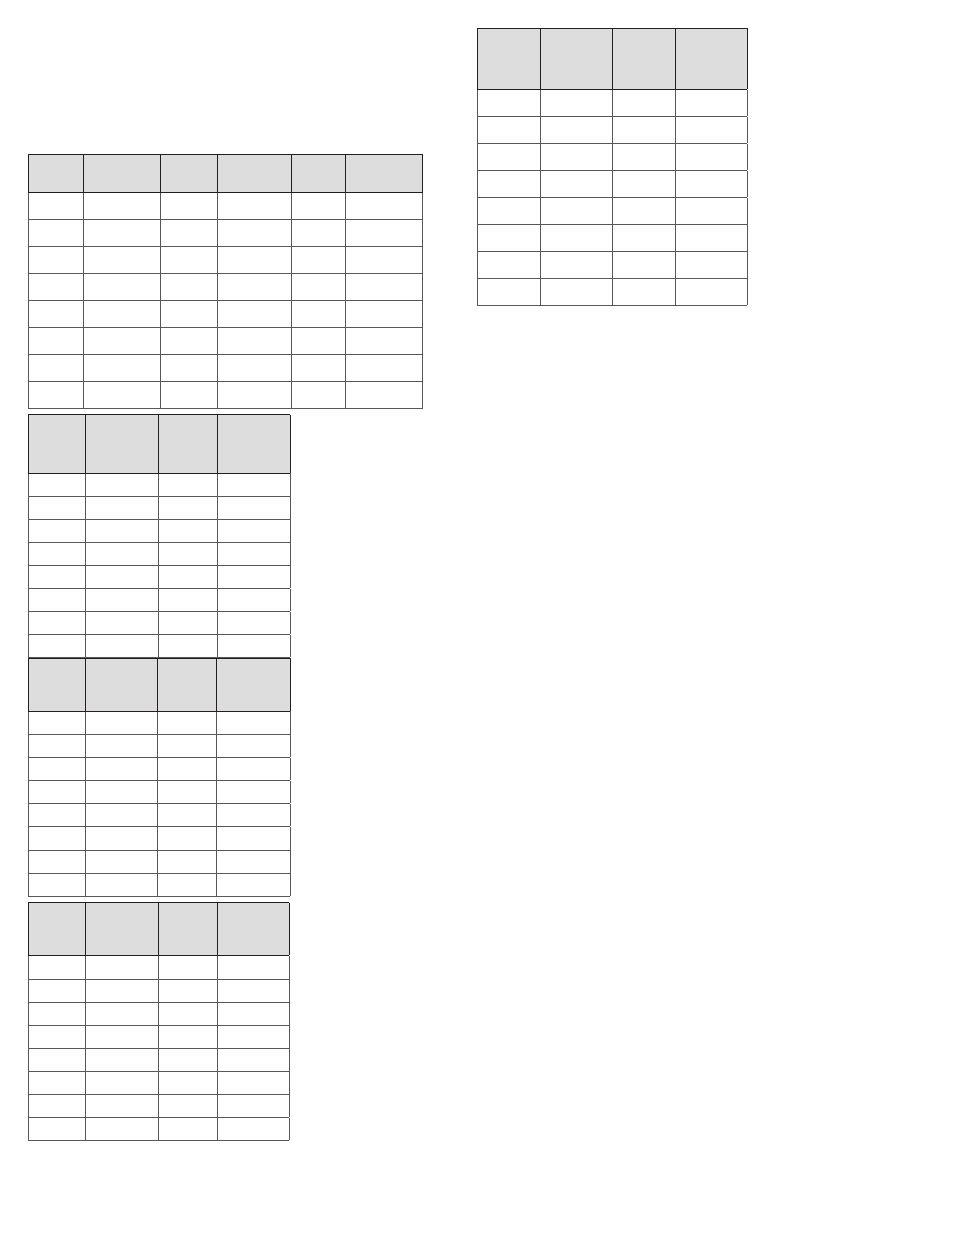
XMW/
XMWHS
Size
Maximum
RPM
XMWH/
XMWHS
Size
Maximum
RPM
20
1462
-
-
24
1272
24
1385
30
860
30
1175
36
672
36
948
42
498
42
829
48
416
48
726
54
350
54
522
60
320
60
530
Pulley and Belt Replacement
1. Clean the motor and fan shafts.
2. Loosen the motor plate mounting bolts to relieve
the belt tension. Remove the belt.
3. Loosen the pulley setscrews and remove the
pulleys from the shaft.
NOTICE! If excessive force
is required to remove the pulleys, a three-
jaw puller can be used. This tool, however,
can easily warp a pulley. If the puller is used,
inspect the trueness of the pulley after it is
removed from the shaft. The pulley will need
replacement if it is more than 0.020 inch out of
true.
4. Clean the bores of the pulleys and place a light
coat of oil on the bores.
5. Remove grease, rust and burrs from the shaft.
6. Place fan pulley on the fan shaft and the motor
pulley on the motor shaft. Damage to the pulleys
can occur when excessive force is used in placing
the pulleys on their respective shafts.
7. After the pulleys have been correctly placed back
onto their shafts, tighten the pulley setscrews.
8. Install the belts on the pulleys. Align and adjust the
belts to the proper tension as described in Belt and
Pulley Installation, page 2
Bearing Replacement
The fan bearings are pillow block ball bearings.
1. Mark the position of the shaft in reference to both
the bearing races and the propeller and pulley.
Make a note of the clearance between the propeller
and the frame.
2. Remove the pulley.
3. Remove the propeller from the shaft. A two-jaw
puller may be needed to remove the propeller from
the shaft.
4. Remove the bearing hold-down bolts. Remove the
shaft and the bearings as one unit.
5. Remove the anti-corrosion coating from the shaft
with a suitable degreaser.
6. Remove the bearing from the shaft using a bearing
puller. If a bearing puller is not available, remove
the bearing by using a wood block and hammer.
An emery cloth or file may be needed to remove
imperfections in the shaft left by the setscrews.
7. Clean the shaft and bearing bore thoroughly.
8. Place the bearings into position ensuring they are
not on a worn section of the shaft. Tapping the
Speed Increase
Close the pulley in order that the belt rides higher in the
groove (larger pitch diameter). Ensure that the RPM limits
of the fan and the horsepower limits of the motor are
maintained.
Maximum RPM
EWB
Size
Maximum
RPM
AWB
Size
Maximum
RPM
APB
Size
Maximum
RPM
24
1675
24
1510
24
1005
30
1370
30
1145
30
800
36
1310
36
990
36
645
42
1175
42
905
42
660
48
1215
48
900
48
605
54
960
-
-
-
-
60
890
-
-
-
-
72
700
-
-
-
-
XLP/
XLPS
Size
Maximum
RPM
XLPH/
XLPHS
Size
Maximum
RPM
20
1280
-
-
24
1012
24
1100
30
666
30
1074
36
566
36
895
42
424
42
870
48
356
48
761
54
316
54
472
60
260
60
446
XMP/
XMPS
Size
Maximum
RPM
XMPH/
XMPHS
Size
Maximum
RPM
20
1280
-
-
24
1276
24
1385
30
830
30
1175
36
680
36
948
42
498
42
829
48
414
48
726
54
346
54
522
60
318
60
530
XLW/
XLWS
Size
Maximum
RPM
XLWH/
XLWHS
Size
Maximum
RPM
20
1276
-
-
24
1018
24
1126
30
674
30
1074
36
570
36
895
42
422
42
870
48
356
48
761
54
320
54
478
60
256
60
438