Motor services, Changing shaft speed, Replacing pulleys and belts – COOK Lo-Pro User Manual
Page 5: Replacing grease terminator, Bearing replacement, Maximum rpm
5
Direct Drive 1050/1075,1200,1300 &1500 rpm units use
a prelubricated sleeve bearing that has a oil saturated wick-
ing material surrounding it. The initial factory lubrication is
adequate for up to 10 years of operation under normal con-
ditions. However, it is advisable to add lubricant after 3
years. Use only LIGHT grade mineral oil or SAE 10W oil up
to 30 drops. If the unit has been stored for a year or more it
is advisable to lubricate as directed above. For VCR direct
drive units and other units in severe conditions, lubrication
intervals should be reduced to half.
Motors without sleeve bearings (as described above) will
have grease lubricated ball or roller bearings. Motor bear-
ings without provisions for relubrication will operate up to
10 years under normal conditions with no maintenance. In
severe applications, high temperatures or excessive con-
taminates, it is advisable to have the maintenance depart-
ment disassemble and lubricate the bearings after 3 years
of operation to prevent interruption of service.
For motors with provisions for relubrication, follow inter-
vals of the table below.
Motors are provided with a polyurea mineral oil NGLI #2
grease. All additions to the motor bearings are to be with a
compatible grease such as Exxon Mobil Polyrex EM and
Chevron SRI.
The above intervals should be reduced to half for vertical
shaft installations.
Motor Services
Should the motor prove defective within a one-year
period, contact your local Loren Cook representative or
your nearest authorized electric motor service representa-
tive.
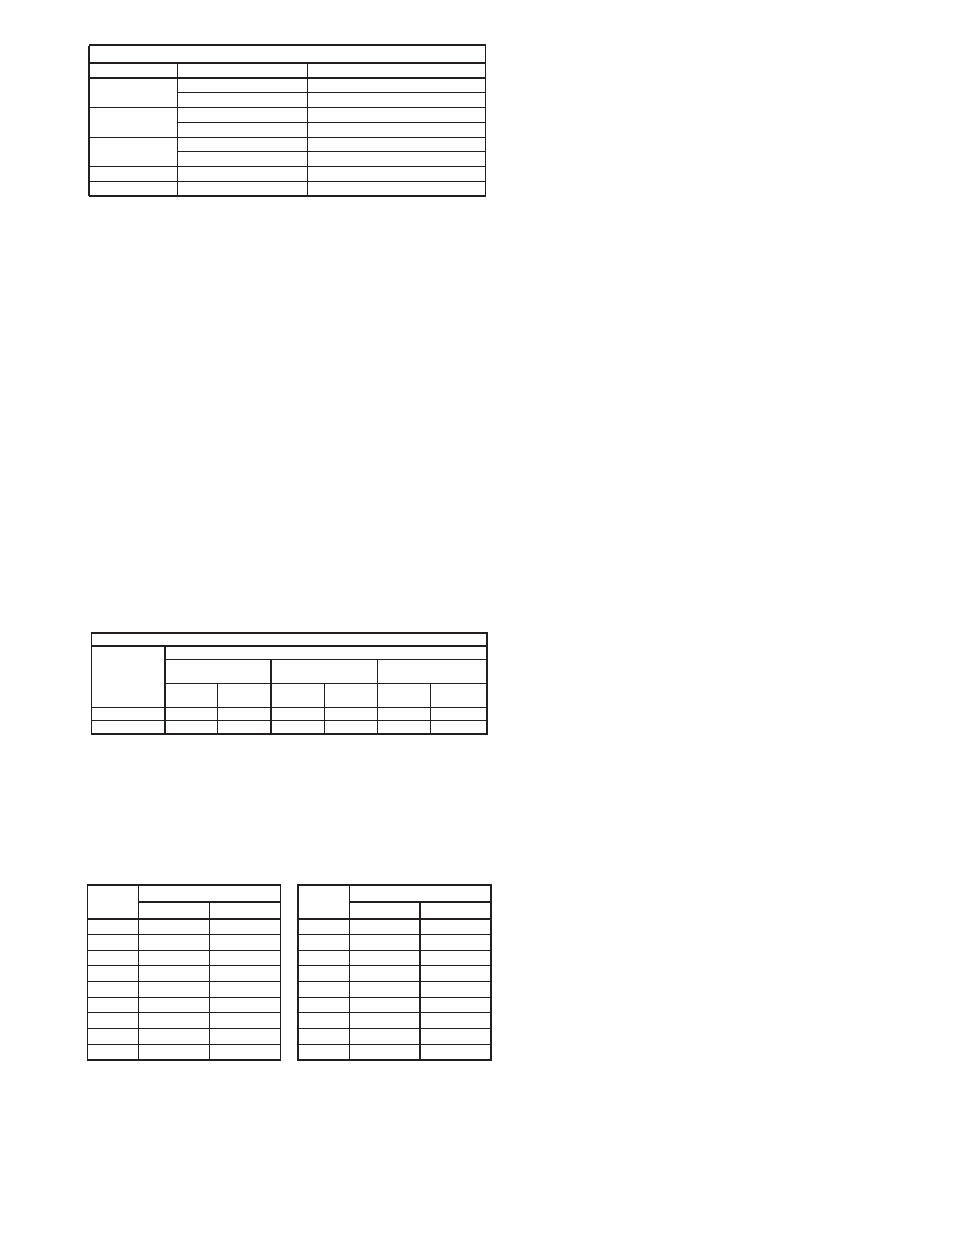
Relubrication Intervals
Service
Conditions
NEMA Frame Size
Up to and
including 184T
213T-365T
404T and larger
1800 RPM
and less
Over 1800
RPM
1800 RPM
and less
Over 1800
RPM
1800 RPM
and less
Over 1800
RPM
Standard
3 yrs.
6 months
2 yrs.
6 months
1 yr.
3 months
Severe
1 yr.
3 months
1 yr.
3 months 6 months 1 months
Maximum RPM
LPB
Size
Maximum RPM
LPB
Size
Maximum RPM
Standard Reinforced
Standard Reinforced
100
3320
-
245
1011
1335
120
2755
-
270
871
1154
135
2481
-
300
835
1121
150
2051
-
330
713
963
165
1832
1971
365
623
884
180
1608
1754
402
538
746
195
1428
1758
445
462
739
210
1270
1507
490
357
682
225
1143
1319
540
345
581
Changing Shaft Speed
All belt driven H-Series fans with motors up to and includ-
ing 5HP are equipped with variable pitch pulleys. To
change the fan speed, perform the following:
a. Loosen setscrew on driver (motor) pulley and remove
key, if equipped.
b. Turn the pulley rim to open or close the groove facing.
If the pulley has multiple grooves, all must be adjusted
to the same width.
c. After adjustment, inspect for proper belt tension.
Speed Reduction
Open the pulley in order that the belt rides deeper in the
groove (smaller pitch diameter).
Speed Increase
Close the pulley in order that the belt rides higher in the
groove (larger pitch diameter). Ensure that the RPM limits
of the fan and the horsepower limits of the motor are main-
tained.
Replacing Pulleys and Belts
a. Clean the motor and fan shafts.
b. Loosen the motor plate mounting bolts to relieve the
belt tension. Remove the belt.
c. Loosen the pulley setscrews and remove the pulleys
from the shaft.
If excessive force is required to remove the pulleys, a
three-jaw puller can be used. This tool, however, can easily
warp a pulley. If the puller is used, inspect the trueness of
the pulley after it is removed from the shaft. The pulley will
need replacement if it is more than 0.020 inch out of true.
d. Clean the bores of the pulleys and place a light coat of
oil on the bores.
e. Remove grease, rust and burrs from the shaft.
f. Place fan pulley on the fan shaft and the motor pulley
on the motor shaft. Damage to the pulleys can occur
when excessive force is used in placing the pulleys on
their respective shafts.
g. After the pulleys have been correctly placed back onto
their shafts, tighten the pulley setscrews.
h. Install the belts on the pulleys. Align and adjust the belts
to the proper tension as described in Belt and Pulley Instal-
lation, page 2.
Replacing Grease Terminator
Set up a regular schedule for changing the Grease Termi-
nator. Depending on the amount of grease going through
the fan, the Grease Terminator should be changed every
30 to 45 days. To replace the Grease Terminator, simply
unscrew the used canister and screw on a new one.
Notice! If the Grease Terminator becomes completely
saturated, grease will no longer be absorbed and will
run through to the roof.
Bearing Replacement
The fan bearings are pillow block ball bearings.
a. Loosen screws on bearing cover.
b. Push bearing cover toward the wheel. As the bearing
cover moves toward the wheel it will slide down to reveal
the bearings and shaft.
c. Remove the old bearing.
d. Remove any burrs from the shaft by sanding.
For moist or otherwise contaminated installations; divide the interval by a
factor of 3. For vertical shaft installations divide the interval by a factor of 2.
Conditions Chart
RPM
Temp °F
Greasing Interval
Up to 1000
-30 to 120
6 months
120 to 200
2 months
1000 to 3000
-30 to 120
3 months
120 to 200
1 month
Over 3000
-30 to 120
1 month
120 to 200
2 weeks
Any Speed
< -30
Consult Factory
Any Speed
> 200
1 week