Programming, User displays/settings, Initial start up – Hellenbrand H-125 Series User Manual
Page 7: General information, General operation
7
prOGraMMinG
initial start up
The initial start up will probably be done by the technician install-
ing the softener system. If not, the following instructions will step
you through the process.
1. Complete all plumbing connections: inlet, outlet, drain
line and brine line. Do not add salt at this time.
2. Place the bypass valve in the bypass position. (See
figure 3 page 5) Turn on the main water supply. Open
a cold soft water faucet to flush the piping of any air
and/or foreign material. Run until the water is clear.
3. Manually add 6 inches of water to the brine tank.
4. Now plug the transformer into a 110-volt receptacle. (Be
certain the outlet is uninterrupted.) Within 5 seconds the
control will automatically align itself into the softening
mode and display will automatically alternate between
time of day, gal/min and gallons remaining. (Figure 8,
page 7).
5. Set the time of day by pushing clock button (figure 9,
page 8) and using and buttons.
6. Push REGEN button and hold it down for 3 seconds.
The system will advance to the “First” position. (Note:
Depending on how the system is programmed it could
read backwash, rinse, brine or fill). Keep pushing
REGEN button until “Rinse” shows in the lower right
hand corner of display. Slowly place the by-pass into
the “diagnostic mode” (see fig 4, page 5). Run water
to the drain until it runs clear. Return the by-pass valve
to the by-pass position (fig 3, page 5). Push REGEN
button until “unit is back to softening mode.
7. Once again, push REGEN button and hold down for
3 seconds. Keep pushing REGEN button until “Back-
wash” appears. Slowly place the by-pass valve into the
“Diagnostic Mode” 1/2 way. Allow water to slowly fill
the mineral tank. When a solid stream of water starts
coming out of the drain line, open the by-pass inlet
valve all the way and allow to run out the drain until
water clears. Then slowly place the by-pass into the
“normal operation” mode by opening the outlet side of
by-pass valve, figure 2, page 5.
8. Press the REGEN button until LED display says “RE-
GENERANT DRAW-DN”. Loosen the brine line from
the control valve. Place finger over the end of brine
connection on valve to check for suction. If no suc-
tion, see trouble-shooting guide. (See #11, Page 20)
If proper suction, attach brine tube to control valve,
and allow it to draw water down to the bottom of the
air check, (figure 6b, page 6).
9. Press REGEN button again until LED once again dis-
plays “BACKWASH”. Keep in backwash until water
once again runs clear at the drain.
10. Press REGEN button again until “RINSE” is displayed.
Allow rinse cycle to run its full course. While the rinse
cycle is finishing, this would be a good time to load
your brine tank with salt. If utilizing brine recovery,
add full volume of water to brine tank for the 1st
REGENERATION.
11. Once the rinse cycle has finished, the softener control
will return to the softening cycle. The LED screen will
scroll between “TIME/GPM/GALLONS REMAINING”.
12. Next set your softeners water hardness, days override
and regeneration time settings (see figure 10a, page 8).
Your programming is now complete.
General information
The H125 control valve is the “brain” of your water softener.
It consists of the valve body and powerhead with solid state
microprocessor.
The display panel (see Figure 7) consists of the LCD display
and five push buttons which are used in displaying and program-
ming the water softener settings.
Figure 7
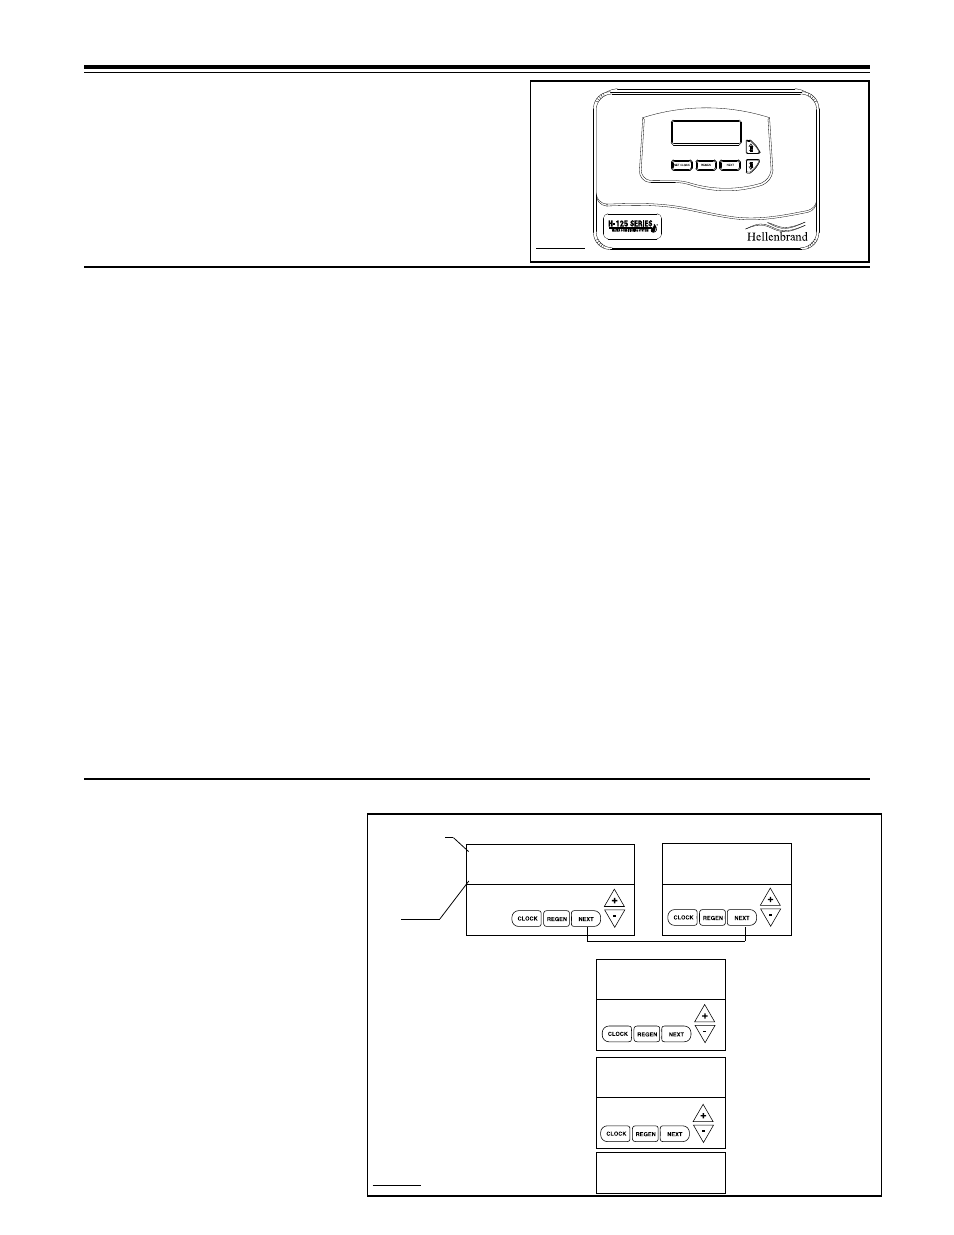
user DisplaYs/seTTinGs
General Operation
When the system is operating, one of three
displays may be shown. Pressing NEXT will
alternate between the displays. One of the
displays is the current time of day. The sec-
ond display is one of the following: days to a
regen or gallons remaining. Days To A Regen
is the number of days left before the system
goes through a regeneration cycle. Capacity
remaining is the number of gallons that will
be treated before the system goes through a
regeneration cycle. The third display is current
flow in gal/min. The user can scroll between
the displays as desired by pushing NEXT or
display will scroll automatically.
When water is being treated (i.e. water is
flowing through the system) the word "GPM"
flashes on left side of display when other than
flow rate is displayed.
Figure 8
DAYS TO A REGEN
6
CAPACITY REMAINING
650
REGEN TODAY
GAL
NORMAL OPERATION SCREENS
PM
6:35
TIME OF DAY
GPM
6.8
FLOW RATE
USER DISPLAY 1
Typical user
display. Shows
capacity or days
remaining before a
regeneration.
USER DISPLAY 2
Displays current time.
USER DISPLAY 3
Displays present flow
rate.
REGEN TODAY
flashes in upper left
corner of display
between rotating dis-
play when REGEN
button pushed once.
GPM
Flashes when the
turbine is rotating.
User screens will continuously scroll, switching
views every 3 seconds. If the screens are manu-
ally scrolled, this screen will remain constant for
5 minutes then continue to scroll. The conditional
screens will take precedence over the scrolling
and the conditional conditions will apply.
OR
DEALER NAME
DEALER PHONE NUMBER
GPM
May display if service is required.
12:00
pm